background image

13

MAINTENANCE

WARNING: 

 ALWAYS DISCONNECT THE PLUG FROM THE POWER OUTLET 

BEFORE REMOVING THE POWER HEAD FROM COLLECTION TANK.

IMPORTANT! 

Clean or change the filter regularly for best performance. 

ALWAYS USE THE 

CARTRIDGE FILTER FOR DRY VACUUMING.

 If the machine is used without the cartridge filter, 

the motor will burn out and the warranty will be voided. Always keep spare filters on hand.

NOTICE!

 The filters included are made of high quality materials designed to stop small dust 

particles. The cartridge filter should be used for dry pick-up only. A dry cartridge filter is necessary 

to pick up dust. If the cartridge filter is wet, it will clog quickly and be very difficult to clean. Handle 

the filter carefully when removing it for cleaning and replacing it. Check the filters for tears or small 

holes. A small hole can let dust pass through and out of the filter. Do not use a filter with holes or 

tears; replace it immediately.

STORAGE

Before storing your vacuum, the collection tank should be emptied and cleaned. The accessories 

should be cleaned and stored so they can be readily available when needed. Store the wet/dry 

vacuum indoors.

REPAIRS

Repairs for this wet/dry vacuum should be performed only by qualified service personnel using 

only identical replacement parts.

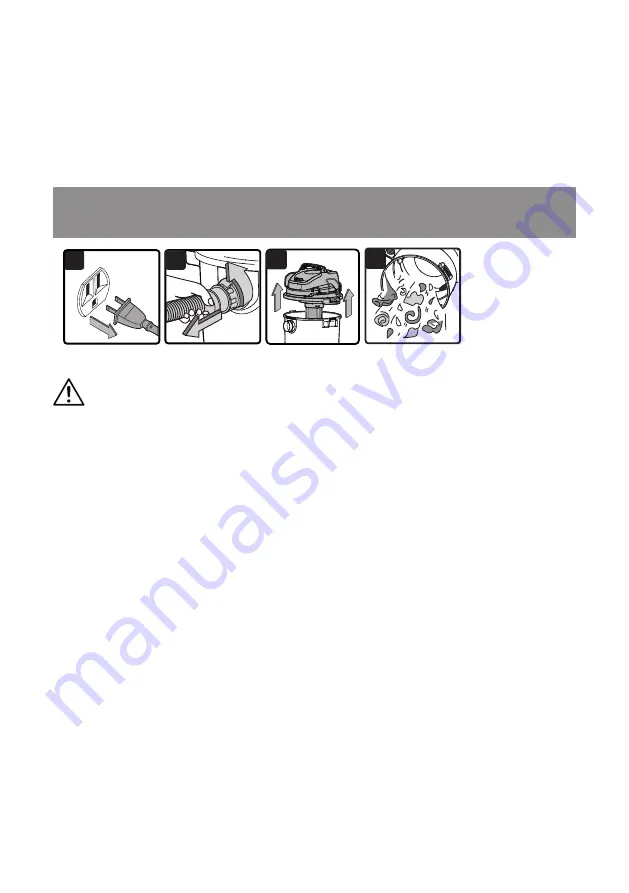
1. Verify that the power cord is disconnected from the outlet (Fig. 1).

2. Disconnect the hose from the vacuum (Fig. 2).

3. Undo the latches and remove the power head from the collection tank (Fig. 3). Place power 

head on a soft, clean surface upside down.

4. Clear all dirt or debris from the collection tank and hose into a proper waste container (Fig. 4).

5. Clean or replace the filters.

6. Check the hose, attachments, and power cord to ensure that they have not been damaged.

7. Place the power head back onto the collection tank and secure latches.

6. Verify that the power switch is in the ‘O’ OFF position before plugging the power cord into the 

outlet. Plug the power cord into the outlet (Fig. 4 & 5).

7. Before turning on the vacuum, firmly hold onto the loose end of the hose. Turn the motor on by 

flipping the switch to the ‘I’ ON position (Fig. 6).

8. Once you have completed blowing, flip the power switch to the ‘O’ OFF position and unplug the 

power cord from the outlet (Fig. 7).

3

4

1

2

6

EMPTYING THE COLLECTION TANK

Summary of Contents for VJF910PF 0201

Page 1: ...ark Court Greenville SC 29607 Replacement Filters Accessories available at Vacmaster com FOR YOUR SAFETY Read and understand this manual before use Keep this manual for future reference Operator s Man...

Page 2: ...ng a high quality durable product This Vacmaster product carries a limited three 3 year warranty against defects in workmanship and materials from date of purchase under normal household use If produc...

Page 3: ...pick up anything that is burning or smoking such as cigarettes matches or hot ashes Do not expose to rain Store indoors If vacuum is not working as it should has been dropped damaged left outdoors or...

Page 4: ...LEDGE OF THE SYSTEM AND SHOULD BE DONE ONLY BY QUALIFIED SERVICE PERSONNEL REPLACEMENT PARTS FOR A DOUBLE INSULATED WET DRY VACUUM MUST BE IDENTICAL TO THE PARTS THEY REPLACE YOUR DOUBLE INSULATED WET...

Page 5: ...er cord and extension cord are in good working condition Make repairs or replacements before using the vacuum cleaner Only use extension cords that are rated for outdoor use Length of Extension Cord 1...

Page 6: ...which if not avoided will result in death or serious injury WARNING Indicates a potentially hazardous situation which if not avoided could result in death or serious injury CAUTION Indicates a potent...

Page 7: ...G H I J K L Vacuum Assembly Hose Extension Wand Utility Nozzle Floor Brush Squeegee Nozzle Hose Storage Rack Foam Wet Filter Cartridge Filter Filter Retainer Caster Foot Assembly 4 Screws Bag Operato...

Page 8: ...n screws Fig 5 6 Position the hose storage rack as illustrated Squeeze the open sides of the hose storage rack inward Insert the hose storage rack into the channel on the front side of the power head...

Page 9: ...e blade wider than the other This plug will fit in a polarized outlet only one way If the plug does not fit fully in the outlet reverse the plug If it still does not fit contact a qualified electricia...

Page 10: ...idge filter pre installed For installation instructions see page 14 Fig 2 3 3 Place the filter retainer on the top of the cartridge filter and tighten down by turning the retainer handle clockwise Fig...

Page 11: ...k is clean and free of dust and dirt Fig 1 2 Remove the cartridge filter then carefully install the foam wet filter over the filter cage and place the power head back on the collection tank For foam w...

Page 12: ...or drain To continue vacuuming refit the collection tank with the drain cap After wet vacuuming turn the machine off and remove plug from power supply Empty the collection tank clean and dry the insid...

Page 13: ...hould be cleaned and stored so they can be readily available when needed Store the wet dry vacuum indoors REPAIRS Repairs for this wet dry vacuum should be performed only by qualified service personne...

Page 14: ...the retainer clockwise do not over tighten Fig 4 5 5 Place the power head back onto the collection tank 1 Unlock and remove the filter retainer by turning the retainer handle counter clockwise 2 With...

Page 15: ...ridge filter on page 14 3 Carefully slide the foam wet filter down over the filter cage making sure the cage is completely covered Fig 2 3 4 Place the power head onto the collection tank 1 With the re...

Page 16: ...r is missing or damaged Attach or replace the cartridge filter Vacuum has been used to collect fine dust such as dry wall dust fireplace soot or ash without a fine dust filter Remove the standard cart...

Page 17: ...17 EXPLODED VIEW...

Page 18: ...Filter Cage 1 6 Collection Tank 1 7 551011106 Vacuum Port 1 8 551002110 Drain Cap With Gasket 1 9 551015104 Caster Foot Assembly 4 10 551541101 Hose 1 11 551001121 Extension Wand 2 12 551001117 Floor...

Reviews: