page 98 of 152
Fault
Possible cause
Remedy
❑
Controller does
not respond when
operating any keys.
No change after
switching off/on.
✔
Contact local distributor.
❑
Pump does not
start or stops im-
mediately. Warning
triangle and pump
symbol are flash
-
ing.
➨
Pump has been ex-
posed to condensate?
✔
Allow pump to run for
some minutes at maxi-
mum speed with atmo-
spheric pressure at the
inlet.
➨
Overpressure in outlet
line?
✔
Remove blockage in line,
open valve.
➨
Motor overloaded?
✔
Allow motor to cool down,
identify and eliminate
cause of failure. Manual
reset is necessary. Switch
off pump or unplug.
❑
Pump does not
achieve its ultimate
vacuum or usual
pumping speed.
➨
Centring ring at small
flange connection not
correctly positioned, or
leak in the pipeline or
vacuum system?
✔
Check pump directly
- connect CVC 3000 di-
rectly at pump inlet - then
check connection, pipe-
line and vacuum system if
necessary.
➨
Wrong setting at con-
troller?
✔
Select function ”Pump
down” with speed set to
”HI” and check again.
➨
Long, narrow vacuum
line?
✔
Use lines with larger di-
ameter, length as short as
possible.
➨
Pump has been ex-
posed to condensate?
✔
Allow pump to run for
some minutes with atmo-
spheric pressure at the
inlet to purge.
➨
Deposits have been
formed inside the
pump?
✔
Clean and inspect the
pump heads.
➨
Diaphragms or valves
damaged?
✔
Replace diaphragms and/
or valves.
➨
Outgassing substances
or vapor generated in
the process?
✔
Check process parame-
ters.
Summary of Contents for MV 10C NT VARIO o.C.
Page 34: ...page 34 of 152 1 8 2 9 18 PC 3012 NT VARIO EK Peltronic 12 11 16 8 17 3 4...
Page 104: ...page 104 of 152 2 3 size 1 2x 4...
Page 105: ...page 105 of 152 6 5 7 4 4x...
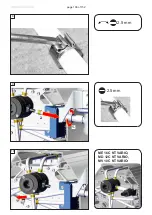
Page 106: ...page 106 of 152 9 8 1 2 2 5 mm 2 5 mm 10 ME 16C NT VARIO MD 12C NT VARIO MV 10C NT VARIO...
Page 108: ...page 108 of 152 12 Emission condenser Peltronic 4 4x 11A 13 4 2x...
Page 109: ...page 109 of 152 15 14 4 4x Don t loosen this screw 15A 16...
Page 110: ...page 110 of 152 16 17 5 2x 15A 1 2 3 1 4 1 4 3 2x 5...
Page 111: ...page 111 of 152 19 20 18 5 2x...
Page 113: ...page 113 of 152 21 2 5 mm Replacing the diaphragms 22 23 696867 696839 Clean 5 8x...
Page 114: ...page 114 of 152 24 25 26 1 2...
Page 115: ...page 115 of 152 27 3 28 29 Pay attention to number of washers...
Page 118: ...page 118 of 152 36 37 38 Clean...
Page 119: ...page 119 of 152 39 40 41 IN IN EX EX 696867 696839 4x...
Page 120: ...page 120 of 152 42 43 44 IN EX T20 4x 2 2 ft lbf 3 Nm...
Page 121: ...page 121 of 152 45 46 47 Maintain all pump heads in the same way...
Page 125: ...page 125 of 152 2 size 2 2x 3 4A Version A valve 24 4 mm...
Page 126: ...page 126 of 152 5A 696839 24 4 mm 26 mm 4B 5B 696839 37 mm 40 mm Version B valve 37 mm...
Page 127: ...page 127 of 152 6 7 size 2 2x 7A ME 16C NT VARIO MD 12C NT VARIO MV 10C NT VARIO size 2 2x...
Page 129: ...page 129 of 152 49 Assembling the pump housing 50 51 5 2x 8 9 ft lbf 12 Nm...
Page 130: ...page 130 of 152 52 53 54 5 2x 8 9 ft lbf 12 Nm...
Page 131: ...page 131 of 152 55 55A 1 2 3 3 2x 55A 56...
Page 132: ...page 132 of 152 56 4 4x 3 7 ft lbf 5 Nm 58 4 4x 3 7 ft lbf 5 Nm 57 4 2x 3 7 ft lbf 5 Nm...
Page 133: ...page 133 of 152 59 60 61...
Page 135: ...page 135 of 152 62 63 4 4x 3 7 ft lbf 5 Nm 64...
Page 136: ...page 136 of 152 65 66 67 size 1 2x...
Page 137: ...page 137 of 152 68 69...
Page 140: ...page 140 of 152 4 638821 638821 5 6...
Page 141: ...page 141 of 152 7 T20 4x size 1 4x 8...
Page 149: ...page 149 of 152...
Page 150: ...page 150 of 152...
Page 151: ...page 151 of 152...


