background image

Installing the Camera

Caution

Before you start, be sure you can identify all cables correctly. Connecting a cable to the wrong port can
result in equipment damage.

Caution

Check your cables. Connecting a cable to the wrong port or using the wrong pin-out can result in equipment
damage and will void the warranty.

1. Verify that you have set the switches on the back of the camera to the desired settings.

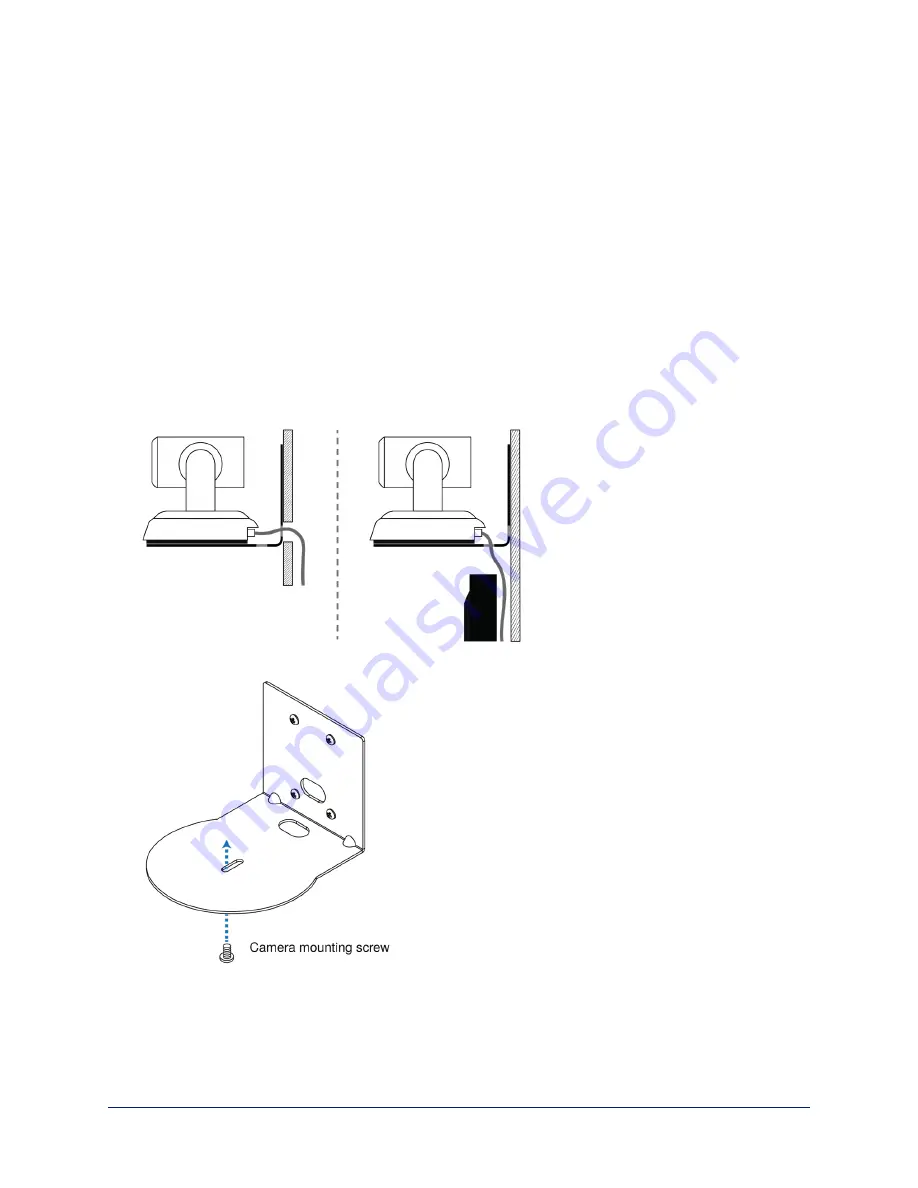
2. Route the cables through the opening in the mounting shelf and connect them to the camera.

Caution:

Use the power supply shipped with the camera. Using a different power supply will damage the camera
and void the warranty, and may create an unsafe operating condition.

3. Place the camera on the mount. 

4. Attach the camera to the mount using the mounting screw supplied with the camera.

Image for illustration only; not to scale. Camera and mount details may differ.

Note

This is a fixed camera. After it is powered up and sending video, it will need to be positioned by hand.

10

Installation Guide for the ConferenceSHOT FX USB 3.0 Fixed Camera

Summary of Contents for ConferenceSHOT FX

Page 1: ...Installation Guide for the ConferenceSHOT FX USB 3 0 Fixed Camera Document 411 0015 31 Rev B October 2020...
Page 2: ...11 Status Indicator Light 11 Initial Device Set Up and System Administration Tasks 12 Browser Support 12 Initial Device Set up Process Overview 12 Initial Device Set Up Using the Vaddio Device Contro...

Page 3: ...Manual includes all the information in this guide plus information on system administration operation and troubleshooting Features n Fixed USB 3 0 camera for small to medium conference rooms n 2 Mega...

Page 4: ...s body when lifting or moving it Lifting the camera by its head or mounting arm will damage it The box should contain one of each item listed here n Camera black or white n Thin Profile Wall Mount wi...

Page 5: ...of the camera base and point the remote at the camera Status light The multi colored LED indicates the camera s current state This light can be turned off in the administrative web interface Note By d...

Page 6: ...3 0 stream n Ethernet RJ 45 connector Connect to the network for IP streaming and camera control via web interface or Telnet n Camera Settings DIP switches to set camera behaviors such as IR frequency...

Page 7: ...or exposed to liquids If any of these things happen return it to Vaddio for safety and functional testing Before You Install the Camera Things to keep in mind when deciding where to install the camera...

Page 8: ...or directly to the drywall n If you mount it to drywall use the wall anchors provided with the wall mount n If you mount it to a wall box use the cover plate screws supplied with the wall box About C...

Page 9: ...to control n SW1 and SW2 up IR frequency 1 n SW1 down SW2 up IR frequency 2 n SW1 up SW2 down IR frequency 3 Image Flip switch 3 If mounting the camera upside down set Image Flip ON This orients the v...

Page 10: ...pass through connectors can also damage the connectors on the product which will void your warranty Intact will make reliable contact with cable connector Damaged Bent contact fingers will NOT make re...

Page 11: ...how the camera might be set up in a conference room In this setup a computer uses a unified communications conferencing application with the camera and a conference phone 9 Installation Guide for the...

Page 12: ...s through the opening in the mounting shelf and connect them to the camera Caution Use the power supply shipped with the camera Using a different power supply will damage the camera and void the warra...

Page 13: ...dby mode or booting n Yellow Firmware update is in progress n Blinking blue USB cable is disconnected UC color scheme Caution Do not remove power or reset the camera while the indicator is yellow show...

Page 14: ...the ones on this list are likely to work also Initial Device Set up Process Overview The sequence of tasks for initial device set up and system administration differs somewhat depending on which meth...

Page 15: ...th the Vaddio Device Controller 1 Be sure the touch panel is installed on the same subnet as the products you need to work with for example connect both to the same PoE switch 2 Go to the touch panel...

Page 16: ...update device firmware from the dashboard n Import or export device configurations reboot or restore a device to factory defaults from its detail page n Access devices web interfaces directly n Change...

Page 17: ...network to scan 4 In the list of equipment that the scan discovers locate the devices marked Not Set Up 5 For each device that you need to work with click the Not Set Up button and set the admin passw...

Page 18: ...the camera s USB stream to get the IP address To get the camera s IP address 1 Connect the camera to the network and connect the camera s USB cable to your computer Then power up the camera If necessa...

Page 19: ...one the initial device set up you will need to configure the camera for the network Initial Access to the Web Interface Enter the camera s IP address in your browser s address bar You may need to ente...

Page 20: ...and traffic is encrypted however You will need to make the selections that your browser s security message discourages Depending on the browser the warning presents an option to learn more view detai...

Page 21: ...for you If the password is lost you will need to restore factory defaults Note This page may include a link to the company s standard privacy policy This product does not record or save audio or video...

Page 22: ...ls Keep this device away from food and liquids Do not operate or store the device under any of the following conditions n Temperatures above 40 C 104 F or below 0 C 32 F n High humidity condensing or...

Page 23: ...ration of this equipment in a residential area is likely to cause harmful interference in which case the user will be required to correct the interference at his her own expense Operation is subject t...

Page 24: ...io interference in which case the user may be required to take adequate measures Standard s To Which Conformity Is Declared EMC Directive 2014 30 EU EN 55032 2015 Conducted and Radiated Emissions EN 5...

Page 25: ...6166230844 Public Domain https commons wikimedia org w index php curid 38931301 European Space Agency astronaut Luca Parmitano Expedition 36 flight engineer outside the International Space Station By...

Page 26: ...set up 12 13 15 17 19 using the Vaddio Device Controller 13 19 using the web interface 16 17 19 using Vaddio Deployment Tool 15 installation 6 9 10 basic connections 9 camera 10 camera mount 6 inverte...

Page 27: ...rage 20 third party control 7 U USB cable 2 V Vaddio Deployment Tool 12 14 15 check for the latest version 14 initial device set up 15 Vaddio Device Controller 12 13 visual parts identification 3 W wa...

Page 28: ...ecifications drawings manuals technical support information and more 2020 Legrand AV Inc Vaddio is a registered trademark of Legrand AV Inc All other brand names or marks are used for identification p...

Reviews: