TrackVIEW Install Guide 341-337 Rev. E
Page 22 of 32
TrackVIEW and Peripherals Install Guide
PROGRAMMING CAMERA PRESETS FROM THE FRONT PANEL AND IR REMOTE
To program camera presets using the StepVIEW Mats and AutoVIEW IR Sensor, connect the mats and IR
sensor to the TrackVIEW back panel as shown in Figure 28. A total of five preset triggers are available.
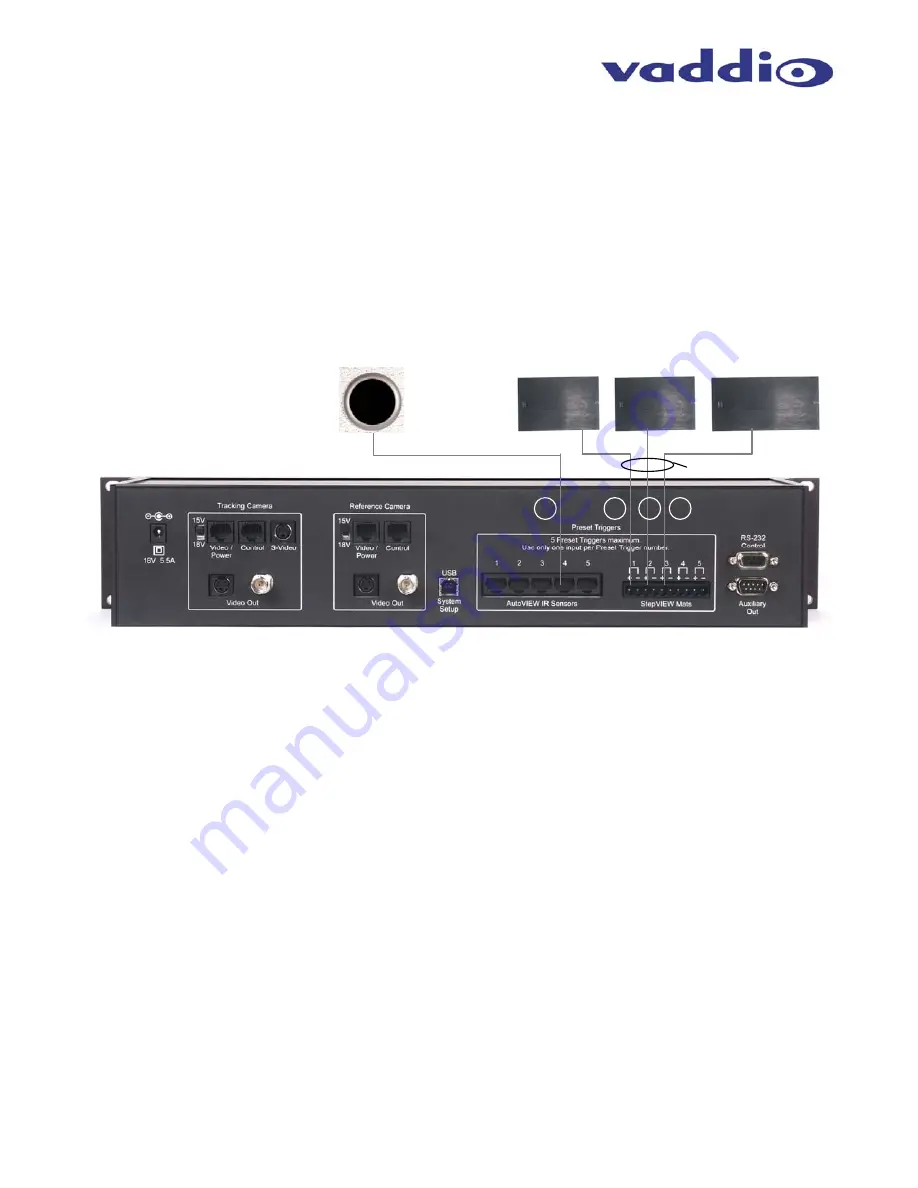
From our installation example (Figure 20 on page 15), if three (3) mats and one (1) sensor are to be used,
connect only one trigger input per preset trigger number. In Figure 29, the mats use trigger inputs 1, 2 & 3 and
the IR sensor occupies trigger inputs 4. Connecting the IR sensor to 1, 2 or 3 while the mats are in 1, 2 & 3 will
not work properly. Use different preset trigger numbers for each of the mats or sensors.
The mats are positioned at a lectern position (position 1), a front mic position (position 2) and a screen position
(position3). The IR Sensor is positioned above the area near the whiteboard (position 4). These four (4)
triggers will be tied to hard camera presets that are independent of the automatic camera-tracking set-up.
Using the TrackVIEW Remote (see Figure 4, page 6) and front panel controls (see figure 2, page 4):
•
Turn
on
Power
. LED will be a solid red when off and power available. Touch the Power button and the red
LED will blink red until the system has booted up. When booted up, the LED will glow solid blue.
•
To
program
First Step
or
Last Step
(the set up is the same for both First or Last), select which mode and
disable the tracking by pushing the
Tracking Disable
button (turn Tracking back on by pressing the button
again after the preset operation is complete).
•
With the TrackVIEW
IR Remote Control
(see Figure 4 on page 6), position the Tracking Camera with the
Pan/tilt/zoom
controls.
(Note: The Camera IR remote and the set-up software can also be used to adjust the tracking camera.)
•
Enter
Program Mode
by pressing the
Program
button.
o
Select which preset or which trigger input (1 through 4 in this case) is to be programmed and
touch the button on the IR remote. The Preset button will flash blue until programmed.
-OR-
o
Step on the mat or into the IR sensor’s detection zone. The associated Preset button will flash
blue until programmed.
•
Exit Program
mode by pressing the Program button and test all the mats and IR Sensor.
•
Repeat to set the other three (3) presets.
•
When the camera presets are triggered, the associated preset LED will blink then glow a solid blue when
the camera PTZ setting is reached.
•
To disable all the triggers, press
Preset Disable
and the LED will turn Blue. To disable a single trigger,
press which preset number is to be disabled on the IR Remote and the preset button will turn solid red.
Press the same button to turn off the Preset Disable (toggle on/off).
Cat. 5
Figure 29:
Installation Example where the mats
are connected to preset triggers 1, 2
& 3 and the IR Sensor is connected
to preset trigger 4.
Three (3) Exposed Mats
1-Lectern 2- Front Mic 3- Screen
Attached 75’ cables
1
2
3
4
AutoVIEW IR
Sensor (4)


