background image

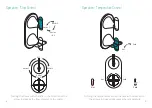
Outlet 1

Turning the flow control handle in the direction of the 

arrow increases the flow of water to the outlet.

Operation - Flow Control

Off

Outlet 2

Outlet 1

Outlet 2

4

Outlet  

1 & 2

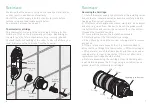
Outlet  

1 & 2

Hot

Cold

Cold

Hot

Hot

Turning the temperature control handle in the direction of 

the arrows increases/decreases the temperature

Operation - Temperature Control

Cold

5

Summary of Contents for ARRONDITM

Page 1: ...aftersales team Registration must be completed within 6 months from date of purchase Under the extended guarantee period VADO will at its option offer to supply any replacement product or component part assessed to be defective SEE NOTE 3 The guarantee whether standard or extended is non transferable to any subsequent owner All claims under the guarantee should be notified in the first instance to...

Page 2: ...r product designs are harmonious with all sanitaryware so when you choose VADO your choice of coordinating items is unlimited With VADO you can really let your inspiration flow For any technical or operational queries please contact our experienced aftersales team on 01934 745163 Cleaning Instructions The electroplating on this product is finished to the highest standard Due care needs to be taken...

Page 3: ...ses the flow of water to the outlet Operation Flow Control Off Outlet 2 Outlet 1 Outlet 2 4 Outlet 1 2 Outlet 1 2 Hot Cold Cold Hot Hot Turning the temperature control handle in the direction of the arrows increases decreases the temperature Operation Temperature Control Cold 5 ...

Page 4: ...inutes in 50 white vinegar 50 hot water brush the filters gently and then rinse under running water to clean all particles If this is not effective a replacement cartridge should be fitted 6 Before reassembling the cartridge clean its housing with a wet cloth and grease the O rings using a suitable silicone grease insert the thermostatic cartridge Locating grub screw O ring O ring O ring Filter Fi...

Page 5: ...ower on to check isolation please ensure that your body hands are not under the flow of water as there is a potential for delivery of hot water 4 Remove the stop adaptor and temperature stop ring 5 With shower in the on position replace stop adaptor and temperature handle on thermostatic valve ensure temperature stop ring has been removed 6 Turn temp handle fully anti clockwise until stop point is...

Page 6: ... 2 7 NRV Housing TAB 003A FIL HOUSING 2 8 Stop Ring TAB STOPRING ARR 1 9 Diverter housing TAB DIVHOUSING ARR 1 10 Thermo housing TAB TEMPHOUSING ARR 1 11 Manuals INSTALLATION GUIDE USER MANUAL 1 10 Parts 11 2 way thermostatic shower valve Installation Guide TAB 148 2 ARR C P ARRON DI TM 2 way thermostatic shower valve User Guide Keep for future reference ARRON DI TM 11 1 2 3 4 8 5 9 6 7 6 7 10 ...

Reviews: