VAG Installation and Operating Instructions • 6
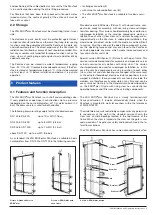
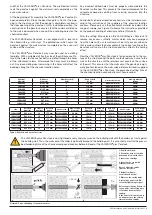
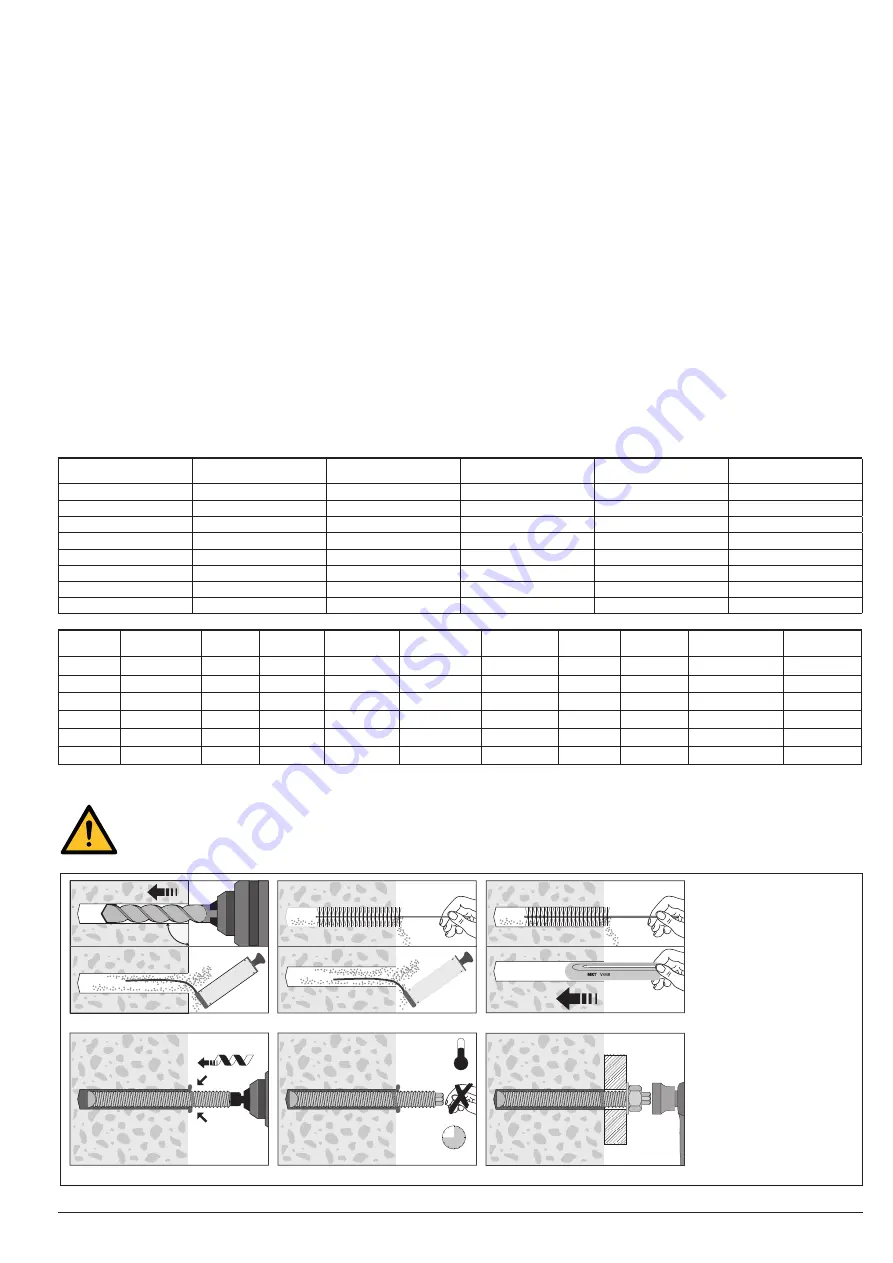
Table 3: Drill hole and anchor bolt size
1. Drill the drill hole
2. Clean the bore hole with a
brush and blow out the dust
3. Insert the cartridge
4. Insert anchor rod with
rotary movement
Excess adhesive swells
from the bore hole
5. Attention! Remo-
ve swollen adhesive!
5. Observe the curing time!
6. Install the penstock. Ob-
serve the tightening torque!
Before exposing the Penstock
to any loads, the setting time
of the adhesive must have
expired.
If the Penstock is anchored to
a humid surface, the setting
times must be doubled!
Picture 6: Proper handling of chemical anchors
Montage
N
m
T
inst
+20 ∞C
20 min.
90∞
1.
2.
3.
4.
5.
6.
Nominal
diameter
Drill hole
diameter
Number of drill
holes
Deep of drill
holes
Anchor bold size
max. tightening
torque
400x400
Ø 14,5 mm
4
110 mm
M12x160/97 mm
40 Nm
500x500
Ø 14,5 mm
8
110 mm
M12x160/97 mm
40 Nm
600x600
Ø 14,5 mm
8
110 mm
M12x160/97 mm
40 Nm
700x700
Ø 17 mm
10
125 mm
M16x190/95mm
60 Nm
800x800
Ø 17 mm
10
125 mm
M16x190/95mm
60 Nm
900x900
Ø 17 mm
12
125 mm
M16x190/95mm
60 Nm
1000x1000
Ø 17 mm
12
125 mm
M16x190/95mm
60 Nm
1200x1200
Ø 17 mm
14
125 mm
M16x190/95mm
60 Nm
size
borehole
diameter
borehole
number
borehole
depth
anchor size
max. torque
moment
borehole
diameter
borehole
number
borehole
depth
anchor size
max. torque
moment
1300x1300
Ø 18 mm
10
175 mm
M16x220/160
60 Nm
18 mm
5
125 mm
M16x190/95mm
60 Nm
1400x1400
Ø 18 mm
10
175 mm
M16x220/160
60 Nm
18 mm
5
125 mm
M16x190/95mm
60 Nm
1500x1500
Ø 18 mm
10
175 mm
M16x220/160
60 Nm
18 mm
7
125 mm
M16x190/95mm
60 Nm
1600x1600
Ø 18 mm
12
175 mm
M16x220/160
60 Nm
18 mm
7
125 mm
M16x190/95mm
60 Nm
1700x1700
Ø 18 mm
12
175 mm
M16x220/160
60 Nm
18 mm
7
125 mm
M16x190/95mm
60 Nm
1800x1800
Ø 18 mm
14
175 mm
M16x220/160
60 Nm
18 mm
9
125 mm
M16x190/95mm
60 Nm
The VAG EROX
®
plus
Penstock is now tightened evenly and crosswise on the building wall until the holders just rest against
the building wall. Thus, the wall seal of the slider is optimally biased to the building wall. It is essential to wait for the prescri-
bed hardening time of the chemical compound anchors before full load of the VAG EROX
®
plus
Penstock.
width of the VAG EROX
®
plus
Penstock. The profiled seal which
seals the penstock against the wall must rest completely on the
even wall surface.
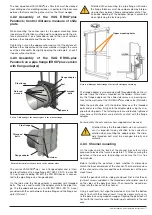
At the beginning of its assembly the VAG EROX
®
plus
Penstock is
opened completely. Place the penstock gate in front of the ope-
ning in the structure so that the opening is completely centred in
the clear opening of the penstock. In this installation position, the
construction of the penstock ensures that the minimum distance
to the wall is observed when you drill the anchoring holes for the
chemical anchors.
The VAG EROX
®
plus
Penstock is now aligned with a level and
then fixed with e.g. with stays. The profiled seal which seals the
penstock against the wall must rest completely on the even wall
surface of the structure.
The VAG EROX
®
plus
Penstock may now be used as a drilling
template. With a suitable drill (for the size of the drill hole see Pic-
ture 4) the holes for the anchor bolts are drilled through the holes
of the attachment claws. Afterwards the holes must be blown
out. Any loose drilling dust remaining in the holes will affect the
bonding strength of the chemical reaction holes.
Any incorrect drilled holes must be properly closed before the
Penstock is attached. This prevents the steel reinforcement of the
concrete exposed by drilling from carrying corrosion into the
structure.
Anchor bolts (chemical reaction anchors) must be installed accor-
ding to the instruction of the suppliers of the chemical reaction
anchors. Please only use the attachment material included in the
scope of supply (see Figure 7) observe the instructions provided
on the proper handling of chemical anchors (Picture 8).
After the setting time unfasten the VAG EROX
®
plus
Penstock to
remove any excess synthetic mortar which may have emerged
from the holes with a screw driver or chisel. Any excess adhesive
that remains outside the holes prevents the correct seating of the
penstock wall seal on the structure and thus affects the sealing
effect.
Now the VAG EROX
®
plus
Penstock is fastened evenly to the sur-
face of the structure and the bolts are fastened cross-wise to the
wall of the structure until the retainers rest evenly on the surface
of the wall. This ensures that the wall seal of the penstock is opti-
mally pre-tensioned on the wall surface. Before full load is applied
to the VAG EROX
®
plus
Penstock, the prescribed setting time of
the chemical reaction anchor bolts must have expired.


