

VAG Installation and Operating Instructions • 8
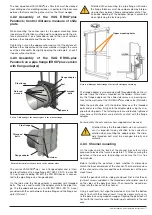
Furthermore, the penstock must be centred between the channel
walls. Now secure the penstock into position in the vertical box
outs using the adjustment screws and make sure that the frame
sill is perpendicular to both channel walls. If necessary, secure
the penstock using wooden wedges or other supports. Care must
be taken to avoid twisting or deforming the guide rails of the pen-
stock frame during this installation step.
Close the vertical box outs between the concrete walls and the
penstock frame using formwork boards. Now the vertical box
outs and the sill box out can be grouted with concrete. Observe
the manufacturer’s instructions regarding the processing of the
concrete. Make sure that no concrete enters the areas of the slide
gate guide rails in the penstock frame or comes into contact with
the operating elements (stem, stem nut, etc.).
It is absolutely necessary to observe the curing times of the grout
specified by the manufacturer. No pressure must be applied on
the penstock until the grout has completely hardened.
When the grout has hardened, the VAG penstock is ready for
operation. Before putting the penstock into service, inspect it es-
pecially in the area of the seals for any dirt or concrete residues
and clean the parts, if necessary.
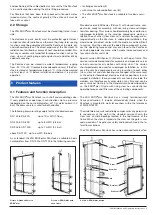
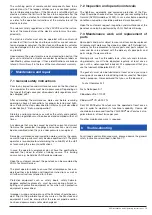
4.3 Installation position
The VAG EROX
®
plus
Penstock is assembled vertically, i.e. with
the stem in a vertical position, at the opening in the construction.
Should installation be required in other installation positions, ple-
ase consult the manufacturer.
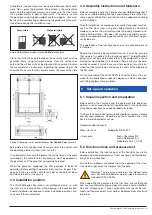
Permissible
Not permissible
Picture 10: Installation position of the VAG EROX
®
plus
Penstock
4.4 Assembly instructions and fasteners
Before assembly, check the Penstock for possible damage that it
may have suffered during transport and storage. Protect the Pen-
stock against dirt on the construction site by adequate covering
until installation.
Prior to installation, all components essential for proper function,
such as the stem, stem nut, gate, sliding elements and sliding
wedges as well as the wall seal must be thoroughly cleaned to re-
move all dirt particles. VAG does not assume any liability or war-
ranty for consequential damage caused by dirt, shot-blasting gra-
vel residue etc.
The operability of the functional parts must be checked prior to
installation.
Should the Penstock be repainted later on, it must be ensured
that no paint is applied to the functional parts. The identification
plates must not be painted over either. If the equipment is sand-
blasted for cleaning prior to installation, these parts must be ade-
quately covered. If solvents are used for cleaning, it must be en-
sured that the solvents do not destroy the seals of the pipeline or
the Penstock.
For the assembly of the VAG EROX
®
plus
Penstock it must be en-
sured that suitable load suspension devices as well as transport
and lifting equipment are available.
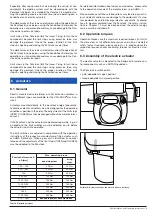
5 Set-up and operation
5.1 Visual inspection and preparation
Before putting the Penstock and the equipment into operation,
perform a visual inspection of all functional parts. Check whether
all bolted connections have been properly fastened.
The Penstock have been factory-lubricated for assembly, storage
and transport purposes. Depending on their condition, they may
have to be relubricated at set-up.
Recommended lubricants:
Stem, stem nut:
Klüberplex BE 31-502
• Seal, gate:
Fuchs Chemplex Si 2
Fuchs Notropeen Si 1
Klüberbeta
VR
67-17002
5.2 Function check and pressure test
Before installation, the function parts of the Penstock have to be
opened and closed completely at least one time and their opera-
bility has to be checked.
Ensure that no objects are present near the opening of the struc-
ture which might block the movement of the gate.
Warning! The pressure exerted on the closed valve
must not exceed it belastet werden (siehe technisches
Datenblatt KAT-A 2452).
When operating the penstock for the first time, ensure that gate
and any mounted actuating components move evenly, vibration-
free and without noise. These components must never be jam-
med and their movement must neither be blocked nor otherwise
impaired.
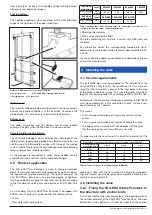
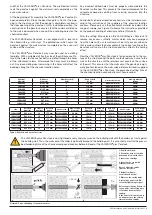
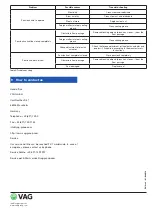
100
100
200
200
Picture 11: Example of a channel installation of the VAG EROX
®
plus
Penstock


