background image


SAFETY INSTRUCTIONS

14

2.9

Signage

The following symbols and information signs may be in the work area. They apply to the immediate environ-
ment of their location.

DANGER!

Danger of life due to electrical current!

Contact with live parts can result in life-threating injuries. 

Make sure that the components are not live or in tension unauthorized approxima-
tion.

WARNING!

Hazard from illegible signs!

Over time, labels and signs may become soiled or otherwise illegible so that hazards
may not be recognized or necessary operating instructions may not be followed.

Always keep all safety, warning and operating instructions in easily legible condi-
tion.

NOTICE!

Observe instructions!

Use the identified device only after this documentation has been read and understood
in full.

Summary of Contents for VKS10

Page 1: ...TRANSLATION OF THE ORIGINAL INSTRUCTIONS VKS10 COMPACT CONDUCTOR SYSTEM INSTALLATION MANUAL SYSTEM MANUAL MAINTENANCE MANUAL EN V 1 01 ...

Page 2: ... 3 Technical data 15 3 1 Type plate 15 4 Layout and function 16 4 1 System overview 16 4 2 Brief system description 16 4 3 Assembly overview 17 4 3 1 Straight sections 17 4 3 2 Curved section 20 4 3 3 Connecting material 20 4 3 4 Fixed hangers sliding hangers 21 4 3 5 End cap 24 4 3 6 Feed terminal 24 4 3 7 Rail separation 27 4 3 8 Transfer funnel 28 4 3 9 Conductor system sections for funnel 29 4...

Page 3: ...mmissioning 51 6 2 Operation Decommissioning 53 6 2 1 Operation 53 6 2 2 Decommissioning 53 6 3 Assembly prerequisites 53 6 4 Assembly tools 54 6 5 Installation 55 6 5 1 Conductor system 55 6 5 2 Line feed VLS and VNS 63 6 5 3 Collector 67 6 5 4 Special components 70 6 5 5 Path measuring systems 73 6 5 6 Condition after the installation 74 6 5 7 Installation completion 74 7 Malfunctions 75 7 1 Saf...

Page 4: ... OF CONTENTS 2 9 Disassembly and disposal 93 9 1 Preparation for disassembly 93 9 1 1 Disassembly 93 9 2 Disposal 93 10 Protective measures 94 10 1 EU conformity declaration 94 Index 95 11 Other documents 96 ...

Page 5: ... safety instructions and their struc ture are explained below DANGER The source of the hazard is described here This combination of a symbol and a signal word indicates an immediately dangerous situation that will result in death or serious injury unless avoided The actions to prevent the hazard are identified here DANGER The source of an electrical hazard is described here This combination of a s...

Page 6: ...document The places in the text or references to other documents are identified here TIPS AND RECOMMENDATIONS Simple tips and recommendations from our long years of experience are provided here 1 3 Copyright protection The contents of this manual are protected by copyright Their use is permitted within the scope of the use of the installation No further use is permitted without the written permiss...

Page 7: ...ries The actual scope of delivery may vary from the descriptions and images in this document in case of custom versions the selection of additional order options or due to latest technical changes The obligations agreed in the supply contract the general terms and conditions and the terms and conditions of delivery and the laws and regulations applicable at the time the contract was signed all app...

Page 8: ...orized changes modifications or accessories Changes or modifications to the delivered product require the permission of the man ufacturer Genuine spare parts and manufacturer approved accessories provide safe ty The use of non approved parts voids any liability of the manufacturer Always consult the manufacturer first The warranty becomes void in case of any of the events below The product is chan...

Page 9: ...It can be mounted vertically or horizontally Appropriate use includes following all the information in these instructions Any use beyond or other than the appropriate use conversion or other modification is to be considered misuse and prohibited WARNING Danger in case of improper use Improper use may give rise to hazardous situations Only ever use the system for its intended purpose Never let untr...

Page 10: ...uity breakers that have been used to unlock a system part or that can be used to connect electricity If this is not possible then the clearly associated prohibition sign must be nearby Existing mechanical interlocking devices against restart must be used for manually op erated switches Determine absence of voltage Absence of voltage is to be determined at or as close as possible to the work site a...

Page 11: ...ing injuries Make sure that the components are not live or in tension unauthorized approxima tion 2 3 2 Risks from hazardous materials WARNING Danger to health from hazardous materials Improper use of hazardous materials may cause damage to health Observe the manufacturer safety data sheets for hazardous materials used ...

Page 12: ...tem Over the entire time the owner has to verify that the instructions drafted by him for the operation of the system conform to the current state of applicable regulations and adapt the instructions as necessary The owner must clearly define responsibilities for the installation operation maintenance and cleaning of the system The owner must ensure that all employees who handle the system have re...

Page 13: ...task Electrically qualified person see VDE 0105 100 Due to their professional training knowledge experience and knowledge of the relevant standards and regu lations professional electricians are able to carry out work on electrical installations and to independently rec ognize and avoid possible hazards The professional electrician has been specifically trained for his her professional working env...

Page 14: ...gainst flying particles and liquid sprays Helmet Helmets protect against falling or flying parts and materials Gloves Gloves protect hands against chafing and abrasion cuts and punctures as well as against contact with hot surfaces Protective work clothes Work clothing is close fitting and resistant to tearing with close fitting sleeves and without any projecting parts It is designed to protect ag...

Page 15: ...regulations the following safety instructions must be observed The following accident prevention regulations UVV Germany respectively the new Accident Prevention Reg ulations Principles of Prevention DGUV Regulation 1 Germany must always be observed 2 8 Conduct in case of danger or accident Precautions Have first aid equipment first aid kit blankets etc and fire extinguisher ready Maintain free ac...

Page 16: ...e that the components are not live or in tension unauthorized approxima tion WARNING Hazard from illegible signs Over time labels and signs may become soiled or otherwise illegible so that hazards may not be recognized or necessary operating instructions may not be followed Always keep all safety warning and operating instructions in easily legible condi tion NOTICE Observe instructions Use the id...

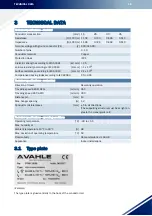
Page 17: ...60093 Ω x cm 1 x 10¹⁶ Surface resistance according to IEC 60093 Ω x cm 2 1 x 10¹³ Comparative tracking index according to IEC 60093 CTI 400 Technical specifications mechanical Direction of travel Reversing operation Traveling speed KESR KESL m min 450 Traveling speed KST KSTU m min 300 Distance pin mm 14 Max hanger spacing m 1 2 Conductor rail tolerances mm 5 in all directions The supporting struc...

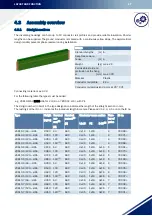
Page 18: ...flat in sulating housing into which the conductor rails are drawn These conductors are contact protected They com ply with accident and VDE regulations in the electrical mechanical and fire engineering sense and are designed according to protection class IP21 The current collectors are protected against contact only if the carbon brushes are fully located in the conductor rails For conductor rail ...

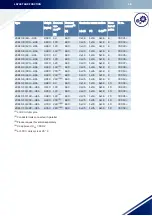
Page 19: ...onductor rail profile E Cu Conductor rail protrusion 34 mm at 20 C UT Type Weight kg m Nominal cur rent 5 A Nominal current 4 V Conductor cross section L1 L3 PE 5 10 3 Num ber of poles ID no VKS10 4 63 HSA 2 020 63 690 3x16 1x16 4 780 99 VKS10 4 100 HSA 2 250 100 690 3x25 1x16 4 780 71 VKS10 4 120 HSA 2 359 120 690 3x30 1x16 4 780 90 VKS10 4 140 HSA 2 520 140 1 690 3x35 1x16 4 780 68 VKS10 5 63 HS...

Page 20: ... VKS10 9 140 HSA 3 240 140 1 690 3x35 1x16 5x16 9 780 28 VKS10 9 200 HSA 3 280 200 2 690 6x25 1x25 2x16 9 780 14 VKS10 9 240 HSA 3 600 240 2 690 6x30 1x30 2x16 9 780 13 VKS10 9 280 HSA 3 910 240 1 2 690 6x35 1x35 2x16 9 780 12 VKS10 10 63 HSA 2 880 63 690 3x16 1x16 6x16 10 780 29 VKS10 10 100 HSA 3 110 100 690 3x25 1x16 6x16 10 780 20 VKS10 10 120 HSA 3 250 120 690 3x30 1x16 6x16 10 780 30 VKS10 1...

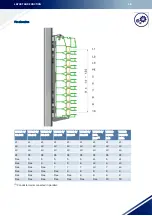
Page 21: ...KS10 9 63 140 VKS10 9 200 280 1 VKS10 10 63 140 VKS10 10 200 280a L1 L1 L1 L1 L1 L1 L1 L1 L1 L2 L2 L2 L2 L2 L2 L2 L2 L2 L3 L3 L3 L3 L3 L3 L3 L3 L3 PE PE PE PE PE PE PE PE PE Free 5 5 5 5 5 L1 5 L1 Free Free 6 6 6 6 L2 6 L2 Free Free Free 7 7 7 L3 7 L3 Free Free Free Free 8 8 8 8 8 Free Free Free Free Free 9 9 9 9 Free Free Free Free Free Free Free 10 10 ...

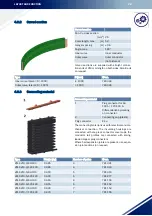
Page 22: ...section Min Cu cross section mm2 25 Curve length max m 5 3 Hanger spacing m 0 6 Angle max 180 Inner curve Inner conductor Outer curve Outer conductor not pictured Type R mm ID no Inner curve lateral R 1000 1000 780 344 Outer curve lateral R 1500 1500 780 345 Connecting material 1 Plug connector for 63 100 A 120 140 A Differentiationbymarking on connector 2 Connecting cap plastic Plug connector E C...

Page 23: ... screw fastening NOTICE The conductor system can slide in the hangers in case of longitudinal expansion It is secured in the hanger by an additional screw at fixed points Here a maximum distance of 6 m between two fixed points must be maintained VM SV10 8 63 100 0 445 8 781 156 VM SV10 8 120 140 0 445 8 781 158 VM SV10 9 63 100 0 460 9 781 159 VM SV10 9 120 140 0 460 9 781 161 VM SV10 9 200 1 0 46...

Page 24: ...LAYOUT AND FUNCTION 22 Fixed hanger on cast in channel with hanger fixed point screw Fixed hanger Type AH VEPS10 H Weight kg 0 224 ID no 780 007 ...

Page 25: ... VTP10 support profile with hanger fixed point screw Sliding hanger on cast in channel with hanger and bracket profile Fixed hanger Type AH VEPS10 VTP Weight kg 0 033 ID no 780 009 Sliding hanger Type AH VAS10 H Weight kg 0 223 ID no 780 008 ...

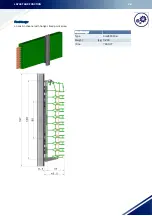
Page 26: ...pecially flat line feeds for cable ends to be executed Both line feed types are supplied mounted on a 1 m straight section The end feeds are supplied loose and only in connection with the 1 m VLS section Sliding hanger Type AH VAS10 VTP Weight kg 0 032 ID no 780 010 End cap Type EK VES10L Weight kg 0 210 ID no 780 004 Material Plastic Screw Galvanized steel A Conductor system length Can be used le...

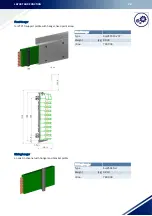
Page 27: ...Ø 8 5 mm for 100 A 120 A mm2 25 up to copper conductor Ø 8 2 mm or feed pin for 60 A conductor system A conductor system length 1 m please order 1m section for this separately Type Weight kg Current A Number of poles ID no ES VLS10 4 63 0 217 63 4 781 445 ES VLS10 4 100 120 0 382 100 200 4 781 479 ES VLS10 4 140 0 574 140 4 781 478 ES VLS10 5 63 0 230 63 5 780 610 ES VLS10 5 100 120 0 426 100 120 ...

Page 28: ... 280 1 0 815 280 10 780 317 Type Weight kg Current A Number of poles ID no Line feed VNS with connection box Number of poles 4 10 Current A 63 280 Cable gland STR M 63 x 1 5 for Ø 28 45 STR M 20 x 1 5 for Ø 5 13 Connecting cable customer side Cable connection Main current Auxiliary current M10 M5 Cable outlet left standard Type Weight kg Current A Number of poles ID no ES VNS10 10 200 280 2 865 20...

Page 29: ...ons and the designations of the conductor rail sections to be separated must be specified on ordering For designation of the conductor rail profiles see 4 3 1 Straight sections Rail separation Weight kg 0 004 Assembly Pre assembled delivery Delivery Loose delivery on re quest currentless section mm 30 longer variant on re quest Material Plastic ID no ST VSTS1 10 63M 156 933 ST VSTS1 100M 150 150 S...

Page 30: ... left and right of prepared straight sections Transfer funnel for current collector KSTU 30 63 14 Speed max V m min 100 Funnel strips Plastic Funnel holder Galvanized steel Attachment material Galvanized steel 1 Conductor system see 4 3 1 2 Auxiliary support and clamping brackets see HRL auxiliary sup port 3 End cap see 4 3 5 4 Support profile ...

Page 31: ...4 97 151 7 780 349 ET EFTV10 7 KSTU30 63 14R 7 564 84 97 151 7 780 172 ET EFTV10 8 KSTU30 63 14L 7 554 98 111 165 8 780 348 ET EFTV10 8 KSTU30 63 14R 7 554 98 111 165 8 780 171 ET EFTV10 9 KSTU30 63 14L 7 554 112 125 179 9 780 347 ET EFTV10 9 KSTU30 63 14R 7 554 112 125 179 9 780 170 ET EFTV10 10 KSTU30 63 14L 7 534 126 139 193 10 780 346 ET EFTV10 10 KSTU30 63 14R 7 535 123 139 193 10 780 169 Typ...

Page 32: ... min 100 Cu cross section mm2 min 25 Guide bars Plastic Attachment material Galvanized steel Tolerances mm x 10 y 8 7 Type Weight kg Dimension A Number of poles ID no SE DSEV10 4 KSTU30 63 1 888 56 5 4 781 453 SE DSEV10 5 KSTU30 63 1 884 70 5 5 781 452 SE DSEV10 6 KSTU30 63 1 880 84 5 6 780 168 SE DSEV10 7 KSTU30 63 1 876 98 5 7 780 167 SE DSEV10 8 KSTU30 63 1 872 112 5 8 780 166 SE DSEV10 9 KSTU3...

Page 33: ...e Allocation from top ID no US VU10 4L Rail 1 4 781 456 US VU10 4R Rail 1 4 781 457 US VU10 5L Rail 1 5 781 458 US VU10 5R Rail 1 5 781 459 US VU10 6L Rail 1 6 780 287 US VU10 6R Rail 1 6 780 288 US VU10 7L Rail 1 7 780 227 US VU10 7R Rail 1 7 780 228 US VU10 8L Rail 1 8 780 229 US VU10 8R Rail 1 8 780 230 US VU10 9L Rail 1 9 780 289 US VU10 9R Rail 1 9 780 290 US VU10 10L Rail 1 10 780 269 US VU1...

Page 34: ...n Phase spacing mm 14 Stroke and lateral deflec tion mm 15 Contact pressure per car bon brush approx N 7 PE green on no 4 other configuration possible PE moves forward when folding into the conductor system max current A Flat plug Screw connec tion 32 FLA 2 5 AEA 2 5 40 FLA 4 0 AEA 4 0 55 FLA 6 0 AEA 6 0 ...

Page 35: ...e 143 116 SA KESR32 55F 10 14HS 0 04 10 0 840 80 146 53 10 10 pin 143 117 Can be supplied individually Type Weight kg ID no Phase PE SA KESR32 55F 14 31 0 0 060 143 111 143 112 Type Weight kg A mm B mm C mm Num ber of poles Base plate ID no SA KESR32 55S 4 14HS 0 04 04 0 504 28 62 4 4 pin 142 937 SA KESR32 55S 5 14HS 0 04 06 06 0 570 56 90 5 6 pin pin 6 free 142 938 SA KESR32 55S 6 14HS 0 04 06 0 ...

Page 36: ...63S KESR 63S Reversing operation Adapter plate and terminal block Phase spacing mm 14 Stroke and lateral deflec tion mm 15 Contact pressure per car bon brush approx N 7 PE yellow on no 4 other configuration possible PE moves forward when folding into the conductor system ...

Page 37: ... 1 9 781 084 SA KESR63S 10 14 HS KBL 04 10 01 10 10 1 10 781 083 Type Number of poles Allocation ID no SA KESR63S 4 14 HS KBR 07 10 06 10 4 7 10 781 096 SA KESR63S 5 14 HS KBR 07 10 05 10 5 6 10 781 095 SA KESR63S 6 14 HS KBR 07 10 05 10 6 5 10 781 094 SA KESR63S 7 14 HS KBR 07 10 04 10 7 4 10 781 093 SA KESR63S 8 14 HS KBR 07 10 03 10 8 3 10 781 092 SA KESR63S 9 14 HS KBR 07 10 02 10 9 2 10 781 0...

Page 38: ...e spacing mm 14 Stroke and lateral deflec tion mm 30 Contact pressure per car bon brush approx N 7 PE yellow on no 4 other configuration possible PE moves forward when folding into the conductor system max current A Flat plug Screw connec tion 32 FLA 2 5 AEA 2 5 40 FLA 4 0 AEA 4 0 55 FLA 6 0 AEA 6 0 63 AEA 10 0 ...

Page 39: ...e 142 886 SA KESL32 55F 10 14HS 0 04 10 0 992 80 146 53 10 10 pin 142 887 Can be supplied individually Type Weight kg ID no Phase PE SA KESL32 55F 14 31 0 0 076 142 881 142 882 Type Weight kg A mm B mm C mm Num ber of poles Base plate ID no SA KESL32 63S 4 14HS 0 04 04 0 553 28 62 4 4 pin 143 539 SA KESL32 63S 5 14HS 0 04 06 06 0 637 56 90 5 6 pin pin 6 free 143 354 SA KESL32 63S 6 14HS 0 04 06 0 ...

Page 40: ...63S KESL 63S Reversing operation Adapter plate and terminal block Phase spacing mm 14 Stroke and lateral deflec tion mm 30 Contact pressure per car bon brush approx N 7 PE yellow on no 4 other configuration possible PE moves forward when folding into the conductor system ...

Page 41: ... 1 9 781 070 SA KESL63S 10 14 HS KBL 04 10 01 10 10 1 10 781 069 Type Number of poles Allocation ID no SA KESL63S 4 14 HS KBR 07 10 06 10 4 7 10 781 082 SA KESL63S 5 14 HS KBR 07 10 05 10 5 6 10 781 081 SA KESL63S 6 14 HS KBR 07 10 05 10 6 5 10 781 080 SA KESL63S 7 14 HS KBR 07 10 04 10 7 4 10 781 079 SA KESL63S 8 14 HS KBR 07 10 03 10 8 3 10 781 078 SA KESL63S 9 14 HS KBR 07 10 02 10 9 2 10 781 0...

Page 42: ...4 438 SA KST63PE 2000 0 394 63 10 00 9 156 792 SA KST63PH 2000 0 394 63 10 00 9 156 791 KSTU Reversing operation for funnel operation and double line guides multi systems Connecting cable m 2 Stroke and lateral deflection mm 20 10 mm to all sides in funnel area Contact pressure approx N 5 Type Weight kg Current A Connecting cable A mm2 Ømax mm ID no Phase black ID no PE yellow SA KSTU30 14PE 04A 2...

Page 43: ...L FLA4PH1 6 3 0 150 4 00 6 00 165 051 AL FLA6PE1 6 3 0 150 6 00 7 00 166 369 AL FLA6PH1 6 3 0 080 6 00 7 00 166 369 FLA highly flexible for current collector with screw termi nal S Length m 1 Longer connecting cable available Temperature range C 15 to 70 Type Weight kg A mm2 Ømax mm ID no Phase black PE yellow AL AEA2 5PE 32 3 7 1000 D 0 038 2 50 3 90 143 079 AL AEA2 5PH 32 4 1000 A 0 038 2 50 3 9...

Page 44: ... 36 94 34 780 185 MN UMAA12HS B 6 14L 108 0 39 108 48 780 184 MN UMAA12HS B 6 14R 108 0 39 108 48 780 183 MN UMAA12HS B 7 14 122 0 42 122 62 780 181 MN UMAA12HS B 8 14L 136 0 46 136 76 780 180 MN UMAA12HS B 8 14R 136 0 46 136 76 780 179 MN UMAA12HS B 9 14L 150 0 49 150 90 780 178 MN UMAA12HS B 9 14R 150 0 49 150 90 780 177 MN UMAA12HS B 10 14L 164 0 52 164 104 780 176 MN UMAA12HS B 10 14R 164 0 52...

Page 45: ...rwise included in combination with fastening of the supporting structure See 4 3 21 Attachment of the supporting structure VTPB1050 ESAE Version in the start and end area ID no 780 100 VTPB1050 ESST Version on the line ID no 780 098 VTPA10 130 HRL hanger Weight kg 0 878 ID no 781 007 VTPV10 HRL connector Weight kg 2 398 ID no 781 000 ...

Page 46: ...LAYOUT AND FUNCTION 44 HRL auxiliary support Auxiliary support Type HRL HSE 500 Length mm 500 Weight kg 1 894 ID no 781 677 with attachment material ...

Page 47: ...t D Clamping bracket E Tightening torque of the mushroom head screw M10 MA 18 Nm F Slot 9 x 30 Type 1 Weight kg clamping area mm Figure ID no VTPB130 P 30 0 938 max 8 1 780 147 VTPB360 SPR 2 674 max 15 3 780 149 VTPB130 SPW 1 066 max 6 4 780 148 VTPB360 35 45 3 054 35 45 2 780 150 VTPB360 45 55 3 062 45 55 2 780 151 ...

Page 48: ... 155 VTPB360 90 105 3 110 90 105 2 780 156 VTPB360 100 115 3 118 100 115 2 780 157 VTPB360 110 125 3 131 110 125 2 780 158 VTPB360 120 135 3 144 120 135 2 780 159 VTPB360 130 145 3 152 130 145 2 780 160 VTPB360 140 155 3 164 140 155 2 780 161 VTPB360 150 165 3 712 150 165 2 780 162 VTPB130 S1 2 0 944 max 8 5 780 163 VTPB130 HST 0 922 max 8 6 780 678 Type 1 Weight kg clamping area mm Figure ID no ...

Page 49: ...ng bracket 2 Bar code strip BCB 3 Path measuring systems WCS 3 with separate aluminum profile bore hole provided by customer Grounding of the code rail When installing the WCS code rail in the VKS10 system the code rail must be connected to the system poten tial at least every 30 m with low impedance Grounding Type PS WCS3 EVTP10 Weight kg 0 026 ID no 302 160 ...

Page 50: ... special perforation WCS 3 Weight kg 0 040 max path length m 327 ID no 302 106 Screw PS WCS3 FPK Screw for fixpoint Weight kg 0 001 ID no 780 140 BCB PS BCB 50 Bar code strip BCB Weight kg 0 015 max path length m 10 000 ID no 302 107 Mounting bracket Type PS WCS3 BKK Weight kg 0 002 Attachment spacing m 0 2 ID no 780 193 for plastic laminate ...

Page 51: ...con tained in an insulating profile 4 5 1 Mechanical interfaces Customer side steel structure Perfectly aligned profile upright or VAHLE auxiliary support On the vehicle side there is a support bracket for the current collectors which is aligned to the conductor rail system Please refer to the installation plan for the required system dimensions and tolerances 4 5 2 Electrical interfaces Rubber ho...

Page 52: ... accept delivery only conditionally Note the scope of the damage in the transport documents or on the carrier s delivery note NOTICE The delivery may be damaged during transport Report all defects as soon as they are found Claims for damages can only be made during the applicable period Document and report the defects found 5 3 Compact conductor system Conductor system Transport and storage in woo...

Page 53: ...persons who do not fulfill the requirements described here may not be aware of the hazards in the relevant working areas Keep unauthorized persons clear of the work area If in doubt address the relevant person and instruct them to leave the work area if necessary Interrupt work until unauthorized persons have left the work area WARNING Hazard in case of insufficient qualification of personnel Insu...

Page 54: ...e used Use own tools for the different materials aluminum copper stainless steel Chip forming work grinding etc must not be performed in the vicinity of the con ductor rail system NOTICE The following points have to be strictly observed during assembly Appropriate handling of materials Clean and metallic bright surfaces on all contact points Smooth crossovers free of burrs of the conductor rail pr...

Page 55: ... be clean and free of all objects There has to be adequate lighting over the entire installation site Tools for proper assembly of the system have to be available see 6 4 Assembly tools Information on installation Before installation observe the system specific installation plan and the applicable system documentation Align the conductor rails and funnels in such a way that the long bar is aligned...

Page 56: ...nsion and nut size 17 13 and 8 Steel tape measure contact angle 0875 hack saw soft face hammer head Ø approx 50 mm Screwdriver set Mounting fork for connecting cap Mounting fork for connecting joint Installation comb Mounting fork for connecting cap Type MZ MGVK Weight kg 0 350 Order no 780 070 Use only with support profile Mounting fork for connecting joint Type MZ MGVS Weight kg 1 50 Order no 78...

Page 57: ...g hanger distances Installing support brackets The support brackets are required for mounting the VKS hangers The implementation is carried out by the customer The use of special structures is possible Assembly steps 1 Mount the support brackets parallel and at right angles to the guide rail Installing the HRL support profile The hanger spacing can be increased with the HRL support profile The VSK...

Page 58: ... steps 1 Attach the hanger to the support brackets by clip ping or screwing M6 Remove the hanger by unscrewing it with a wrench SW13 Step 1 HRL support profile Assembly steps 1 Place the hanger in the bore hole provided in the support profile NOTICE Subsequent assembly applies both to the support brackets and to the HRL support profiles The WCS laminate code rail mount 1 must al ways be at the top...

Page 59: ...ivery length 4 m from 30 C to 20 C delivery length 4 m Step 4 Prerequisites Before inserting the springs must be checked for proper contact with the connector rail During insertion the springs must point towards the curvature of the conductor rail profile Required tools Tape measure Assembly steps 1 Slide the connectors into the conductor rail pro files on the section with an even projection of 90...

Page 60: ... of the conductor system with an impact protec tion and drive the sections together using a ham mer to setting dimension A table page 60 NOTICE You can use an installation comb to precisely ad just the air gap in the copper It is inserted be tween the copper conductor rails Depending on the air gap required 0 5 mm the various installation combs can be used e g at an installation temperature of 20 ...

Page 61: ...as sembly tool which places the cap correctly over the joint NOTICE The setting dimensions according to Table Table of plug connector assignments must only be strictly ob served if the maximum temperature range 10 C to 40 C is to be expected for the conductor system To simplify installation at lower temperature differences t 20 C the conductor system can be pushed together so that that a closed co...

Page 62: ... L1 L2 L3 VKS10 8 63 100 L1 L2 L3 PE 1 2 3 4 VKS10 8 120 140 PE 1 2 3 4 L1 L2 L3 VKS10 9 63 100 L1 L2 L3 PE 1 2 3 4 5 VKS10 9 120 140 PE 1 2 3 4 5 L1 L2 L3 VKS10 9 200 2x L1 2x L2 2x L3 PE 1 2 VKS10 9 240 280 1 2 2x L1 2x L2 2x L3 PE VKS10 10 63 100 L1 L2 L3 PE 1 2 3 4 5 6 VKS10 10 120 140 PE 1 2 3 4 5 6 L1 L2 L3 VKS10 10 200 2x L1 2x L2 2x L3 PE 1 2 3 VKS10 10 240 280 1 2 3 2x L1 2x L2 2x L3 PE I...

Page 63: ...le Assembly steps 1 Push in the conductor rail on the right side using a wooden board until they are flush with the insu lation housing 2 Mark the new section length at right angles Step 2 Required tools Hack saw Assembly steps 1 Saw off the conductor rail at the marking Step 3 Required tools Tape measure File Assembly steps 1 Push the conductor rail back until the same pro jection B of 34 mm is a...

Page 64: ... caps onto the conductor rail ends NOTICE The end caps are secured with a screw from the conductor rail side through the existing holes Ob serve the markings for right R and left L on the end cap Step 3 Required tools Screwdriver Assembly steps 1 Screw the end caps to the conductor rail The screws are included in the packaging unit NOTICE The overhang to the first or last hanger must not exceed 30...

Page 65: ...VLS Step 1 Required tools Screwdriver Assembly steps 1 Remove the cover caps from the installed line feed 2 Remove the outer insulation of the connecting cable in the area of the feed 3 Strip and cut the connecting cable as required The additional conductor protection is still given due to the hollow chamber profile Step 2 Required tools Wrench Torque wrench Assembly steps 1 Attach the cable lugs ...

Page 66: ...MMENDATIONS The connecting cables for the VLS line feeds can also be supplied pre assembled preferably rubber hose line HO7RN F H07V K Line feed VNS Step 1 Required tools Screwdriver Torque wrench Assembly steps 1 Open the cover on the installed line feed 2 Strip and cut the connecting wires as required 3 Attach the cable lugs to the single wires and pass the connecting cable through the cable gla...

Page 67: ...lose the connection box End feed VEKS 10 The end feed consists of a connection box and the VLS feed see Line feed VLS Step 1 Assembly steps 1 Slide the end feed to the left or right onto one of the conductor rail ends of the VLS line feed Step 2 Required tools Screwdriver Assembly steps 1 Secure the box with two screws The screws are included in the packaging unit 2 Then pull the cables through th...

Page 68: ...eft L Step 3 Assembly steps 1 Tighten the cable gland until it is sealed against the connecting cable Step 4 Required tools Screwdriver Assembly steps 1 Replace the cover and close the connection box Step 5 Assembly steps 1 Place the cover cap on the feed terminal ...

Page 69: ...NOTICE The installation height H is shown in the table on page 68 2 Slide the current collectors into the intended po sition 3 Align the current collector with the phase center NOTICE The permissible deviation is 1 mm The permissible angle deviation is 1 in all di rections relative to the current collector 4 Install the freely hanging part of the connecting cable with a minimum bending radius of 1...

Page 70: ...ep freeze warehouse with special connection cable on request 1 Use with flat plug connection and or screw terminal 2 Version with adapter plate and terminal block Current collector types Installation height H mm Stroke and lateral deflection A mm KST 30 to KST 63 85 20 KSTU 30 to KSTU 63 85 20 KESR 32 55 S 6 14 to 10 14 1 88 15 KESR 32 55 F 6 14 to 10 14 1 88 15 KESL 32 63 S 6 14 to 10 14 1 105 30...

Page 71: ...the system before making any elec trical connections Assembly steps 1 Connect the feed terminal to the power supply see Feed terminal 4 3 6 2 Wire the current collectors to the consumers NOTICE Risk of damage by polarity reversal Observe the correct pole configuration of the current collector NOTICE Switches fuses and cables for wiring must be provided and installed by the customer ...

Page 72: ...collectors in the entrance area of the transfer funnels are limited to max 10 mm in all directions The speed is max 100 m min Step 1 Required tools Wrench Assembly steps 1 Install the pillar according to the installation plan 2 Attach the retaining plate to the pillar Step 2 Required tools Wrench Assembly steps 1 Attach the HRL hanger to the retaining plate Step 3 Required tools Wrench Assembly st...

Page 73: ...he conductor rail sec tion Step 5 Assembly steps 1 Attach the transfer funnel to the retaining plate using the VKS hangers Step 6 Required tools Screwdriver Assembly steps 1 Secure the hangers using the fixed point screws Step 7 Assembly steps 1 Align the funnel unit accurately with the auxiliary support and fasten it ...

Page 74: ...e PVC bars in the area of the line guides NOTICE Do not mount VKS10 hangers and VTP10 hangers connectors in the area of the line guide See the cor responding installation plan for specific installation situations TIPS AND RECOMMENDATIONS It is recommended to create a reference lane using a reference device Afterwards all lanes must be approached with this reference device All current collector pac...

Page 75: ... bracket engages first in the groove 1 3 Fix the laminate tape in the middle of each con ductor rail section with a screw NOTICE The mounting distance is 200 mm 6 6 x 30 mm slot in the laminate every 200 mm Grounding of the code rail The laminate rail must be connected to the system potential at least every 30 m e g via Vahle support profile Bar code strip In addition to the path measuring system ...

Page 76: ...functionality of the system Clearances of the line transitions and transfers Open spaces and interfering edges Random sample checking of tightening torques Correct connection and routing of the cables Check of the feed terminals and their wirings Have all required parts been installed safely and according to instructions Current collector units 6 5 7 Installation completion After completing the as...

Page 77: ...nning any work Switch off power supply verify that the system is free of voltage and secure against switching back on 7 2 Conduct in case of malfunction General principle If case of malfunctions that present an immediate hazard to persons or property immediately activate the safety devices Determine the cause of the fault Notify the person in charge at the place of operation NOTICE The inspection ...

Page 78: ...ed and components have been replaced an insulation resistance measurement in accor dance with EN 60204 32 Section 18 3 must be carried out and a condition in compliance with the relevant standards must be restored before restarting Fault Cause Remedy Conductor system transmits no too little current No supply voltage Check voltage supply on site Conductor system burnt Current collector position on ...

Page 79: ... of death due to electrical current Contact with live components conductor rail may result in life threatening injuries Ensure that the relevant components are not live and protected against unautho rized access NOTICE The inspection and maintenance tasks listed in the technical documentation must be performed and documented regularly Location spare part task performed date name of inspector Only ...

Page 80: ...persons are unable to judge the risks when working on the sys tem which puts them and others at risk if severe or fatal injuries All work must be performed by qualified personnel only Insufficiently qualified personnel must stay out of the work area CAUTION Tripping hazard due to protruding parts There is a tripping hazard during the work Watch out for steps and holes in the floor when walking ins...

Page 81: ...Service monitoring Personnel daily Check safety equipment and operating behavior Operator monthly Visual inspection of general condition Replace damaged de fective parts Check mechanical and electrical connections especially at the feed terminals re tighten if necessary Remove small burns or discolorations on the contact surface by scouring with an abrasive pad min grit size 400 Do not use a power...

Page 82: ...de the mobility of the current collectors Electrical control Check for wear of graphite contacts firm seat of all contact screws and cable attachments Check remaining height of graphite contact See 8 4 Cleaning Check pressing force Use a spring scale to pull the graphite contacts from the con ductor system The contact force must be about 5 7 N per graphite contact If a check with a spring scale is...

Page 83: ...ubsequent sets Replacement intervals Graphite contacts must be replaced in time so that the sockets of the graphite contacts cannot scrape on the conductor system housing or make contact with the edges of the connecting caps The residual heights of the graphite contacts are Recommendation Replace the entire current collector unit with every third replacement of the graphite con tacts NOTICE Based ...

Page 84: ... FFP3 Vahle product ID 10017880 Never blow out the mask with compressed air Use vacuum with class M filter Do not eat drink or smoke during work Dust in the vacuum cleaner bag or the air filter can be disposed of as commercial waste in the usual quantities up to about 2 liters Larger quantities must be disposed of in a controlled manner according to applicable law Cleaning the conductor system Req...

Page 85: ...tem sections 1 Vacuum the sections with the cleaning brush and vacuum cleaner Connecting caps 1 Vacuum the connecting caps with the cleaning brush and vacuum cleaner knocking the back of the connecting caps with the ball of the hand Knock the connecting caps at least twice with three knocks each If this is not possible due to design then knock the connecting caps from the front side NOTICE Clean e...

Page 86: ...MAINTENANCE 84 Connector cap moving along the rail before Connecting cap moving along the rail after ...

Page 87: ...MAINTENANCE 85 Reversal points moving along the rail before Reversal points moving along the rail after ...

Page 88: ...t part end cap Conductor system sections 1 Vacuum the sections with the cleaning brush and vacuum cleaner Connecting caps 1 Vacuum the connecting caps with the cleaning brush and vacuum cleaner knocking the back of the connecting caps with the ball of the hand Knock the connecting caps at least twice with three knocks each If this is not possible due to design then knock the connecting caps from t...

Page 89: ...MAINTENANCE 87 Connecting caps mast assembly before Connecting caps mast assembly after ...

Page 90: ...MAINTENANCE 88 End cap 1 Remove the lower end cap 2 Vacuum the end cap 3 Remove the leakage path extension 4 Knock out the leakage path extension 5 Install the leakage path extension and the end cap ...

Page 91: ...ctor rail due to adhesive contamina tion of the surfaces degrading contact Influence on graphite contact lifetime In case of strong soiling as described above it is recommended to wet clean the conductor rail using the fol lowing agents NOTICE The conductor rail must only be used with manufacturer approved cleaners The cleaners are suitable for the relevant plastics and usually do not degrade them...

Page 92: ...cate Ident No Use of third party copied or non approved components voids our warranty WARNING No liability in case of unauthorized changes modifications or accessories Changes or modifications to the delivered product require the permission of the manufacturer Genuine spare parts and manufacturer approved accessories provide safety The use of non approved parts voids any liability of the manufactu...

Page 93: ... PH KST 30 KST 63 and KSTU 30 63 0 031 4 00 4 40 154 440 SK KMK30 63 04 PE KST 30 KST 63 and KSTU 30 63 0 031 4 00 4 40 154 453 SK MK55F 31 14 KESR 32 55F and KESL 32 55F 0 040 3 50 4 20 780 920 SK MK63S 31 14 KESR 32 63S and KESL 32 96S 0 046 3 50 4 20 780 921 Type for current collector S mm D mm L mm ID no DF2 KESR 32 63 0 90 7 70 43 00 153 848 DF4 KESL 32 63 1 10 6 40 41 00 157 312 RF3 KESR 32 ...

Page 94: ...1 SA KESR32 55F 14PE 0 006 PE 143 112 SA KESR32 55S 14PH 0 066 Phase 143 120 SA KESR32 55S 14PE 0 066 PE 143 121 SA KESL32 63S 14PH 0 084 Phase 168 395 SA KESL32 63S 14PE 0 084 PE 142 880 Type Weight kg Current A Connecting cable A mm2 d max mm ID no Phase black PE yellow SA KST30PE 04A 2000 0 240 30 2 50 5 152 086 SA KST30PH 04C 2000 0 240 30 2 50 5 152 085 SA KST55PE 04D 2000 0 368 55 6 00 11 15...

Page 95: ...rve the information in chapter 2 3 1 WARNING Risk of death from improper replacement or removal Errors during the removal or replacement of components may cause life threatening situations or significant property damage Observe the safety instructions before beginning any removal work CAUTION All accessories must be checked for wear Only defect free parts may be reused Use only genuine VAHLE spare...

Page 96: ...PROTECTIVE MEASURES 94 10 PROTECTIVE MEASURES 10 1 EU conformity declaration ...

Page 97: ... and short circuiting 8 I Information to the instructions 3 Isolation 8 O Operating company 10 Operation 53 Owner obligations 10 Q Qualifications 11 R Requirements to personnel 11 S safety aspects 7 Safety information 4 Storage temperature 50 Switch on again 8 Symbols 3 T Technical condition 10 Transport 50 U Unloading 50 ...

Page 98: ...OTHER DOCUMENTS 96 11 OTHER DOCUMENTS SAFETY DATA SHEET RIVOLTA Cleaner If the link does not work see the appendix of this document ...

Page 99: ...CE Technical Documentation DQS certified in accordance DIN EN ISO 9001 2015 OHSAS 18001 2007 ...

Reviews: