background image

Operation 6

0020181589_04 auroCOMPACT Installation and maintenance instructions

19

5.7.7.1 Using the auxiliary relay

1.

Connect an additional component directly to the integ-
rated auxiliary relay using the grey plug on the PCB.

2.

Connect the wiring in the same way as described in the
section "Installing the control (

Page 18)".

3.

To start up the connected component, select the com-
ponent using diagnostics code

D.026

, see Calling up

diagnostics codes (

Page 28).

5.7.7.2 Using the VR 40 ("2 in 7" multi-functional

module)

1.

Install the components in accordance with the respect-
ive instructions.

2.

Select

D.027

(

Page 28) to actuate relay 1 on the

multi-functional module.

3.

Select

D.028

(

Page 28) to actuate relay 2 on the

multi-functional module.

5.7.7.3 Actuating the circulation pump according to

requirements

1.

Connect the connection cable for the external button
using terminals 1

(0) and 6 (functional drawing) on

the X41 edge connector, which is supplied with the con-
troller.

2.

Plug the edge connector into the PCB slot X41.

3.

Press the external button to make the circulation pump
to run for five minutes.

5.7.7.4 Actuating a circulation pump with an eBUS

controller

1.

Select a hot water programme (preparation).

2.

Parametrise a circulation programme on the controller.

The pump runs during the time period specified in
the programme.

6

Operation

6.1

Operating concept of the product

The operating concept and the display and setting options of
the end user level are described in the operating instructions.

An overview of the display and setting options of the installer
level can be found in the section "Overview of the menu
structure

Installer level" (

Page 45).

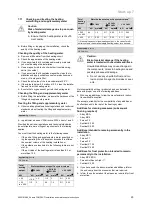
6.1.1

Calling up the installer level

Caution.
Risk of material damage caused by incor-
rect handling.

Incorrect settings at installer level may cause
damage and operating faults to the heating
installation.

You must only access the installer level if
you are an approved competent person.

Note

The installer level is protected against unauthor-
ised access using a password.

1.

Press

and

("i") simultaneously.

The following menu appears in the display.

2.

Use the

or

button to scroll until the

Installer

level

menu point appears.

3.

Press (

OK

) to confirm your selection.

In the display, the text

Enter code

appears along

with the value

00

.

4.

Use

or

to set the value

17

(code).

5.

Press (

OK

) to confirm your selection.

The installer level appears with a selection of menu
points.

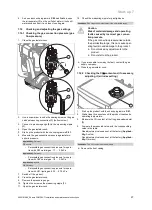
6.2

Live Monitor (status codes)

Menu

Live Monitor

Status codes in the display provide information on the pro-
duct's current operating status.

Status codes

Overview (

Applicability:

Germany)

(

Page 51)

Status codes

Overview

6.3

Test programmes

As well as the installation assistants, you can also call up the
test programmes for start-up, service and troubleshooting.

Menu

Installer level Appliance config.

There you will find the

Check programs

(

Page 24), in

addition to the

Function menu

, an

Electronics self-test

and the

Gas family check

.

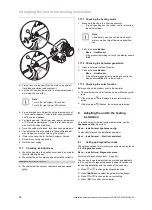
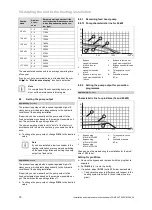
7

Start-up

7.1

Auxiliary service equipment

Applicability:

Germany

OR Austria

The following test and measuring equipment is required for
start-up:

CO

2

measuring instrument

Digital or U tube manometer

Flat blade screwdriver, small

2.5 mm Allen key
Summary of Contents for 0010015609

Page 1: ...llation and maintenance instructions auroCOMPACT VSC S 4 AT DE Publisher manufacturer Vaillant GmbH Berghauser Str 40 D 42859 Remscheid Tel 49 21 91 18 0 Fax 49 21 91 18 2810 info vaillant de www vaillant de ...

Page 2: ...iagnostics menu 23 7 9 Performing a gas family check 23 7 10 Using check programmes 24 7 11 Checking and treating the heating water filling and supplementary water 25 7 12 Reading off the filling pressure 26 7 13 Preventing low water pressure 26 7 14 Filling and purging the heating installation 26 7 15 Filling and purging the hot water system 26 7 16 Checking and adjusting the gas settings 27 7 17...

Page 3: ... work 44 11 Decommissioning 44 11 1 Decommissioning the product 44 12 Recycling and disposal 44 13 Customer service 44 13 1 Customer service 44 Appendix 45 A Installer level menu structure Overview 45 B Overview of diagnostics codes 46 C Inspection and maintenance work Overview 50 D Status codes Overview 51 E Overview of fault codes 52 F Connection diagram 55 G Gas adjustment values as set at the ...

Page 4: ...g operating installation and servicing instructions for the product and any other system compon ents installing and fitting the product in accord ance with the product and system approval compliance with all inspection and main tenance conditions listed in the instruc tions Intended use also covers installation in ac cordance with the IP code Any other use that is not specified in these in structi...

Page 5: ... smell flue gas in the prop erty Open all accessible doors and windows fully to provide ventilation Switch off the product Check the flue gas routes in the product and the flue gas diversions 1 3 6 Risk of poisoning and burns caused by escaping hot flue gases Only operate the product if the air flue pipe has been completely installed With the exception of short periods for testing purposes only op...

Page 6: ...f combustion air is always free of fluorine chlorine sulphur dust etc Ensure that no chemical substances are stored at the installation site If you are installing the product in hairdressing salons painter s or joiner s workshops cleaning businesses or similar locations choose a separate installation room in which the room air is technically free of chemical substances Ensure that the combustion a...

Page 7: ...tory setting for type of gas and gas connection pressure Kat e g II2H3P Approved gas category Condensing techno logy Efficiency class of the boiler in accord ance with EC Directive 92 42 EEC Type e g C13 Permissible flue gas connections Information on the identification plate Meaning PMS e g 3 bar 0 3 MPa Maximum water pressure in heating mode 230 V 50 Hz Electrical connection Voltage Fre quency e...

Page 8: ...olar pump 12 Solar safety group 13 Solar circuit electronics box 14 Condensate siphon 15 3 way valve 16 Thermostatic radiator valve 17 Heating drain cock 18 Pressure sensor 19 Secondary heat ex changer 20 Heating expansion vessel 21 Switch box 4 Set up 4 1 Unpacking the product 1 5 7 3 A B A B 1 Remove the packaging surrounding the unit 2 Remove the front casing Page 11 3 Unscrew the four fixing t...

Page 9: ... C 20 mm 300 mm D 600 mm E 165 mm air flue pipe 60 100 mm diameter 275 mm air flue pipe 80 125 mm diameter F 40 mm G 70 mm 4 5 Clearance from combustible components It is not necessary to maintain a clearance between the product and components made of combustible materials that goes beyond the minimum clearances Page 9 4 6 Unit dimensions for transport A Unit dimensions for transport 150L 190L 1 7...

Page 10: ... on the domestic hot water cylinder Remove the upper hose from the condensate trap Remove the power plug from the cylinder temperature sensor Remove the two power plugs 2 of the domestic hot wa ter pump Remove the 2 power plugs of the solar PCB 10 from the unit s main PCB Undo the nuts 6 and 8 Undo the nuts 11 of the solar circuit Remove the four screws 7 When assembling the unit carry out the ste...

Page 11: ...chlorinated cleaning agents paint adhesives ammonia compounds or other similar substances are stored or used Take the weight of the unit including the water content into account Look up information on this in the technical data Ensure that the room in which you want to set up the unit is sufficiently protected against frost Do not route the combustion air via the smoke outlet on an old oil fired f...

Page 12: ... bend connection pipes if they have not yet been connected to the product Caution Risk of material damage due to heat trans fer during soldering Only solder connectors if the connectors are not yet screwed to the service valves 5 1 Information on liquid gas operation In the as supplied condition the product is preset for opera tion with the gas group indicated on the data plate If you have a produ...

Page 13: ...ion vessel is insufficient for the installation install an additional expansion vessel connected as close to the product as pos sible in the heating return 2 Install an expansion relief valve and a stopcock on the heating return 3 Install a domestic hot water safety group and a stop cock on the cold water pipe 4 Install a filling device between the cold water pipe and the heating flow 5 Install a ...

Page 14: ...it the presence of air in the system would significantly impair its efficiency You must make sure that the diameter of the lines is not over dimensioned This would slow down the system op eration and thereby reduce the efficiency of the system Set up the system in such a way that guarantees an even volume flow which matches the required nominal flow Ensure that the thermal insulation of the lines ...

Page 15: ...er vessel With expansion vessel and or buf fer vessel Note If there is a lack of solar fluid in the installa tions fault F 1355 may occur Check the pres sure in the solar circuit and if required top it up with fluid 5 5 4 Solar connection Note The unit has the following components as stand ard Solar pump Safety group with pressure gauge Expansion vessel Air vent Brine collecting container 2 1 1 So...

Page 16: ...e gas system that is being used by other units Observe the applicable international national and local regulations for flue gas systems in particular for installa tions in living rooms Inform the operator how to correctly operate the product 5 7 Electrical installation Only qualified electricians may carry out the electrical install ation Danger Risk of death from electric shock Touching live conn...

Page 17: ...cted voltage At mains voltages greater than 253 V elec tronic components may be damaged Make sure that the rated voltage of the mains is 230 V 30 mm 1 Observe all valid regulations 2 Open the electronics box Page 16 3 Set up a fixed connection and install a partition with a contact gap of at least 3 mm e g fuses or power switches 4 Use a flexible line for the mains feed line which is routed throug...

Page 18: ...necting a weather controlled eBUS controller or a room temperature controlled eBUS controller Connect the controller to the BUS plug Bridge the plug 24 V RT if it has not been bridged already Conditions If you are connecting a low voltage controller 24 V Connect the controller to the 24 V RT plug instead of the bridge Conditions If you are connecting a safety thermostat for underfloor heat ing Con...

Page 19: ...ructions An overview of the display and setting options of the installer level can be found in the section Overview of the menu structure Installer level Page 45 6 1 1 Calling up the installer level Caution Risk of material damage caused by incor rect handling Incorrect settings at installer level may cause damage and operating faults to the heating installation You must only access the installer ...

Page 20: ...ith the gas group available at the installation site The product s combustion has been factory tested and is preset for operation with the gas group indicated on the iden tification plate Conditions The product design is not compatible with the local gas group Do not start up the product Change the type of gas in accordance with your system Conditions The product design is compatible with the loca...

Page 21: ...n the solar circuit 2 Connect the outlet line of the filling pump to the filling cock 5 on the solar circuit 3 Close the valve 14 4 Switch the filling pump on The solar fluid that is introduced via the valve 5 fills the panels and then fills the pipe coil until it eventu ally drains at the valve 9 5 Allow the solar fluid to flow through the solar circuit for ten minutes in order to flush and filte...

Page 22: ... are described here for filling the heating cir cuit and the hot water circuit must be carried out before run ning the programme for automatically purging the heating and hot water circuits Filling mode check programme P 06 is activated automatic ally in the installation assistant for as long as the filling mode appears on the display If problems occur restart the purge programme 7 6 3 Purging Pur...

Page 23: ...e so that the test result is not dis torted Applicability Germany Perform the gas family check as part of routine product maintenance work after replacing components carrying out work on the gas route and following gas conversion Result Meaning Measure F 92 Coding resistance fault The coding resistor on the PCB does not match the gas group that is entered Check the coding res istor repeat the gas ...

Page 24: ...nd the hot water circuit are purged via the automatic air vent on the heating pump the automatic air vent s cap must be loosened The purge programme always begins with the hot water circuit 7 minutes and 30 seconds and ends with the heating circuit 2 minutes and 30 seconds 1 x Cancel End purge programme Note The purge programme runs for 10 minutes and then ends Purging the hot water circuit 3 way ...

Page 25: ...of the heating installation or If the guideline values listed in the following table are not met or If the pH value of the heating water is less than 8 2 or more than 10 0 Applicability Austria OR Germany Total heating output Water hardness at specific system volume 1 20 l kW 20 l kW 50 l kW 50 l kW kW dH mol m dH mol m dH mol m 50 16 8 3 11 2 2 0 11 0 02 50 to 200 11 2 2 8 4 1 5 0 11 0 02 Total h...

Page 26: ... ance with the relevant standards fit a cold water valve where possible 5 Supply the heating circuit with water 6 Open all thermostatic radiator valves 7 Check whether the stop cocks for the heating flow and return are open 8 Slowly open the combined filling and emptying valve to allow water to flow into the heating circuit 9 Purge the highest radiator and wait until water flows out of the purging...

Page 27: ... 5 75 kPa 7 Switch off the product 8 Close the gas isolator cock 9 Remove the pressure gauge 10 Tighten the screw on the measuring nipple 1 11 Open the gas isolator cock 12 Check the measuring nipple for gas tightness Conditions Gas connection pressure not in the permissible range Caution Risk of material damage and operating faults caused by incorrect gas connec tion pressure If the gas connectio...

Page 28: ...l or cooling the buffer cylinder Note Alternatively you can use the service soft ware to make a target flow value specifica tion 2 Call up the Live Monitor Menu Live Monitor If the product is working correctly the display shows S 04 7 17 2 Checking the hot water generation 1 Open a hot water valve all the way 2 Call up the Live Monitor Menu Live Monitor If the hot water generation is working corre...

Page 29: ...You can adjust the burner anti cycling time to the conditions of the heating installation The burner anti cycling time is only active for the heating mode Hot water handling mode during a burner anti cycling time does not af fect the time function element You can use diagnostics code D 002 to set the maximum burner anti cycling time default setting 20 min The effective burner anti cycling times wi...

Page 30: ...e recommend switching off the speed regulation and setting the pump output to a fixed value Applicability Austria The product is equipped with a speed regulated high effi ciency pump which adjusts independently to the hydraulic conditions of the heating installation If required you can manually set the pump output to five fixed selectable steps based on the maximum possible out put This switches t...

Page 31: ...t to the heating system is limited to the set value see dia gram Note When starting up the product or after switching on the power supply this pump setting does not take effect until after the burner has run for the first time Setting for KfW Set D 014 to 7 fixed Δp Limit Conditions The hydraulics in the heating system or the heating sys tem itself is suitable for this type of pump operation The p...

Page 32: ...code D 014 Remove the front casing Page 11 1 Set the pressure using the adjusting screw 1 Position of the adjusting screw Pres sure Notes application Right hand stop turned all the way down 35 kPa 0 35 bar If the radiators do not heat up sufficiently at the default setting In this case you must set the pump to the maximum speed Mid position 5 turns to the left 30 kPa 0 30 bar Default setting 5 fur...

Page 33: ...d set the thermostatic mixer to the position that cor responds to the maximum temperature that is required by the operator 40 C 1 45 C 2 50 C 3 55 C 4 60 C 5 3 Then set the set target temperature for the cylinder on the operating display Each additional temperature boost causes unneces sary energy consumption 4 To optimise solar energy consumption in the summer reduce the minimum hot water tempera...

Page 34: ...4 Check cylinder charge pump Switch the cylinder charging pump on and off T 05 Check circulation pump Switch the circulation pump on and off T 06 Check external pump Switch the external pump on and off T 07 Inspect solar pump Switch the solar pump on and off T 08 Checking the burner The product starts up and switches to minimum load The flow temperature is shown in the display T 92 Inspect Legion ...

Page 35: ... or replace the components accord ing to the following sections 16 Fit a new burner door seal 17 Check the heat insulation on the burner door If you notice any signs of damage replace the heat insulation 9 7 Cleaning the heat exchanger 1 Protect the folded down electronics box against sprayed water 1 2 3 4 2 The four nuts on the threaded pins 4 must never be loosened or tightened 3 Clean the heati...

Page 36: ...ntake nozzle 9 Secure the air intake pipe with the retaining screw 10 Check the gas connection pressure gas flow pres sure Page 27 9 11 Draining 9 11 1 Draining the unit s heating circuit 1 2 1 Close the service valves in the heating flow and in the heating return 2 Remove the front casing Page 11 3 Move the electronics box into the upper position Page 11 4 Connect a hose to the drain cock 1 and g...

Page 37: ... time after two years and then every year To avoid having to maintain the magnesium protection anode an electrical protection anode which requires no maintenance is optionally available 1 1 Drain the unit s process water circuit Page 36 End the draining process as soon as the anode con nection projects from the water 2 Unscrew the magnesium protection anode 1 from the cylinder and check the extent...

Page 38: ...dropped back down the safety cut out must be reset before starting up the product again 10 Troubleshooting You can find an overview of the fault codes in the appendix Overview of fault codes Page 52 10 1 Contacting your service partner If you contact your service partner please mention if pos sible The fault code that is displayed F xx The unit status S xx that is displayed in the Live Monitor Pag...

Page 39: ...es You can also use check programmes for troubleshooting 10 8 Resetting parameters to factory settings To reset all parameters simultaneously to the default settings set D 096 to 1 10 9 Preparing the repair work 1 Decommission the product 2 Disconnect the product from the power mains 3 Remove the front casing 4 Close the gas isolator cock 5 Close the service valves in the heating flow and in the h...

Page 40: ...hree screws 1 12 Replace the defective fan 1 2 3 5 4 13 Reinstall the components in the reverse order You must use new seals at position 4 and 5 Follow the tightening sequence for the three screws that connect the fan to the mixer tube by following the numbering 1 2 and 3 14 Screw the gas pipe onto the gas valve Use new seals for this 15 Hold on to the gas valve when tightening the cap nuts 16 Aft...

Page 41: ...led carry out a leak tightness check Leak tightness check Page 28 check the type of gas and set the gas ratio 10 10 4 Replacing the Venturi 2 1 3 1 Remove the air intake pipe 2 Remove the plug from the sensor on the Venturi jet 2 by pressing on the locking lug 3 Undo the cap nut 3 for the gas connection pipe 1 on the gas valve 4 Remove the Venturi jet and the gas connection pipe from the fan by tu...

Page 42: ... pins on the underside of the gas restrictor Caution Risk of material damage to the product Lubricant can block function related chan nels in the Venturi Do not use lubricant when installing the gas restrictor Insert the gas restrictor for the gas group in question which may have been replaced into the new Ven turi Type of gas Colour of the gas restrictor G20 natural gas Yellow G25 natural gas Blu...

Page 43: ...0 6 Replacing the expansion vessel 1 2 3 1 Empty the product 2 Detach the connection 3 3 Undo the strap handle 2 4 Pull the expansion vessel 1 out towards the front 5 Insert the new expansion vessel into the product 6 Screw the new expansion vessel to the water connec tion Use a new seal for this 7 Attach the support plate using both screws 1 8 If necessary adjust the pressure to the static height...

Page 44: ...ck that the product functions correctly and check the leak tightness Page 28 11 Decommissioning 11 1 Decommissioning the product Switch off the product Disconnect the product from the power mains Close the gas isolator cock Close the cold water stop cock Close the heating stop cock Drain the unit s heating circuit Page 36 12 Recycling and disposal Disposing of the packaging Dispose of the packagin...

Page 45: ... config Language DHW temperature Back Select Target flow temp Appliance config Language DHW temperature Back Select Target flow temp Appliance config Language DHW temperature Back Select Appliance config Test programs Installer level Fault list Back Select Enter code 1 7 Back OK F 75 Fault Pump water shortage F 00 Interruption Flow sensor P 00 Pump is actuated Purging cyclically Back Select Gas ty...

Page 46: ...027 Zubehörrelais 1 externe Pumpe Cancel OK D 027 Accessory relay 1 Cirkulation pump Back D 028 Zubehörrelais 2 externe Pumpe Cancel OK D 028 Accessory relay 2 Cirkulation pump Back D 000 Heating load 0 Cancel OK D 001 Pumpennachlauf Heizung 0 Back D 000 Heating load auto Back Contakt Phone number Back Cancel OK D 096 Cancel OK Reset to factory settings No Target flow temp To start the In stallati...

Page 47: ...p Target value of internal high efficiency pump in Pos sible settings 0 Auto 1 53 2 60 3 70 4 85 5 100 6 proKlima 7 KfW 8 Auto pump boost 0 Auto D 015 Actual pump speed high efficiency pump Actual value for internal high efficiency pump in Not ad justable D 016 24 V DC room thermostat open closed Heating mode off on Not ad justable D 017 Heating flow return temperature control changeover Control t...

Page 48: ...n of the 3 port valve 0 Heating mode 1 Parallel operation 2 Domestic hot water mode Not ad justable D 040 Heating flow temperature Actual value in C Not ad justable D 041 Return temperature Actual value in C Not ad justable D 044 Digitised ionisation value Display field 0 to 1020 800 no flame 400 good flame Not ad justable D 050 Offset for minimum speed In rpm adjustment range 0 to 3000 Nominal va...

Page 49: ...plate D 094 Delete fault history Delete fault list 0 No 1 Yes D 095 Software version of PeBUS compon ents PCB BMU Display AI Solar card SMU Not ad justable D 096 Default setting Reset all adjustable parameters to factory setting 0 No 1 Yes D 098 Value of coding resistors for gas group and output range Display xx yy xx Coding resistor 1 in cable harness for output range 08 Up to 25 kW 09 30 kW 10 3...

Page 50: ...tion of the unit Remove dirt from the product and from the combustion chamber X X 3 Visually inspect the general condition of the heating block In doing so pay particular attention to signs of corrosion rust and other defects If you notice any damage carry out maintenance work X X 4 Check the gas connection pressure at maximum heat input If the gas connection pressure is not within the specified r...

Page 51: ...age X X 25 Check the solar fluid level and top it up if necessary X 26 Check the fill level in the glycol container and the pressure in the glycol circuit If the pressure is below 1 bar manually actuate the air trap and correct the glycol fill level X X 27 Record the inspection maintenance work carried out X X D Status codes Overview Applicability Germany Status code Meaning Heating mode S 00 Heat...

Page 52: ... of fault codes Code Meaning Cause F 00 Flow temperature sensor interruption NTC plug not plugged in or has come loose multiple plug on the PCB not plugged in correctly interruption in cable harness NTC defective F 01 Return temperature sensor interruption NTC plug not plugged in or has come loose multiple plug on the PCB not plugged in correctly interruption in cable harness NTC defective F 02 Cy...

Page 53: ...olarities on the eBUS F 52 Mass flow sensor connection fault Mass flow sensor not connected disconnected plug not connected or incorrectly connected F 53 Mass flow sensor fault Gas flow pressure too low filter under Venturi filter cap wet or blocked mass flow sensor defective internal pressure measuring point in Venturi blocked do not use lubricant on Venturi O ring F 54 Gas pressure fault in comb...

Page 54: ...rn temperature sensors have been installed on the same pipe incorrect pipe F 86 Fault Floor contact Activate the overheating thermostat for the underfloor heating Set the heating target value F 90 Fault No communication between SMU and BMU Interruption between BMU and SMU faulty product code F 92 Coding resistance fault The coding resistance on the PCB does not match the entered gas group Check th...

Page 55: ...4V RT BUS Burner off X1 FUS X41 X41 18 17 8 7 10 4 OT OT DCF RF AF FB X100 X100 L N X16 X35 X90 X12 X51 X51 4 3 2 1 M 5 5 2 3 4 1 6 3 1 1 2 1 2 4 1 3 2 1 1 2 3 1 2 M 4 1 6 3 N L 24V 230V 24V 230V 22 2 4 5 3 10 11 12 13 14 15 16 18 19 17 1 20 21 X31 Burner off eBUS X20 16 4 3 17 7 5 1 15 2 13 12 8 13 14 2 1 2 1 2 1 M 5 4 2 1 6 7 8 9 1 Main PCB 2 Interface PCB 3 Coding resistor for the gas group 4 C...

Page 56: ...ity Germany Settings Unit G20 natural gas G25 natural gas G31 propane CO after 5 minutes in full load mode with front casing closed Vol 9 2 1 0 9 1 1 0 10 4 0 5 CO after 5 minutes in full load mode with front casing removed Vol 9 0 1 0 8 9 1 0 10 2 0 5 Set for Wobbe index W kWh m 14 09 11 53 21 41 O after 5 minutes in full load mode with front casing closed Vol 4 5 1 8 4 3 1 8 5 1 0 8 I Technical ...

Page 57: ... 16 0 kW 3 0 16 0 kW 3 8 24 0 kW 3 8 24 0 kW Maximum heat input heating Q 14 3 kW 14 3 kW 20 4 kW 20 4 kW Minimum heat input heat ing Q 3 2 kW 3 2 kW 4 0 kW 4 0 kW Maximum heat input hot water Q 16 3 kW 16 3 kW 24 5 kW 24 5 kW Minimum heat input hot water Q 3 2 kW 3 2 kW 4 0 kW 4 0 kW VSC S 146 4 5 150 LL VSC S 206 4 5 150 LL Effective output range P at 50 30 C 3 3 15 2 kW 4 3 21 5 kW Effective ou...

Page 58: ...W Technical data Power loading G31 VSC S 146 4 5 150 VSC S 146 4 5 190 VSC S 206 4 5 150 VSC S 206 4 5 190 Effective output range P at 50 30 C 5 6 15 2 kW 5 6 15 2 kW 5 6 21 5 kW 5 6 21 5 kW Effective output range P at 80 60 C 5 0 14 0 kW 5 0 14 0 kW 5 0 20 0 kW 5 0 20 0 kW Hot water heat output range P 5 0 16 0 kW 5 0 16 0 kW 5 0 24 0 kW 5 0 24 0 kW Maximum heat input heating Q 14 3 kW 14 3 kW 20...

Page 59: ...chnical data General VSC S 146 4 5 150 VSC S 146 4 5 190 VSC S 206 4 5 150 Gas category Austria II2H3P II2H3P II2H3P Gas category Germany II2ELL3P II2ELL3P II2ELL3P Diameter of the gas pipe G 3 4 inch G 3 4 inch G 3 4 inch Diameter of the heating pipe G 3 4 inch G 3 4 inch G 3 4 inch Expansion relief valve connector min 24 mm 24 mm 24 mm Condensed water discharge pipe min 24 mm 24 mm 24 mm Gas sup...

Page 60: ...heating mode at P min 1 8 g s 1 5 g s 1 9 g s Smoke mass flow in heating mode at P max 9 2 g s 6 5 g s 9 3 g s Smoke mass flow in hot water handling mode at P max 11 0 g s 7 41 g s 11 13 g s Released system types Austria C13 C33 C43 C53 C83 C93 B23P B33P B53P C13 C33 C43 C53 C83 C93 B23P B33P B53P C13 C33 C43 C53 C83 C93 B23P B33P B53P Released system types Germany C13x C33x C43x C53x C83x C93x B2...

Page 61: ...tructions 61 VSC S 146 4 5 150 LL VSC S 206 4 5 150 LL Electric connection 230 V 50 Hz 230 V 50 Hz Built in fuse slow blow T4A 250 T4A 250 Max electrical power con sumption 175 W 175 W Standby electrical power consumption 4 2 W 4 2 W Level of protection IP X4 D IP X4 D ...

Page 62: ...orrugated gas pipe 6 D Decommissioning 44 Diagnostics Carrying out 39 Diagnostics codes 46 Calling up 28 Display Replacing 43 Disposal packaging 44 Disposing of the packaging 44 Documents 7 E Electricity 4 Electronics self test Carrying out 34 F Fan Replacing 39 Fault codes 52 Reading 39 Fault list Deleting 39 Fault memory Querying 39 Resetting 39 Fault symbol 24 Filling Heating installation 26 Fi...

Page 63: ...g installation 26 Q Qualification 4 R Reading Fault codes 39 Regulations 6 Remaining feed head pump 30 Removing Compact thermal module 34 Repair Completing 44 Preparing 39 Replacing Burner 39 Display 43 Fan 39 Gas valve 40 Heat exchanger 42 PCB 43 Venturi 41 Resetting All parameters 39 Return flow temperature control Setting 29 S Safety device 5 Scale 32 Schematic drawing 5 Self test 34 Serial num...

Page 64: ...Telefon 05 7050 Telefax 05 7050 1199 Telefon 05 7050 2100 zum Regionaltarif österreichweit bei Anrufen aus dem Mobilfunknetz ggf abweichende Tarife nähere Information erhalten Sie bei Ihrem Mobilnetzbetreiber info vaillant at termin vaillant at www vaillant at www vaillant at werkskundendienst These instructions or parts thereof are protected by copyright and may be reproduced or distributed only ...

Reviews: