background image

4 Set-up

8

Installation and maintenance instructions auroCOMPACT 0020181589_04

3.5

DVGW mark

The DVGW mark documents that the products comply with
all of the requirements of the DVGW VP 112 (test basis from
the German Association for Gas and Water Industry Asso-
ciation for granting the DVGW quality mark) in accordance
with the identification plate.

3.6

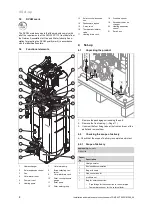
Functional elements

1

5

7

3

1

2

21

20

3

19

4

18

5

17

6

16

15

7

14

13

12

11

10

8

9

1

Heat exchanger

2

Solar expansion vessel

3

Fan

4

Hot water air vent

5

Pump air vent

6

Heating pump

7

Hot water pump

8

Brine collecting con-
tainer

9

Hot water drain cock

10

Solar circuit pressure
gauge

11

Solar pump

12

Solar safety group

13

Solar circuit electronics
box

14

Condensate siphon

15

3-way valve

16

Thermostatic radiator
valve

17

Heating drain cock

18

Pressure sensor

19

Secondary heat ex-
changer

20

Heating expansion
vessel

21

Switch box

4

Set-up

4.1

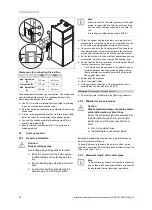
Unpacking the product

1

5

7

3

A

B

A

B

1.

Remove the packaging surrounding the unit.

2.

Remove the front casing. (

Page 11)

3.

Unscrew the four fixing tabs at the front and rear of the
pallet and remove them.

4.2

Checking the scope of delivery

Check that the scope of delivery is complete and intact.

4.2.1

Scope of delivery

Applicability:

Germany

OR Austria

Quant-
ity

Description

1

Heat generator

1

Enclosed documentation

1

Bag with seals

1

Gas conversion kit

1

proKlima set

1

Bag for solar connection:

Pipe fittings for the connection to the solar pipe

Temperature sensor for the solar collector

Summary of Contents for auroCOMPACT VSC S/4 Series

Page 1: ...lation and maintenance instructions auroCOMPACT VSC S 4 AT DE Publisher manufacturer Vaillant GmbH Berghauser Str 40 D 42859 Remscheid Tel 49 21 91 18 0 Fax 49 21 91 18 2810 info vaillant de www vaill...

Page 2: ...gnostics menu 23 7 9 Performing a gas family check 23 7 10 Using check programmes 24 7 11 Checking and treating the heating water filling and supplementary water 25 7 12 Reading off the filling pressu...

Page 3: ...work 44 11 Decommissioning 44 11 1 Decommissioning the product 44 12 Recycling and disposal 44 13 Customer service 44 13 1 Customer service 44 Appendix 45 A Installer level menu structure Overview 45...

Page 4: ...operating installation and servicing instructions for the product and any other system compon ents installing and fitting the product in accord ance with the product and system approval compliance wi...

Page 5: ...smell flue gas in the prop erty Open all accessible doors and windows fully to provide ventilation Switch off the product Check the flue gas routes in the product and the flue gas diversions 1 3 6 Ris...

Page 6: ...combustion air is always free of fluorine chlorine sulphur dust etc Ensure that no chemical substances are stored at the installation site If you are installing the product in hairdressing salons pai...

Page 7: ...ctory setting for type of gas and gas connection pressure Kat e g II2H3P Approved gas category Condensing techno logy Efficiency class of the boiler in accord ance with EC Directive 92 42 EEC Type e g...

Page 8: ...lar pump 12 Solar safety group 13 Solar circuit electronics box 14 Condensate siphon 15 3 way valve 16 Thermostatic radiator valve 17 Heating drain cock 18 Pressure sensor 19 Secondary heat ex changer...

Page 9: ...C 20 mm 300 mm D 600 mm E 165 mm air flue pipe 60 100 mm diameter 275 mm air flue pipe 80 125 mm diameter F 40 mm G 70 mm 4 5 Clearance from combustible components It is not necessary to maintain a cl...

Page 10: ...on the domestic hot water cylinder Remove the upper hose from the condensate trap Remove the power plug from the cylinder temperature sensor Remove the two power plugs 2 of the domestic hot wa ter pum...

Page 11: ...hlorinated cleaning agents paint adhesives ammonia compounds or other similar substances are stored or used Take the weight of the unit including the water content into account Look up information on...

Page 12: ...bend connection pipes if they have not yet been connected to the product Caution Risk of material damage due to heat trans fer during soldering Only solder connectors if the connectors are not yet scr...

Page 13: ...on vessel is insufficient for the installation install an additional expansion vessel connected as close to the product as pos sible in the heating return 2 Install an expansion relief valve and a sto...

Page 14: ...t the presence of air in the system would significantly impair its efficiency You must make sure that the diameter of the lines is not over dimensioned This would slow down the system op eration and t...

Page 15: ...r vessel With expansion vessel and or buf fer vessel Note If there is a lack of solar fluid in the installa tions fault F 1355 may occur Check the pres sure in the solar circuit and if required top it...

Page 16: ...gas system that is being used by other units Observe the applicable international national and local regulations for flue gas systems in particular for installa tions in living rooms Inform the opera...

Page 17: ...ted voltage At mains voltages greater than 253 V elec tronic components may be damaged Make sure that the rated voltage of the mains is 230 V 30 mm 1 Observe all valid regulations 2 Open the electroni...

Page 18: ...ecting a weather controlled eBUS controller or a room temperature controlled eBUS controller Connect the controller to the BUS plug Bridge the plug 24 V RT if it has not been bridged already Condition...

Page 19: ...uctions An overview of the display and setting options of the installer level can be found in the section Overview of the menu structure Installer level Page 45 6 1 1 Calling up the installer level Ca...

Page 20: ...th the gas group available at the installation site The product s combustion has been factory tested and is preset for operation with the gas group indicated on the iden tification plate Conditions Th...

Page 21: ...the solar circuit 2 Connect the outlet line of the filling pump to the filling cock 5 on the solar circuit 3 Close the valve 14 4 Switch the filling pump on The solar fluid that is introduced via the...

Page 22: ...are described here for filling the heating cir cuit and the hot water circuit must be carried out before run ning the programme for automatically purging the heating and hot water circuits Filling mod...

Page 23: ...so that the test result is not dis torted Applicability Germany Perform the gas family check as part of routine product maintenance work after replacing components carrying out work on the gas route...

Page 24: ...d the hot water circuit are purged via the automatic air vent on the heating pump the automatic air vent s cap must be loosened The purge programme always begins with the hot water circuit 7 minutes a...

Page 25: ...f the heating installation or If the guideline values listed in the following table are not met or If the pH value of the heating water is less than 8 2 or more than 10 0 Applicability Austria OR Germ...

Page 26: ...ance with the relevant standards fit a cold water valve where possible 5 Supply the heating circuit with water 6 Open all thermostatic radiator valves 7 Check whether the stop cocks for the heating fl...

Page 27: ...5 75 kPa 7 Switch off the product 8 Close the gas isolator cock 9 Remove the pressure gauge 10 Tighten the screw on the measuring nipple 1 11 Open the gas isolator cock 12 Check the measuring nipple f...

Page 28: ...or cooling the buffer cylinder Note Alternatively you can use the service soft ware to make a target flow value specifica tion 2 Call up the Live Monitor Menu Live Monitor If the product is working c...

Page 29: ...ou can adjust the burner anti cycling time to the conditions of the heating installation The burner anti cycling time is only active for the heating mode Hot water handling mode during a burner anti c...

Page 30: ...recommend switching off the speed regulation and setting the pump output to a fixed value Applicability Austria The product is equipped with a speed regulated high effi ciency pump which adjusts inde...

Page 31: ...to the heating system is limited to the set value see dia gram Note When starting up the product or after switching on the power supply this pump setting does not take effect until after the burner h...

Page 32: ...ode D 014 Remove the front casing Page 11 1 Set the pressure using the adjusting screw 1 Position of the adjusting screw Pres sure Notes application Right hand stop turned all the way down 35 kPa 0 35...

Page 33: ...set the thermostatic mixer to the position that cor responds to the maximum temperature that is required by the operator 40 C 1 45 C 2 50 C 3 55 C 4 60 C 5 3 Then set the set target temperature for t...

Page 34: ...Check cylinder charge pump Switch the cylinder charging pump on and off T 05 Check circulation pump Switch the circulation pump on and off T 06 Check external pump Switch the external pump on and off...

Page 35: ...or replace the components accord ing to the following sections 16 Fit a new burner door seal 17 Check the heat insulation on the burner door If you notice any signs of damage replace the heat insulati...

Page 36: ...take nozzle 9 Secure the air intake pipe with the retaining screw 10 Check the gas connection pressure gas flow pres sure Page 27 9 11 Draining 9 11 1 Draining the unit s heating circuit 1 2 1 Close t...

Page 37: ...time after two years and then every year To avoid having to maintain the magnesium protection anode an electrical protection anode which requires no maintenance is optionally available 1 1 Drain the u...

Page 38: ...ropped back down the safety cut out must be reset before starting up the product again 10 Troubleshooting You can find an overview of the fault codes in the appendix Overview of fault codes Page 52 10...

Page 39: ...s You can also use check programmes for troubleshooting 10 8 Resetting parameters to factory settings To reset all parameters simultaneously to the default settings set D 096 to 1 10 9 Preparing the r...

Page 40: ...ree screws 1 12 Replace the defective fan 1 2 3 5 4 13 Reinstall the components in the reverse order You must use new seals at position 4 and 5 Follow the tightening sequence for the three screws that...

Page 41: ...ed carry out a leak tightness check Leak tightness check Page 28 check the type of gas and set the gas ratio 10 10 4 Replacing the Venturi 2 1 3 1 Remove the air intake pipe 2 Remove the plug from the...

Page 42: ...pins on the underside of the gas restrictor Caution Risk of material damage to the product Lubricant can block function related chan nels in the Venturi Do not use lubricant when installing the gas re...

Page 43: ...6 Replacing the expansion vessel 1 2 3 1 Empty the product 2 Detach the connection 3 3 Undo the strap handle 2 4 Pull the expansion vessel 1 out towards the front 5 Insert the new expansion vessel in...

Page 44: ...eck that the product functions correctly and check the leak tightness Page 28 11 Decommissioning 11 1 Decommissioning the product Switch off the product Disconnect the product from the power mains Clo...

Page 45: ...config Language DHW temperature Back Select Target flow temp Appliance config Language DHW temperature Back Select Target flow temp Appliance config Language DHW temperature Back Select Appliance conf...

Page 46: ...27 Zubeh rrelais 1 externe Pumpe Cancel OK D 027 Accessory relay 1 Cirkulation pump Back D 028 Zubeh rrelais 2 externe Pumpe Cancel OK D 028 Accessory relay 2 Cirkulation pump Back D 000 Heating load...

Page 47: ...Target value of internal high efficiency pump in Pos sible settings 0 Auto 1 53 2 60 3 70 4 85 5 100 6 proKlima 7 KfW 8 Auto pump boost 0 Auto D 015 Actual pump speed high efficiency pump Actual valu...

Page 48: ...of the 3 port valve 0 Heating mode 1 Parallel operation 2 Domestic hot water mode Not ad justable D 040 Heating flow temperature Actual value in C Not ad justable D 041 Return temperature Actual valu...

Page 49: ...late D 094 Delete fault history Delete fault list 0 No 1 Yes D 095 Software version of PeBUS compon ents PCB BMU Display AI Solar card SMU Not ad justable D 096 Default setting Reset all adjustable pa...

Page 50: ...ion of the unit Remove dirt from the product and from the combustion chamber X X 3 Visually inspect the general condition of the heating block In doing so pay particular attention to signs of corrosio...

Page 51: ...ge X X 25 Check the solar fluid level and top it up if necessary X 26 Check the fill level in the glycol container and the pressure in the glycol circuit If the pressure is below 1 bar manually actuat...

Page 52: ...of fault codes Code Meaning Cause F 00 Flow temperature sensor interruption NTC plug not plugged in or has come loose multiple plug on the PCB not plugged in correctly interruption in cable harness NT...

Page 53: ...larities on the eBUS F 52 Mass flow sensor connection fault Mass flow sensor not connected disconnected plug not connected or incorrectly connected F 53 Mass flow sensor fault Gas flow pressure too lo...

Page 54: ...n temperature sensors have been installed on the same pipe incorrect pipe F 86 Fault Floor contact Activate the overheating thermostat for the underfloor heating Set the heating target value F 90 Faul...

Page 55: ...V RT BUS Burner off X1 FUS X41 X41 18 17 8 7 10 4 OT OT DCF RF AF FB X100 X100 L N X16 X35 X90 X12 X51 X51 4 3 2 1 M 5 5 2 3 4 1 6 3 1 1 2 1 2 4 1 3 2 1 1 2 3 1 2 M 4 1 6 3 N L 24V 230V 24V 230V 22 2...

Page 56: ...lity Germany Settings Unit G20 natural gas G25 natural gas G31 propane CO after 5 minutes in full load mode with front casing closed Vol 9 2 1 0 9 1 1 0 10 4 0 5 CO after 5 minutes in full load mode w...

Page 57: ...0 kW 3 0 16 0 kW 3 8 24 0 kW 3 8 24 0 kW Maximum heat input heating Q 14 3 kW 14 3 kW 20 4 kW 20 4 kW Minimum heat input heat ing Q 3 2 kW 3 2 kW 4 0 kW 4 0 kW Maximum heat input hot water Q 16 3 kW...

Page 58: ...Technical data Power loading G31 VSC S 146 4 5 150 VSC S 146 4 5 190 VSC S 206 4 5 150 VSC S 206 4 5 190 Effective output range P at 50 30 C 5 6 15 2 kW 5 6 15 2 kW 5 6 21 5 kW 5 6 21 5 kW Effective...

Page 59: ...cal data General VSC S 146 4 5 150 VSC S 146 4 5 190 VSC S 206 4 5 150 Gas category Austria II2H3P II2H3P II2H3P Gas category Germany II2ELL3P II2ELL3P II2ELL3P Diameter of the gas pipe G 3 4 inch G 3...

Page 60: ...eating mode at P min 1 8 g s 1 5 g s 1 9 g s Smoke mass flow in heating mode at P max 9 2 g s 6 5 g s 9 3 g s Smoke mass flow in hot water handling mode at P max 11 0 g s 7 41 g s 11 13 g s Released s...

Page 61: ...ructions 61 VSC S 146 4 5 150 LL VSC S 206 4 5 150 LL Electric connection 230 V 50 Hz 230 V 50 Hz Built in fuse slow blow T4A 250 T4A 250 Max electrical power con sumption 175 W 175 W Standby electric...

Page 62: ...rrugated gas pipe 6 D Decommissioning 44 Diagnostics Carrying out 39 Diagnostics codes 46 Calling up 28 Display Replacing 43 Disposal packaging 44 Disposing of the packaging 44 Documents 7 E Electrici...

Page 63: ...installation 26 Q Qualification 4 R Reading Fault codes 39 Regulations 6 Remaining feed head pump 30 Removing Compact thermal module 34 Repair Completing 44 Preparing 39 Replacing Burner 39 Display 4...

Page 64: ...elefon 05 7050 Telefax 05 7050 1199 Telefon 05 7050 2100 zum Regionaltarif sterreichweit bei Anrufen aus dem Mobilfunknetz ggf abweichende Tarife n here Information erhalten Sie bei Ihrem Mobilnetzbet...

Reviews: