background image

VAI 2-025 WN
VAI 2-035 WN
VAI 2-050 WN
VAI 2-065 WN
VAM 2-050 W2N
VAM 2-060 W2N
VAM 2-085 W3N
VAM 2-085 W4N
VAI 2-025 W
VAI 2-035 W
VAI 2-050 W
VAM 2-060 W2

climaVAIR

DE, EN, HR, IT, TR

Summary of Contents for climaVAIR VAI 2-025 WN

Page 1: ...VAI 2 025 WN VAI 2 035 WN VAI 2 050 WN VAI 2 065 WN VAM 2 050 W2N VAM 2 060 W2N VAM 2 085 W3N VAM 2 085 W4N VAI 2 025 W VAI 2 035 W VAI 2 050 W VAM 2 060 W2 climaVAIR DE EN HR IT TR...

Page 2: ......

Page 3: ...F r den Benutzer Benutzerhandbuch Klimager t climaVAIR Split Ger t wandh ngend DE VAI2 VAM2...

Page 4: ...dus FAN 12 7 5 5 Heizmodus HEAT 13 7 6 Einstellen der Luftstromrichtung 14 7 6 1 Senkrechter Luftstrom 14 7 7 Auswahl spezieller Funktionen 14 7 7 1 Health Funktion Anionenbetrieb ION 14 7 7 2 SLEEP F...

Page 5: ...n Hinweis Bewahren Sie die Handb cher bitte w hrend der gesamten Lebensdauer des Ger tes auf Hinweis Die Information bez glich dieses Ger tes ist in zwei Handb cher aufgeteilt die Installations und di...

Page 6: ...Ger tebeschreibung Dieses Ger t besteht aus den folgenden Komponenten Au enger t Innenger t Fernbedienung Anschl sse und Rohrleitungen Zubeh r Die Ger tekomponenten werden in Abb 5 1 dargestellt Abb...

Page 7: ...se eliminiert unangenehme Ger che und erfrischt den Raum Wird dieser Filter Sonnenbestrahlung ausgesetzt so regeneriert sich seine geruchsbindende Eigenschaft Antibakterieller Filter Filter mit antial...

Page 8: ...er t f r einen l ngeren Zeitraum au er Betrieb nehmen so nehmen Sie die Batterien aus der Fernbedienung heraus Wird danach auf dem Display noch etwas angezeigt dr cken Sie die Taste RESET Wenn Sie das...

Page 9: ...en der Schicht von der Oberfl che Wenn das K hlmittel herausspritzt und in Ihre Augen gelangt kann dies zu schweren Augenverletzungen f hren Unterbrechen Sie den Betrieb des Klima ger tes nicht durch...

Page 10: ...6 Taste REPEAT 7 Taste CLOCK 8 Taste TIMER 9 Taste ION 10 Taste DEL 11 Taste FAN 12 Taste TURBO FP 13 Taste LIGHT LOCK LICHT SPERRE 14 Taste FOLLOW ME 7 2 2 Anzeigen auf dem Display Abb 7 2 Darstellun...

Page 11: ...funktion Halten Sie die LIGHT LOCK Taste k rzer als 2 Sekunden gedr ckt um das Display der Inneneinheit einzuschalten Um das Display wieder abzuschalten erneut die LIGHT LOCK Taste k rzer als 2 Sekund...

Page 12: ...ltetem Ger t siehe Abschnitt 7 4 Dr cken Sie die Taste MODE Die verschiedenen Betriebsmodi werden angezeigt Abb 7 6 Betriebs Modi W hlen Sie den K hlmodus COOL Dr cken Sie die Tasten TEMP TIME um die...

Page 13: ...bb 7 9 Betriebs Modi W hlen Sie den Entfeuchtermodus DRY Dr cken Sie die Tasten TEMP TIME um die Temperatureinstellung auszuw hlen Durch Dr cken der Taste TEMP TIME k nnen Sie die Temperatur um 1 C na...

Page 14: ...EEP Abb 7 12Auswahl des Gebl semodus Legende 1 Taste MODE 2 Modus Anzeige FAN 3 Taste FAN Aktivieren des Gebl se Modus FAN Bei eingeschaltetem Ger t siehe Abschnitt 7 4 Dr cken Sie die Taste MODE Die...

Page 15: ...erden angezeigt Abb 7 16 Betriebs Modi W hlen Sie den Heizmodus HEAT aus Dr cken Sie die Tasten TEMP TIME um die Temperatureinstellung auszuw hlen Durch Dr cken der Taste TEMP TIME k nnen Sie die Temp...

Page 16: ...Taste SWING VERTICAL um die Richtung des Luftstroms nach oben oder nach unten auszuw hlen Durch Dr cken dreht sich der Windabweiser jeweils um 6 Grad Wird diese Taste 3 Sekunden lang gedr ckt gehalte...

Page 17: ...ngestellte Temperatur Nach einer weiteren Stunde steigt sie erneut um 1 C an Das Ger t bleibt 7 Stunden lang in Betrieb bevor es abschaltet Im Modus HEAT Die Umgebungstemperatur wird im Vergleich mit...

Page 18: ...programierten Ein Ausschalten oder umgekehrt der Einheit o g Schritte der Reihenfolge nach ausf hren Durch Dr cken der Tasten TEMP TIME k nnen Sie die Uhrzeit im zehn Minuten Takt korrigieren Durch Ge...

Page 19: ...ME Aktivieren Sie die Funktion FOLLOW ME nach folgender Anweisung Dr cke den Knopf FOLLOW ME Wenn diese Funktion aktiviert ist zeigt das Display der Fernbedingung die Temperatur an dem Ort der Fernbe...

Page 20: ...betrieb Diese Funktion nur bei defekter oder verlorener Fernbedienung verwenden Zum Aktivieren Notbetriebsschalter bet tigen Ein Piepton weist darauf hin dass die Funktion aktiviert wurde Abb 7 28 Not...

Page 21: ...en In einem Haus wird oftmals nur ein Raum beheizt Es werden jedoch nicht nur die begrenzenden Fl chen dieses Raums W nde T ren Fenster Decke und Boden geheizt sondern es kommt auch zu einer unkontrol...

Page 22: ...Raum Entfernen Sie wenn m glich die W rmequelle Der Thermostat ist im K hl Modus zu hoch eingestellt oder aber im Heiz Modus zu niedrig Stellen Sie die Temperatur passend ein Hindernis vor dem Luftein...

Page 23: ...ziehen Sie dann die Filter nach unten heraus Reinigen Sie Staub oder Schmutz innerhalb der Filter mit Hilfe eines Staubsaugers oder reinigen Sie sie mit kaltem Wasser Die Filter m ssen vollst ndig tr...

Page 24: ...itten Kurzschl ssen oder sogar zu Br nden kommen 12 Entsorgung des Produktes Gefahr von Verletzungen und Personensch den Ergreifen Sie bei der Entsorgung des Ger tes die entsprechenden Ma nahmen Befol...

Page 25: ...For the user User Manual Air Conditioner climaVAIR Split Type EN VAI2 VAM2...

Page 26: ...ting Mode HEAT 13 7 6 Setting the Airflow Direction 14 7 6 1 Vertical Airflow 14 7 7 Special Function Selection 14 7 7 1 Health Anion Operation ION 14 7 7 2 SLEEP Function 15 7 7 3 TIMER ON OFF Functi...

Page 27: ...g the air conditioning Note Keep the manuals throughout the service life of the unit Note The information relating to this unit is divided between two manuals installation manual and user manual Your...

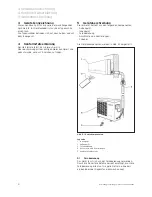
Page 28: ...ised of the following elements Outdoor unit Indoor unit Remote controller Interconnecting services Supplied accessories Figure 5 1 shows the unit components Fig 5 1 Unit components Legend 1 Indoor Uni...

Page 29: ...city Anti bacterial filter Filter with an anti allergenic and anti bacterial effect which keeps the atmosphere clean and healthy Anti dust filter General filter which eliminates much of the dirt and d...

Page 30: ...oning is out of use for a long period If there is anything still showing on display just press the reset button Remove the batteries in case the air conditioning is out of use for a long period If the...

Page 31: ...t interrupt the operation of the air conditioning unit by pulling the cord Danger of injury and physical damage Danger of fire and explosion Damaged air conditioners should not be put into operation I...

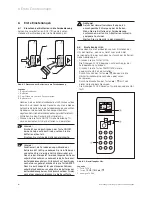
Page 32: ...on 7 CLOCK button 8 TIMER button 9 ION button 10 DEL button 11 FAN button 12 TURBO FP button 13 LIGHT LOCK button 14 FOLLOW ME button 7 2 2 Display Indicators Fig 7 2 Overview of the indicators Legend...

Page 33: ...ss the LIGHT LOCK button for less than 2 seconds to light the display of the Indoor Unit To switch the display back off press the LIGHT LOCK button for less than 2 seconds once again 7 4 Connection Di...

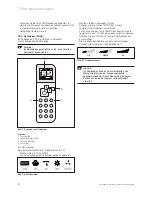
Page 34: ...activate With the unit connected see section 7 4 Press the MODE button The different operation modes are displayed Fig 7 6 Operation modes Select the cooling operation mode COOL Press the TEMP TIME b...

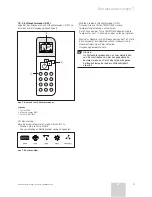
Page 35: ...n modes are displayed Fig 7 9 Operation modes Select the dehumidifying mode DRY Press the TEMP TIME buttons to select the temperature setting When pressing the TEMP TIME buttons the temperature config...

Page 36: ...Fan selection mode Legend 1 MODE button 2 FAN mode indicator 3 FAN button In order to activate the fan mode FAN With the unit connected see section 7 4 Press the MODE button The different operation mo...

Page 37: ...ig 7 16 Operation modes Select the heating operation mode HEAT Press the TEMP TIME buttons to select the temperature setting When pressing the TEMP TIME buttons the temperature configuration will incr...

Page 38: ...NG button to direct the airflow upwards or downwards Once pressing air deflector will turn 6 degrees When pressing for over 3 seconds the vertical airflow enters AUTO mode 7 7 Special Function Selecti...

Page 39: ...ove the configured temperature Once an hour has elapsed the temperature will rise 1 C more The unit is operational for 7 hours before stopping In HEAT mode The ambient temperature decreases 2 C in rel...

Page 40: ...he previous steps successively When pressing the TEMP TIME buttons the time configuration will increase or decrease by 10 minutes If the TEMP TIME buttons are kept pressed the time will increase or de...

Page 41: ...en activated the remote control display shows the actual temperature at its location The remote control will send this infor mation to the indoor unit every 3 minutes so the tem perature at the locati...

Page 42: ...ncy Operation Only use this function when the remote controller is broken or has been mislaid In order to activate Press the emergency operation switch A beeping noise is heard which indicates that th...

Page 43: ...doors windows ceiling and floor the adjacent rooms are cooler than the room temperature therefore thermal energy is unintentionally lost It is therefore difficult to adequately heat the room and an u...

Page 44: ...cooling mode or excessively low temperature in heating mode Set the temperature properly Obstacle in front of the air inlet or outlet Remove the obstacle to allow the air to circulate properly The amb...

Page 45: ...them with cold water Ensure that the filters are dried completely dry in the shade before putting them back into the unit The activated carbon filters where fitted can be reactivated by placing in dir...

Page 46: ...f the product ensure that is done safely and in accordance with local by laws and reulations In order to do so follow the steps described in the installation manual in reverse order and use the necess...

Page 47: ...Za korisnika Upute za rukovanje Klima ure aj climaVAIR Split klima ure aj HR VAI2 VAM2...

Page 48: ...e HEAT 13 7 6 Namje tanje Smjera Protoka Zraka 14 7 6 1 Okomiti Protok Zraka 14 7 7 Odabir Posebnih Funkcija 14 7 7 1 Ioniziranje Zraka ION 14 7 7 2 Funkcija SLEEP 15 7 7 3 Funkcija TIMER ON OFF UKLJU...

Page 49: ...ove Upute za rukovanje Napomena uvajte upute tijekom itavog vijeka trajanja jedinice Napomena Informacije koje se odnose na ovu jedinicu podijeljene su u dva priru nika s uputama Upute za monta u i Up...

Page 50: ...bivanja oznake CE 5 Opis Jedinice Ova jedinica je sastavljena od sljede ih elemenata Vanjske jedinice Unutarnje jedinice Daljinskog upravlja a Spojeva i kanala Dodatne opreme Slika 5 1 pokazuje kompon...

Page 51: ...avaju i svje u atmosferu Izlaganjem ovog filtera sun evoj svjetlosti regenerira se njegova sposobnost uklanjanja neugodnih mirisa Antibakterijski filter Filter s antialergijskim i antibakterijskim u...

Page 52: ...minuta Uklonite baterije ukoliko se klima ure aj ne koristi dulje vrijeme Ukoliko je jo bilo to prikazano na zaslonu samo pritisnite gumb za resetiranje Uklonite baterije ukoliko se klima ure aj ne ko...

Page 53: ...vo prsnulo u va e o i moglo bi uzrokovati ozbiljne ozljede oka Nemojte prekidati rad jedinice klima ure aja povla enjem za strujni kabel Opasnost od ozljeda i materijalne tete Opasnost od vatre i eksp...

Page 54: ...SATI 8 Gumb TIMER 9 Gumb ION 10 Gumb DEL 11 Gumb FAN VENTILATOR 12 Gumb TURBO FP 13 Gumb LIGHT LOCK SVJETLO BLOKIRANJE 14 Gumb FOLLOW ME 7 2 2 Prikazi na Zaslonu Sl 7 2 Pregled prikaza indikatora Leg...

Page 55: ...itisnite kra e od 2 sekunde za uklju ivanje zaslona unutarnje jedinice Za ponovno isklju ivanje zaslona ponovno pritisnite tipku LIGHT LOCK svjetlo blokada kra e od 2 sekunde 7 4 Povezivanje Isklju iv...

Page 56: ...Uklju ite jedinicu i u inite sljede e vidi poglavlje 7 4 Pritisnite gumb MODE Na in rada Prikazani su razli iti na ini rada Sl 7 6 Na ini rada Odaberite radni na in hla enja COOL Pritisnite gumbe TEMP...

Page 57: ...E Na in rada Prikazani su razli iti na ini rada Sl 7 9 Na ini rada Odaberite na in odvla ivanja DRY Pritisnite gumbe TEMP TIME kako biste odabrali postavke temperature Pritiskivanjem gumba TEMP TIME t...

Page 58: ...tora Legenda 1 Gumb MODE NA IN RADA 2 Indikator za na in FAN VENTILATOR 3 Gumb FAN VENTILATOR Aktiviranje na ina rada s ventilatorom FAN Uklju ite jedinicu i u inite sljede e vidi poglavlje 7 4 Pritis...

Page 59: ...a ini rada Sl 7 16 Na ini rada Odaberite radni na in grijanja HEAT Pritisnite gumbe TEMP TIME kako biste odabrali postavke temperature Pritiskivanjem gumba TEMP TIME temperatura e se smanjivati i pove...

Page 60: ...gumb SWING VERTICAL kako biste usmjerili protok zraka prema gore ili dolje Prilikom svakog pritiska usmjeriva zraka zakrenut e se za 6 stupnjeva Pritisnom ove tipke na 3 sekunde okomiti protok zraka...

Page 61: ...tura e porasti 1 C iznad namje tene temperature Nakon isteka jednog sata temperatura e porasti za jo 1 C Jedinica mo e raditi 7 sata prije prekida rada U Na inu Rada HEAT Temperatura okoline se smanju...

Page 62: ...ati Kako biste programirali uklju ivanje isklju ivanje ili obrnuto jedinice pa ljivo izvr ite prethodno navedene korake Kada priti ete gumbe TEMP TIME pode eno vrijeme e porasti ili se smanjiti za 10...

Page 63: ...cije FOLLOW ME Za aktiviranje funkcije FOLLOW ME slijedi me Pritisnite tipku FOLLOW ME Kad je aktivirana zaslon na daljinskom upravlja u prikazuje temperaturu na mjestu gdje se upravlja nalazi Daljins...

Page 64: ...de Ovu funkciju koristite samo kad je daljinski upravlja slomljen ili zagubljen Za aktiviranje Pritisnite prekida za upravljanje u slu aju nu de Visoki kratki zvu ni signal ozna ava da je funkcija st...

Page 65: ...Grijanje esto je u ku i zagrijana samo jedna prostorija Uz povr ine koje ome uju ovo podru je tj zidovi vrata prozori strop i pod susjedne prostorije su tako er zagrijane nekontrolirano toplinska ener...

Page 66: ...mogu e uklonite izvor topline Termostat je namje ten a previsoku temperaturu u na inu hla enja ili prenisku u na inu grijanja Pravilno podesite temperaturu Prepreka pred ulaznim ili izlaznim otvorom z...

Page 67: ...sredi nje plo e sve dok se ne oslobodi iz zaustavlja a i izvadite filtere prema dolje Uporabom usisiva a ili hladne vode uklonite pra inu ili ne isto e iz filtera Pobrinite se da se filteri u potpuno...

Page 68: ...materijalne tete Kada proizvod stavljate van pogona svakako se pobrinite za sve mjere predostro nosti To mo ete posti i pra enjem koraka opisanih u Uputama za instalaciju u obratnom redoslijedu i kori...

Page 69: ...Per l utente Manuale d uso Climatizzatore climaVAIR Split murale IT VAI2 VAM2...

Page 70: ...stazione della Direzione del Flusso d aria 14 7 6 1 Flusso d aria Verticale 14 7 7 Selezione delle Funzioni Speciali 14 7 7 1 Ionizzazione per il Benessere ION 14 7 7 2 Funzione SLEEP 15 7 7 3 Funzion...

Page 71: ...ta la durata utile dell unit Nota Le informazioni relative a questa unit si dividono in due manuali il manuale di installazione e il manuale d uso Nota L impianto contiene refrigerante R 410A Non imme...

Page 72: ...ne del marchio CE 5 Descrizione dell unit L unit composta dai seguenti elementi Unit esterna Unit interna Telecomando Collegamenti e condotti Accessori In Figura 5 1 sono indicati i componenti dell un...

Page 73: ...elimina gli odori e mantiene fresco l ambiente Il filtro se esposto al sole rigenera le sue propriet antiodore Filtro antibatterico Filtro con propriet antiallergiche e antibatteriche utilizzato per...

Page 74: ...tore non viene utilizzato a lungo Se sul dispIaycompare ancora qualche messaggio premere il pulsante reset Rimuovere le batterie se il climatizzatore non viene utilizzato a lungo Se sul dispIay compar...

Page 75: ...ia il trattamento superficiale Se il refrigerante fuoriesce penetrando negli occhi pu causare gravi lesioni oculari Non interrompere il funzionamento del climatizzatore tirando il cavo Pericolo di les...

Page 76: ...Pulsante TIMER 9 Pulsante ION 10 Pulsante DEL 11 Pulsante FAN 12 Pulsante TURBO FP 13 Pulsante LIGHT LOCK 14 Pulsante FOLLOW ME 7 2 2 Indicatori Display Fig 7 2 Panoramica degli indicatori Legenda 1...

Page 77: ...GHT LOCK per meno di 2 secondi per attivare la funzione LIGHT Il display dell unit interna viene spento Per riaccendere il display premere nuovamente il bottone LIGHT per meno di 2 secondi 7 4 Accensi...

Page 78: ...dalit Con l unit accesa vedere sezione 7 4 Premere il pulsante MODE Vengono visualizzate le diverse modalit operative Fig 7 6 Modalit operative Selezionare la modalit operativa Raffreddamento COOL Pre...

Page 79: ...e modalit operative Fig 7 9 Modalit operative Selezionare la modalit operativa DRY Premere i pulsanti TEMP TIME per selezionare l impostazione della temperatura Premendo i pulsanti TEMP TIME l imposta...

Page 80: ...alit Fan Legenda 1 Pulsante MODE 2 Indicatore della modalit FAN 3 Pulsante FAN Per attivare la modalit Fan FAN Con l unit accesa vedere sezione 7 4 Premere il pulsante MODE Vengono visualizzate le div...

Page 81: ...16 Modalit operative Selezionare la modalit operativa Riscaldamento HEAT Premere i pulsanti TEMP TIME per selezionare l impostazione della temperatura Premendo i pulsanti TEMP TIME l impostazione del...

Page 82: ...to o in basso Premendo una volta questo pulsante il deflettore dell aria gira di 6 Se si preme questo bottone per 3 secondi il flusso verticale dell aria entra in modo automatico 7 7 Selezione di Funz...

Page 83: ...te salir di 1 C rispetto alla temperatura impostata Dopo un ora la temperatura salir ulteriormente di 1 C L unit rimane attiva per 7 ore prima di arrestarsi In modalit HEAT La temperatura ambiente dim...

Page 84: ...ento scollegamento o viceversa dell unit compiere i passaggi descritti sopra in successione Premendo i pulsanti TEMP TIME l impostazione dell ora aumenter o diminuir di 10 minutI Tenendo premuti i pul...

Page 85: ...FOLLOW ME 2 Indicazione FOLLOW ME Per attivare questa modalit Premere il pulsante FOLLOW ME Quando attiva il dis play del telecomando mostra la temperatura del punto in cui si trova Il telecomando in...

Page 86: ...7 9 Funzionamento d emergenza Utilizzare questa funzione solo quando il telecomando rotto o stato piazzato in modo erroneo Per attivare Premere l interruttore di funzionamento d emergenza Si sentir un...

Page 87: ...o della casa riscaldata solo una stanza Oltre alle superfici di delimitazione delle stanze ad esempio pareti porte finestre soffitti e pavimenti anche le stanze adiacenti vengono riscaldate incontroll...

Page 88: ...nto o eccessivamente bassa in modalit Riscaldamento Impostare correttamente la temperatura Vi un ostacolo di fronte agli sfiati dell aria Rimuovere l ostacolo per consentire all aria di circolare adeg...

Page 89: ...inch si sar staccata dal fermo e togliere il filtro dal basso Pulire il filtro rimuovendo la polvere o le impurit presenti per mezzo di un aspirapolvere o pulire i filtri con acqua fredda Assicurarsi...

Page 90: ...nel manuale di installazione e utilizzare gli strumenti e i mezzi di protezione necessari Assicurarsi che lo smontaggio sia eseguito da tecnici qualificati ed appositamente addestrati Avvertenza Lo s...

Page 91: ...Kullan c i in Kullan m K lavuzu Klima climaVAIR Split Tipi TR VAI2 VAM2...

Page 92: ...5 Is tma Modu HEAT 13 7 6 Hava Ak m Y n n Ayarlama 14 7 6 1 D ey Hava Ak m 14 7 7 zel Fonksiyon Se imi 14 7 7 1 Sa l k Negatif yon lemi ION 14 7 7 2 SLEEP Fonksiyonu 15 7 7 3 TIMER ON OFF Fonksiyonu K...

Page 93: ...tfen klimay kullanmadan nce kullanma k lavuzunu dikkatle okuyun Not K lavuzlar kliman n servis mr boyunca saklay n Not Bu klimaya ili kin bilgiler iki k lavuza b l nm t r montaj k lavuzu ve kullanma k...

Page 94: ...tir 5 Kliman n Tarifi Klima a a daki elerden olu maktad r D nite nite Uzaktan kumanda Ba lant lar ve kanallar Aksesuarlar ekil 5 1 klima bile enlerini g stermektedir ekil 5 1 Klima bile enleri Lejant...

Page 95: ...ederek ve temiz bir hava sa layarak zararl gazlar analiz eder ve temizler Bu filtrenin g ne e maruz kalmas anti koku kapasitesini yeniden olu turur Anti bakteriyel filtre Atmosferi temiz ve sa l kl tu...

Page 96: ...lima nitesinin uzun bir s re kullan mda olmamas durumunda bataryalar kar n E er hala g stergede herhangi bir ey varsa sadece reset butonuna bas n Klima nitesinin uzun bir s re kullan mda olmamas durum...

Page 97: ...zerek veya d nd rerek ya da y zeyi kaz yarak zarar vermeyin E er d ar gaz s zarsa ve g z n ze zarar verirse ciddi g z hasarlar na sebep verebilir Klima nitesinin i lemini kordonu ekerek b lmeyin Yaral...

Page 98: ...onu SAAT 8 TIMER butonu KRONOMETRE 9 ION butonu 10 DEL butonu 11 FAN butonu 12 TURBO FP butonu 13 LIGHT LOCK butonu AYDINLATMA K L T 14 FOLLOW ME butonu 7 2 2 Ekran G stergeleri ekil 7 2 G stergelere...

Page 99: ...2 LIGHT fonksiyonu Dahili Birimin g stergesini ayd nlatmak i in 2 saniyeden daha k sa s reyle I IK K L T d mesine bas n z G stergeyi yeniden kapatmak i in ise 2 saniyeden daha k sa s reyle I IK K L T...

Page 100: ...ktif hale getirmek i in Klima a kken bak n z b l m 7 4 MODE MOD butonuna bas n Farkl al t rma modlar ekrana gelir ekil 7 6 letim modlar So utma al t rma modunu COOL se in S cakl k ayar n se mek i in T...

Page 101: ...t rma modlar ekrana gelir ekil 7 9 letim modlar Rutubet giderme modunu DRY se in S cakl k ayar n se mek i in TEMP TIME butonlar na bas n TEMP TIME butonlar na bas ld nda s cakl k konfig rasyonu 1 C i...

Page 102: ...r ekil 7 12 Fan se im modu Lejant 1 MODE MOD butonu 2 FAN modu g stergesi 3 FAN butonu Fan modunu FAN aktif hale getirmek i in Klima a kken bak n z b l m 7 4 MODE MOD butonuna bas n Farkl al t rma mod...

Page 103: ...modlar ekrana gelir ekil 7 16 letim modlar Is tma al t rma modunu HEAT se in S cakl k ayar n se mek i in TEMP TIME butonlar na bas n TEMP TIME butonlar na bas ld nda s cakl k konfig rasyonu 1 C ile ar...

Page 104: ...i in SWING VERTICAL butonuna bas n Bast ktan sonra hava deflekt r her seferinde 6 dere ce d necektir Bu d meye 3 saniye s reyle bas ld nda dikey hava ak OTOMAT K moda girer 7 7 zel Fonksiyon Se imi 7...

Page 105: ...s cakl konfig re edilen s cakl n 1 C zerine kacakt r Bir saat ge tikten sonra s cakl k 1 C daha artacakt r Klima durmadan nce 7 saat i in al r durumda olur HEAT modunda S cakl n uyku saatleri s ras nd...

Page 106: ...lant kesmesini ya da tersini programlamak i in nceki ad mlar s rayla yerine getirin TEMP TIME butonlar na basarken saat konfig rasyonu 10 dakika artacak veya azalacakt r E er TEMP TIME butonlar na ba...

Page 107: ...mi Lejant 1 FOLLOW ME butonu 2 FOLLOW ME fonksiyon g stergesi FOLLOW ME BEN ZLE i levini etkinle tirmek i in FOLLOW ME d mesine bas n z Etkinle tirildi inde uzaktan kumanda g stergesi ger ek s cakl k...

Page 108: ...s Bu i levi sadece uzaktan denetleyici bozuldu unda ya da olmad nda kullan n Etkinle tirmek i in Acil durum al t rma anahtar na bas n levin al t r ld n g stermek zere bir bipleme sesi duyulur ekil 7 2...

Page 109: ...a s t l r Bu alan n s n rlar n yok eden y zeylere ilaveten yani duvarlar kap lar pencereler tavan ve d eme kom u odalar da kontrols z olarak s t l r termal enerji istem d kaybedilir Bu nedenle oday ye...

Page 110: ...t ok y ksek bir de ere so utma veya ok d k bir de ere s tma ayarlanm t r S cakl do ru bi imde ayarlay n Hava giri i veya k n nde engel Havan n d zg n bi imde sirk le olmas i in engeli kald r n Ortam s...

Page 111: ...filtreyi a a ya do ru kar n Vakumlu bir temizleyici kullanarak veya so uk su ile temizleyerek filtrelerdeki toz ve kiri kar n Temizlemenin tamamlanmas ndan sonra filtrenin niteye tekrar tak lmas ndan...

Page 112: ...li tedbirlerin al nd ndan emin olun Bunu yapmak i in montaj k lavuzunda tarif edilen ad mlar ters s ra ile takip edin ve gerekli aletler ile koruma kaynaklar kullan n S k m n kalifiye teknik olarak ye...

Page 113: ...Notes Split Type User Manual 23...

Page 114: ...Notes Split Type User Manual 24...

Page 115: ...r Vaillant si riserva il diritto di apportare modifiche senza preavviso Vaillant pridr ava pravo na izmjene bez najave Vaillant reserves the right to add modifications without prior notice Vaillant be...

Page 116: ...t de Vaillant GmBH Predstavnistvo u RH Ul Planinska 11 10000 Zagreb Hrvatska Tel 01 61 88 670 61 88 671 Telefax 0 21 931 18 28 10 www vaillant de info vaillant de Vaillant GmbH Berghauser Str 40 Remsc...

Reviews: