background image

Technical data

20

ecoLEVEL installation and maintenance instructions  0020029316_01 

12

12 Technical 

data

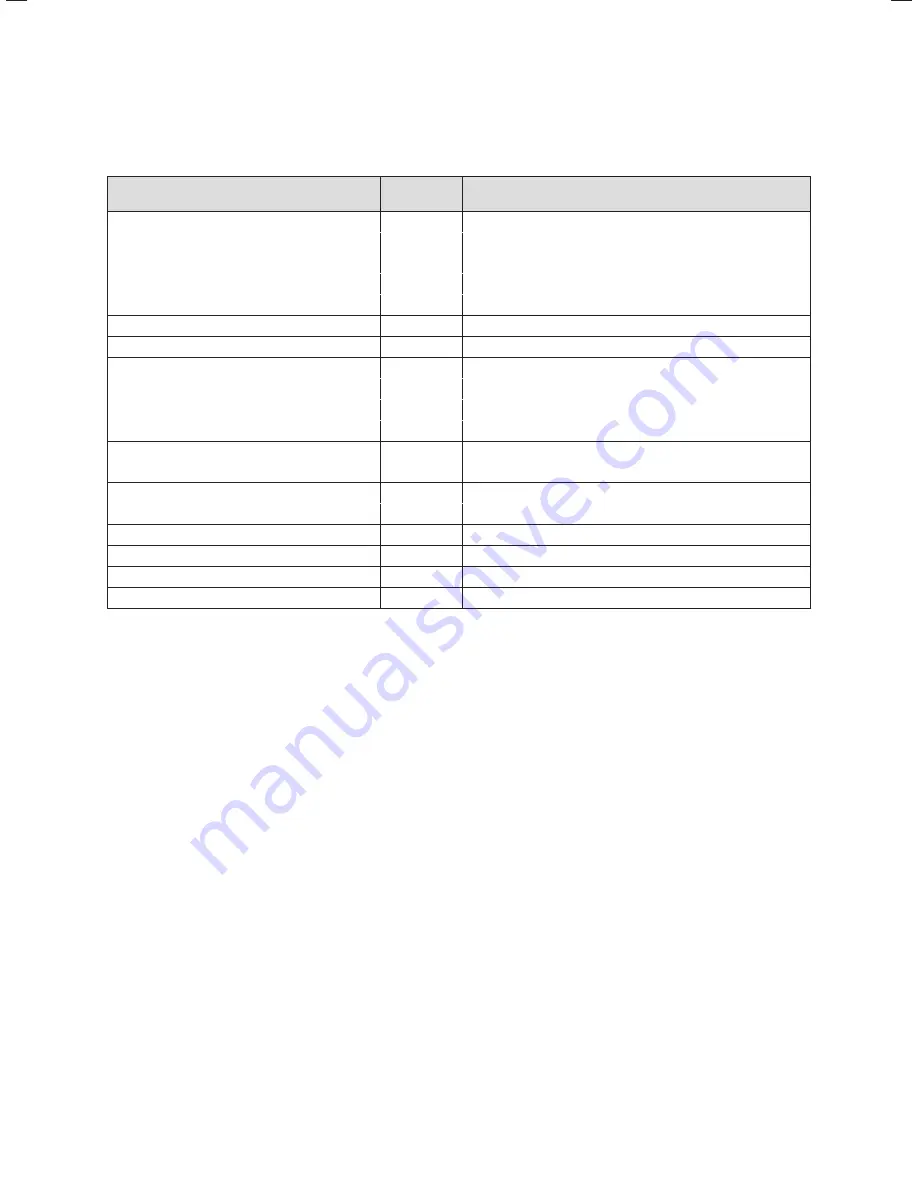
Technical data

Units

ecoLEVEL

Design

Appliance for wall-mounted installation

Nominal capacity

l

0.5

Supply voltage

V

230

Max. current consumption

A

1

Frequency

Hz

50

Max. nominal output

W

25

Max. feed height

m

4

Dimensions Height

mm

150

  Width

mm

175

  Depth

mm

100

Weight when filled with water

kg

1.8

Inlet hose (max. outside diameter)

mm

24

Drain hose (min. inner diameter)

mm

10

Water inlet temperature

°C

1 - 60

Ambient temperature

°C

5 - 60

Safety

Radio-shielded, non-interacting with the mains supply

Safety cut-out switch

5 mA - 4 A; 230 V

Level of protection in accordance with EN 60529

IP 44

Approved for individual units

kW

up to 45 

12.1 Technical data

Summary of Contents for ecoLEVEL

Page 1: ...Installation and maintenance instructions For the competent person GB IE Installation and maintenance instructions ecoLEVEL Condensed water pump ...

Page 2: ...g and positioning the drain hose 9 4 4 Connecting the drain hose to the existing discharge pipe 10 4 5 Connecting the condensed water pump to the boiler 11 5 Electrical connection 12 5 1 Overview of the electrical connections 12 5 2 Preparing the electrical connection 12 5 3 Connecting the condensed water pump to the 230 V mains voltage 12 5 4 Connecting the condensed water pump to the safety cut ...

Page 3: ...e ecoLEVEL condensed water pump 2 Safety information and regulations Classification of warnings The warnings are classified in accordance with the severity of the possible danger using the following warning signs and signal words Warning symbol Signal word Explanation a Danger Imminent danger to life or risk of severe personal injury e Danger Risk of death from electric shock a Warning Risk of min...

Page 4: ...n components must inevita bly be under dangerous voltages which can lead to severe bodily injury or to death If measurements need to be made with the power supply switched on never touch the electrical connections Remove all jewellery from wrists and fingers Make sure that the test equipment is in a good safe operating condition When working on the unit when it is switched on ensure that it is sta...

Page 5: ...nnection Make sure that the power supply is earthed in accordance with legal requirements Regulations and standards IEC 60364 7 712 Electrical installations of buildings Part 7 712 EMC test procedure in accordance with EN 50081 1 1992 EN 50082 1 1997 Interference emission EN 55014 1 1993 Immunity EN 55014 2 1997 Rules of engineering The installation must suit the conditions at the site of the cust...

Page 6: ...erial 1 10 Inlet hose dia 24 mm x 1 15 m 1 Wall bracket for drain hose 6 3 1 Scope of delivery 3 2 Required tools The following tools are required for installation Drill Drill bit 6 mm Flat blade screwdriver Spirit level Cutting blade Tools for electrical connection 3 3 Selecting the installation site The ecoLEVEL condensed water pump is designed for installation in the room housing the boiler The...

Page 7: ...and installation clearances During installation adhere to the appropriate dimensions and installation clearances 3 5 Installing the wall bracket A B 3 3 Installing the wall bracket Push the pre assembled wall bracket downwards out of the casing for the condensed water pump Install the wall bracket in a suitable position underneath the condensate drain point of the boiler The wall bracket must be i...

Page 8: ...over b Caution Material damage If the inlet hose is not connected correctly the condensed water cannot flow freely into the pump Route the inlet hose at a constant down ward gradient from the boiler to the ecoLEVEL condensed water pump Lay the inlet hose as straight as possible avoiding any bends or kinks 4 1 Removing the ecoLEVEL 1 3 5 4 2 4 1 Removing the non return valve and cover and installin...

Page 9: ...vel Note that the hoses must be pushed no more than 3 notches into the inlet openings 3 and 4 Replacing the cover Place the cover onto the ecoLEVEL condensed water pump from above 4 3 Connecting and positioning the drain hose Connecting the drain hose Push the drain hose fig 3 1 item 5 onto the removed non return valve fig 3 3 item 1 until it stops Insert the non return valve into the cover and lo...

Page 10: ...he existing discharge pipe i Note If a 21 5 mm discharge pipe is already present you can use the supplied pipe connecting ele ments 1 4 3 Drain hose and stainless steel pipe insert not installed Shorten the end of the drain hose 1 For this ensure that the cut on the hose is at a right angle and is free from burrs fig 4 3 1 2 4 4 Drain hose and stainless steel pipe insert installed Hold the cut end...

Page 11: ...tion 2 and the coupling piece 3 together fig 4 6 4 5 Connecting the condensed water pump to the boiler The ecoLEVEL condensed water pump can be connected to the siphon of all Vaillant condensing boilers using the inlet hose provided If the boiler s condensed water drain hose is long enough it can be connected directly to the pump fig 4 1 fig 4 2 If the boiler hose is too short replace it with the ...

Page 12: ...can be connected 2 Main line from ecoLEVEL 3 Connection cable for the safety cut out switch with Pro E plug and X 40 plug The 230 V connection cable 1 with the free cable end pro vides the power supply to the pump The connection cable of the safety cut out switch 3 is used for the electrical connection of the safety cut out switch to the boiler 5 2 Preparing the electrical connection Before you es...

Page 13: ...witch to the extra low voltage circuit of the boiler using variants I II or III 1 Anl Therm 24V RT BUS Burner off 24V RT BUS 2 2 5 2 Connecting the safety cut out switch connection type A Variants I and II Open the electronics box on the boiler On the boiler PCB remove the plug from the blue socket which is labelled as either Anl Therm I or Burner off B Off II 1 Instead plug the Pro E plug on the ...

Page 14: ...pied If this is the case connect the safety cut out switch as follows Insert the plug in the connection X40B of the multi func tional module 2 of 7 Also refer to the instructions for the multi functional module If a flue non return flap is connected to the multi functional module 2 in 7 and you want to use the function of the flue non return flap you must not use the X40B connection In this case u...

Page 15: ...e maximum permitted value The safety cut out switch is triggered if this condition is prolonged If a connection between the safety cut out switch and the boiler has been installed the boiler is switched off Switching off prevents further con densed water from form ing 4 Flashes green Flashes red The pump is at rest for a defined time period and then starts up again on its own 5 Flashes green Flash...

Page 16: ...our unit To eliminate the fault refer to the installation instruc tions for your boiler or system Connection for safety cut out switch Message if fault occurs Connection type A Status message on unit display S 39 Connection type B Status message on unit display S 42 approx 15 min fault message F 77 6 3 Fault messages divided according to the connection type 7 Handing over to the operator The opera...

Page 17: ...e In doing so protect against leaking condensed water For more information see the Safety section section 2 Remove the non return valve 1 from the pump cover by turning it anti clockwise 1 4 3 2 3 8 2 Removing the sealing insert Removing the sealing insert from the non return valve Proceed carefully when removing the sealing insert Ensure that the sealing insert is not damaged To remove the sealin...

Page 18: ...or cleaning agents which could damage the plastic casing Reassemble the unit Place the O ring 2 onto the internal component 1 as shown Place the internal component 1 back into the conden sate vessel Ensure that the clips click into place Replace the pump cover on the unit 9 Spare parts Procuring spare parts The original components of the unit were also certified as part of the CE declaration of co...

Page 19: ...priate service agreement Terms and conditions do apply to the guarantee details of which can be found on the registration card included with this appliance In order to qualify for guarantee after one year the appliance must be serviced in accordance with our installation manual servicing instructions The benchmark service history should be completed Note all costs associated with this service are ...

Page 20: ... nominal output W 25 Max feed height m 4 Dimensions Height mm 150 Width mm 175 Depth mm 100 Weight when filled with water kg 1 8 Inlet hose max outside diameter mm 24 Drain hose min inner diameter mm 10 Water inlet temperature C 1 60 Ambient temperature C 5 60 Safety Radio shielded non interacting with the mains supply Safety cut out switch 5 mA 4 A 230 V Level of protection in accordance with EN ...

Page 21: ......

Page 22: ......

Page 23: ......

Page 24: ...0020029316_01 GBIE 102012 Subject to change Manufacturer Supplier ...

Reviews: