6 Start-up
26
Installation and maintenance instructions 0020237953_00
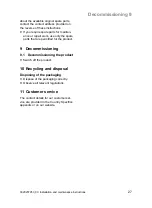
5.4.1 Connecting the power supply
~
N
L
Ls
~
N
L
Ls
L
N
L
N
2
1
A
B
1. Connect the power supply as follows.
Conditions
: Automatic mode
▶
Connect L and N
(1)
.
Conditions
: Manual mode
▶
Connect L, N and Ls
(2)
.
2. Secure the two screws for the strain
relief.
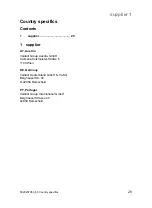
5.4.2 Setting the timer for the
overrun time and air humidity
15´
T
2´
25´
65
HT
90
40
1. Set the timer for the overrun time.
–
Adjustable overrun time:
2
–
25 minutes
2. Set the air humidity.
–
Factory-set air humidity: 65%
–
Adjustable air humidity: 40-90%
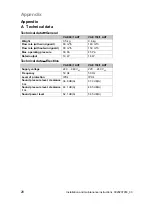
5.5 Fitting the front panel
▶
Fit the front panel.
6 Start-up
6.1 Switching on the product
▶
Switch on the power supply.
7 Troubleshooting
Conditions
: The product does not work
▶
Switch off the power supply.
▶
Ensure that the threaded connection
contact has been established.
8 Maintenance
Regular product maintenance is not re-
quired.
8.1 Procuring spare parts
The original components of the product
were also certified by the manufacturer as
part of the declaration of conformity. If you
use other, non-certified or unauthorised
parts during maintenance or repair work,
this may void the conformity of the product
and it will therefore no longer comply with
the applicable standards.
We strongly recommend that you use ori-
ginal spare parts from the manufacturer as
this guarantees fault-free and safe opera-
tion of the product. To receive information

