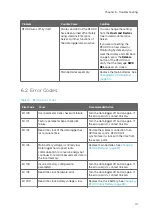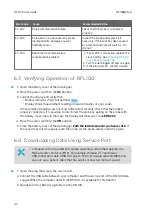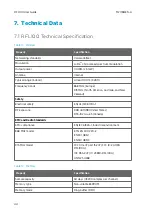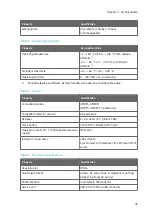
4. Remove the old AA size batteries from the data logger.
5. Check the battery orientation markings on the data logger and insert the new batteries in
the correct orientation.
6. Move the power switch to the
On
position.
7. Close the battery cover of the data logger.
Push the latch down until you hear a click.
If
the cover does not close easily, push the probe (or the probe cable) in and try again.
8. Insert the data logger back in the mounting bracket.
5.7 Changing RFL100 Clock Battery
• New 3 V lithium battery (type CR1/3N button cell)
• Small flat-head screwdriver
1. Open the battery cover of the data logger.
2. Use a small flat-head screwdriver to lift the top part of the small plastic cover marked
Clock battery (CR1/3N)
, and slide the cover upward until it comes loose.
3. Use the small screwdriver to lift the old clock battery from the battery socket.
4. Take the new clock battery and verify the + and - markings of the battery itself and the
clock battery socket. Insert the new clock battery in the clock battery socket.
5. Replace the clock battery cover.
6. Close the battery cover of the data logger.
Push the latch down until you hear a click.
If
the cover does not close easily, push the probe (or the probe cable) in and try again.
5.8 Updating RFL100 Firmware
Required:
• Computer with a free USB port and an operating system that supports the
Media Transfer Protocol (MTP). For example, Windows
â
7 and newer.
• USB connection cable (USB 2.0 Type A - Micro-B, Vaisala cable 244961). You
also can use a generic cable that has all pins connected (not just power).
• RFL100 firmware update file from Vaisala
Updating RFL100 firmware erases the recorded data on the device.
Before updating, verify from the viewLinc Enterprise Server that up-to-date data
from this device is available. You can also copy the data from the device; see
Downloading Data Using Service Port (page 42)
CAUTION!
RFL100 User Guide
M211861EN-A
38

