Appendix C
—
Glue-Pressure Software (Older Generation Controls)
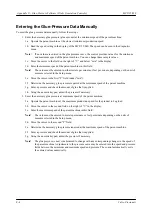
MCP-25/MS
Valco Cincinnati
C-6
Deleting a Current
Glue-Pressure Curve
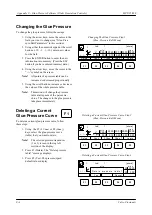
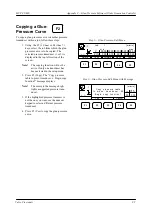
To delete a current glue-pressure curve, follow
these steps:
1. Using the F3 ( ) or F4 ( )
keys, select the glue-pressure curve
(table) that you want to delete.
Note!
The selected pressure-transducer
(1 or 2) is seen in the top left
section of the display.
2. Press F1 (Delete). The “Delete pressure
table?” message displays.
3. Press F2 (Yes). The pressure/speed
default values display.
F1
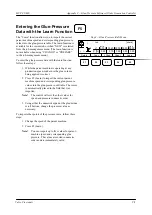
Changing the Glue Pressure
To change the glue pressure, follow these steps:
1. Using the arrow keys, move the cursor to the
field you want to change (see “Glue-Pres-
sure-Edit Parameters” in this section).
2. Using either the numeric keypad or the scroll
buttons (+10, +1, -1, -10), enter new values
for the field.
3. Press the ENTER button to enter the new
information into memory. (Press the ESC
button if you have entered incorrect data.)
4. Using the arrow keys, move the cursor to the
“+/-” symbol on the screen.
Note!
All points of a pressure table can be
increased or decreased proportionally.
5. Using the scroll buttons, increase or decrease
the values of the whole pressure table.
Note!
This action will change the pressure
table at all speeds of the parent ma-
chine. The changes to the glue pressure
take place immediately.
Job:
1
[m/min]
0000 0020 0300 0000 0000
+ / -
1
m i n.
ma x.
005 010 090 000 000
V
P [%]
F1
F2
F3
F4
F5
Changing The Glue Pressure, Step 1
(
Glue-Pressure-Edit Menu)
Deleting a Current Glue-Pressure Curve, Step 2
(
Glue-Pressure-Edit Menu)
Deleting a Current Glue-Pressure Curve, Step 3
D e l e t e p r e s s u r e t a b l e ?
Yes
Cancel
Job:
1
[m/min]
00 0000
+ / -
1
m i n.
max.
00 000
F1
F2
F3
F4
F5
Delete
Copy
Chan.
Chan.
+^
Learn
^ -
Chan. ^ -
+ Chan.
^
Job:
1
[m/min]
0000 0020 0300 0000 0000
+ / -
1
m i n.
ma x.
005 010 090 000 000
V
P [%]
F1
F2
F3
F4
F5
Delete
Copy
Chan.
Chan.
+^
Learn
^ -
Summary of Contents for MCP-25/MS
Page 1: ...MCP 25 MS Control Manual Number MC051 Release Date June 2004 ...
Page 25: ......
Page 27: ......
Page 28: ......
Page 29: ...3 4 5 1 2 2 4 5 3 1 ...
Page 30: ......
Page 31: ......
Page 33: ...4 8 12 11 10 9 6 7 5 3 2 1 ...
Page 34: ...3 7 9 10 8 5 6 4 1 2 1 4 3 2 ...
Page 35: ...1 3 4 2 ...
Page 36: ...7 9 10 8 3 5 6 4 1 2 ...
Page 37: ...SHD NPN 5 4 3 24V Low Level Detector 0V 1 2 ...
Page 38: ......
Page 39: ......
Page 40: ......
Page 41: ......
Page 42: ......
Page 43: ...3 4 5 6 2 3 1 5 6 4 1 2 ...
Page 44: ......
Page 45: ......
Page 46: ......
Page 47: ......
Page 48: ......
Page 49: ...RODUCT 7 10 9 8 3 5 6 4 1 2 8 10 9 2 5 7 6 3 4 1 ...
Page 50: ......
Page 51: ......
Page 52: ...6 8 10 9 7 1 3 5 4 2 ...
Page 53: ......
Page 54: ......
Page 55: ...6 8 10 9 7 1 3 5 4 2 ...
Page 56: ...VA LC O CI NCIN NA TI INC 513 87 4 6550 5 13 87 4 6550 VALC O C INCIN NATI INC ...
Page 57: ......
Page 58: ......
Page 59: ......
Page 60: ......
Page 61: ......
Page 62: ......
Page 87: ......
Page 99: ...F1 F2 F3 F4 F5 ...

