


Service manual
22
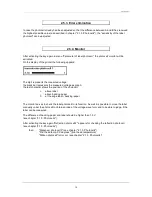
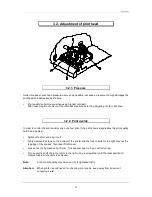
3.4. Exchange of pressure roll
Switch off machine and plug it out!
At first remove 2 screws on the bottom of the printer and the lock-in bolts for the right cover at the
top edge of the chassis, then take off left cover.
Take off small front panel (C) after removing the screws (D1, D2).
Lift print head bracket (B) with print head by turning the clamping lever (A) counter-clockwise.
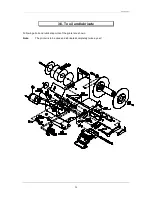
Loosen 2 locking screws (E1, E2) of the cogged belt drive.
Remove 2 safety washers (G1, G2) from the rolling shaft.
Press pressure roll (H) inwards and draw external ball bearing (I) off the rolling shaft.
Take pressure roll with inner ball bearing (J) off the drilling to the front, in doing so hold the
cogged belt drive (F).
It is advisable to clean ball bearing in dry cleaning solvent and then lubricate it anew!
Installation:
Installation of new roll and reinstallation of all component parts in opposite order.
Regard that locking screw (E1 or E2) meets milled surface of the roll.


