803
Thermo AC/DC
8 Repairs
8.3
Hood removal/installation
Removing the hood provides access to the following com-
ponents for maintenance, inspection and repair purposes:
–
Small distribution board (load contactor AC/DC)
–
Heating cartridges
–
HVIL contact
Removal
1. Establish voltage-free state of the heater and secure
it for duration of the work (
Observe
!
).
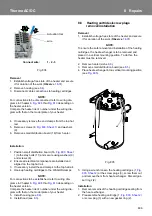
2. Loosen screws (2,
NOTE:
The screws remain in the hood.
3. Remove hood (1) with stabilizer (3) from heater.
Installation
1. Place stabilizer (3,
) onto the small
distribution board (16).
2. Place hood (1) in assembly position, turn in the
screws (2) and tighten them.
3. Restore power supply.
4. Perform functional test.
8.4
Housing removal/installation (incl.
cable connections)
Removal
1. Disconnect all cables from the vehicle electrical sys-
tem to the heater.
2. Remove hood (see
3. Disconnect cables connected to the small distribution
board (16,
) by loosening the appro-
priate connections.
NOTE:
For connections to be disconnected, refer to wiring
diagrams in Chapter
thru
depending
on the heater version.
Compare the heater ident. number under the wiring dia-
gram with that on the model plate of your heater.
4. Remove the cable ties that bundle the single cables.
5. Disconnect temperature guards plug (8,
) from connection piece (13,
).
6. Loosen grounding screw (15) and remove it with
washer (14) and vehicle grounding cable lug.
7. Remove nuts (6) and washers (7).
NOTE:
During the next step pay attention that the cables are not
jammed or are still connected. “Danger of damage“.
8. Remove housing from heater.
Installation
1. Position housing over the small distribution board onto
the heater and then secure it using screws (6,
) and washers (7).
2. Screw grounding screw (15) with washer (14) and
vehicle grounding cable lug into the housing (17) and
tighten as required.
3. Install connection piece (13) of temperature guards
onto the housing (17) if necessary.
4. Plug the temperature guards plug (8,
) into the connection piece (13) of temperature
guards (note the snap-in noise).
5. Hook-up the supply cables to the corresponding ter-
minals of the small distribution board (16,
) and tighten screws as required.
NOTE:
For connections to be established, refer to wiring dia-
grams in Chapter
depending on
the heater version.
Compare the heater ident. number under the wiring dia-
gram with that on the model plate of your heater.
6. Check the wiring again using the wiring diagram (see
chapter
).
7. Bundle single wires using cable ties.
8. Install hood (see
9. Connect all supply cables to the vehicle electrical sys-
tem, fix them if required.
8.5
Small distribution board removal/
installation
NOTE:
For loosening and connecting of cables to WAGO®
terminals a special actuation tool is required. Learn more
on the manufacturer's website regarding its proper hand-
ling.
Fig. 802
1 3
2
Loosen wire: 1 - 2 - 3
Actuation tool
Wire
Summary of Contents for Thermo AC 070
Page 47: ...memos...


