806
Thermo AC/DC
8 Repairs
Removal
1. Establish voltage-free state of the heater and secure
it for duration of the work (
Observ
).
2. Remove housing (see
3. Disconnect cable connections to heating cartridges.
NOTE:
For connections to be disconnected, refer to wiring dia-
grams in Chapter
thru
depending on
the heater version.
Compare the heater ident. number under the wiring dia-
gram with that on the model plate of your heater.
4. If necessary remove the end clamps from the top hat
rail.
5. Remove screws (8,
) and washers
(9).
6. Remove small distribution board (16) from heater.
Installation
1. Position small distribution board (16,
) to the stay bolts (11) and secure using washers (9)
and screws (8).
2. Ensure all electrical components are installed and
aligned on the top hat rail.
3. If necessary install the end clamps to the top hat rail.
4. Hook-up heating cartridges to the WAGO® clamps.
NOTE:
For connections to be established, refer to wiring dia-
grams in Chapter
thru
depending on
the heater version.
Compare the heater ident. number under the wiring dia-
gram with that on the model plate of your heater.
5. Install housing (see
6. Install hood (see
8.6
Heating cartrides/screw plugs
removal/installation
Removal
1. Establish voltage-free state of the heater and secure
it for duration of the work (
Observe
!
)
NOTE:
To ensure the safe removal and installation of the heating
cartridges, the heat exchanger is to be removed and
placed in a vertical mounting position. To do this, the
heater must be removed.
).
3. Remove small distribution board (see
).
4. Place heat exchanger into a vertical mounting position
(see
).
5. Using a wrench loosen the heating cartridges (1,
) or the screw plugs (3), screw them out
and remove them from heat exchanger. Discard gas-
ket rings (2).
Installation
1. Remove remains of the heating cartridge sealing from
the heat exchanger.
2. Preassemble heating cartridge (1,
or screw plug (3) with a new gasket ring (2).
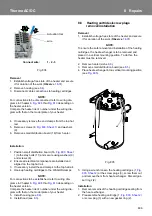
Fig. 804
1 3
2
Connect wire:
1 - 2 - 3
Actuation tool
wire
Fig. 805
Summary of Contents for Thermo AC 070
Page 47: ...memos...


