background image


8.Извадете ключалката на сменяемия резервоар и го изпразнете. 
9.Поставете резервоара обратно и го затворете. 

Поддръжка 

15.Изключете уреда. 
16.Освободете  приставката с гумената чистачка  и я  извадете  от смукателната глава. След 
това освободете смукателната глава. 
17.Почиствайте смукателната  глава  и  приставката с гумени  чистачки  под течаща вода. Не 
измивайте ги в течаща вода. 
Внимание: Основният уред съдържа електрически компоненти. Не го почиствайте под 
течаща вода. 

18.Извадете резервоара. Завъртете ключалката и го издърпайте. 
19.Изпразнете резервоара и изплакнете с чиста вода. Затворете резервоара отново. 
20.Издърпайте  подложката  от  микрофибър  от  бутилката  за  пулверизиране  и  я  почистете 
под  течаща  вода.  Микрофибърната  подложка  може  да  се  почиства  в  пералня,  но  не 
използвайте омекотител за тъкани. 
21.Оставете уреда да изсъхне, преди да заредите батерията, и да го съхранявайте на сухо 
място.


Отстраняване на проблеми 

Бутилката за пулверизиране не работи 

Заредете препарата. 

Ако механизмът на помпата в бутилката за пулверизиране е дефектен, свържете се с 
дилъра. 


Summary of Contents for PREMIUM 050312W36V

Page 1: ...struction is issued by the manufacturer INTRADE LINE LTD with address NINGBO SHI JIANGBEI QU HONGTANG YAO JIANG XINDU 10 LOU 1001 1 ZHEJIANG CHINAImporter for Bulgaria VALERII S M GROUP AD Sofia 44 Botevgradsko shose blvdTel 02 942 34 00 Fax 359 2 942 34 40 www valerii com ...

Page 2: ...h the device Do not obstruct or place into the air vents Do not spray directly on equipment containing electrical components Do not insert conductive objects such as screwdriver or similar into the charge plug The voltage indicated on the rating plate must correspond to the supply voltage The charge must be used and stored in a dry area Never touch the main plug with wet hands Use this battery ope...

Page 3: ......

Page 4: ...per attachment and fill it with detergent 3 Attach the pad holder Remove the spray head from the spray bottle Attach the micro fibre pad to the spray head Secure the micro fibre pad to the spray head with the ring clamp Charging the battery 1 Insert the charger into a proper socket 2 Insert the charging cable plug to the back of the appliance Note During the charging process the charge operating d...

Page 5: ... light up 3 Maneuver the appliance from top to bottom or sideways to vacuum up the detergent Note Switch the appliance off after each cleaned surface This will increase your operating time per battery charge If the battery is losing power the display light is blinking recharge the battery Cleaning without the spray bottle 1 Apply the detergent to loosen the dirt 2 Switch the appliance on The charg...

Page 6: ...bber wiper blades under running water Do not wash in dishwater Caution The basic appliance contains electrical components Do not clean this under running water 4 Remove the tank Rotate the lock and pull out 5 Empty the tank and rinse with clear water Close the tank again 6 Pull the micro fibre pad off the spray bottle and dean under running water The micro fibre pad can be deaned in a washing mach...

Page 7: ...king return to supplier Not cleaning properly Clean the rubber wiper blades Reverse the used rubber wiper blades Pull the blades out of the housing Moisten with water or detergent Reverse the rubber blades and reinstall Replace the rubber wiper blades once worn out If water is leaking from suction head empty the water tank Warning ...

Page 8: ...Do not open the battery as it may cause an electrical short or release Do not expose the battery directly to heat fire or sunlight ...

Page 9: ...i de utilizare sunt emise de către producător INTRADE LINE LTD Adderss NINGBO SHI JIANGBEI QU HONGTANG YAO JIANG XINDU 10 LOU 1001 1 ZHEJIANG CHINA Importator pentru Bulgaria VALERII S i M GRUP AD Sofia bul Botevgradsko shose 44 Tel 02 942 34 00 Fax 359 2 942 34 40 www valerii com Destinație ...

Page 10: ...obiecte în orificiile de ventilație Nu pulverizați direct pe echipamente care conțin componente electrice Nu introduceți obiecte conductive cum ar fi o șurubelniță sau ceva similar în încărcător Tensiunea indicată pe plăcuța cu date trebuie să corespundă tensiunii de alimentare Încărcătorul trebuie utilizat și depozitat într un loc uscat Nu atingeți niciodată ștecărul principal cu mâinile ude Util...

Page 11: ...1 Lame de cauciuc 8 Conector pentru dispozitivul de încărcare 2 Cap de aspirație 9 Mânerul plăcii 3 Buton de oprire 10 Părghie de pulverizare 4 Comutator de pornire oprire 11 Capacul buteliei ...

Page 12: ...nerul plăcii Scoateți pulverizatorul din butelia de pulverizare Atașați placa de microfibră la capul de pulverizare Atașați placa de microfibră la pulverizatorul cu scoabă în forma de inel Încărcarea bateriei 1 Introduceți încărcătorul într o priză potrivită 2 Introduceți ștecherul cablului de încărcare pe partea din spate a aparatului Notă În timpul procesului de încărcare display ul de încărcare...

Page 13: ...l după fiecare suprafață curățată Acest lucru va crește durata de viață a bateriei Dacă bateria își pierde încărcarea indicatorul de pe display clipește încărcați bateria din nou Curățare fără butelia de pulverizare 4 Aplicați preparatul de îndepărtare a murdăriei 5 Porniți dispozitivul Indicatorul de încărcare funcționare este afișat 6 Deplasați aparatul de sus în jos sau lateral pentru a îndepăr...

Page 14: ...cu apă curată Închideți rezervorul din nou 13 Trageți placa din microfibră din butelia de pulverizare și o curățați sub apă curentă Placa din microfibră poate fi curățată într o mașină de spălat dar nu folosiți un balsam de rufe 14 Lăsați aparatul să se usuce înainte de încărcarea bateriei și depozitarea acestuia într un loc uscat Îndepărtarea problemelor Butelia de pulverizare nu funcționează Înc...

Page 15: ...in carcasă Umeziți le cu apă sau preparat Răsturnați lamele de cauciuc și le introduceți din nou Scoateți lamele ștergătorului de cauciuc după ce acesta este uzat Dacă apa curge din capul de aspirație goliți rezervorul pentru apă Atenție Nu deschideți bateria deoarece acest lucru poate cauza scurtcircuit sau electrocutare Nu expuneți bateria direct la căldură foc sau lumina soarelui ...

Page 16: ......

Page 17: ......

Page 18: ...Тази инструкция е издадена от производителя INTRADE LINE LTD NINGBO SHI JIANGBEI QU HONGTANG YAO JIANG XINDU 10 LOU 1001 1 ZHEJIANG Китай Вносител за България ВАЛЕРИЙ С и М ГРУП АД София бул Ботевградско шосе 44 Тел 02 942 34 00 Факс 359 2 942 34 40 www valerii com Предназначение ...

Page 19: ...редмети в вентилационните отвори Не пръскайте директно върху оборудване съдържащо електрически компоненти Не поставяйте проводящи предмети като отвертка или подобни в зарядното устройство Напрежението указано на табелката с данни трябва да съответства на захранващото напрежение Зарядното трябва да се използва и да се съхранява на сухо място Никога не докосвайте главния щекер с мокри ръце Използвай...

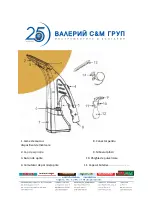
Page 20: ...1 Гумени остриета 8 Конектор за зарядното устройство 2 Смукателна глава 9 Държач на подложка 3 Бутон за изключване 10 Лост за пулверизиране 4 вкл изкл превключвател 11 Капачката на бутилката ...

Page 21: ...епарат 7 Поставете държача на подложката Отстранете пръскачката от бутилката за пулверизиране Прикрепете микрофибърната подложка към главата за пръскане Закрепете микрофибърната подложка към пръскачката с пръстеновидна скоба Зареждане на батерията 1 Поставете зарядното устройство в подходящо гнездо 2 Поставете щепсела на зарядния кабел на гърба на уреда Забележка По време на процеса на зареждане д...

Page 22: ...ре надолу или настрани за да премахнете препарата Забележка Изключвайте уреда след всяка почистена повърхност Това ще увеличи времето за работа на батерията Ако батерията загуби заряда индикаторът на дисплея мига заредете батерията отново Почистване без бутилката за пулверизиране 7 Нанесете препарата за отстраняване на мръсотията 8 Включете устройството Показва се индикаторът за зареждане функцион...

Page 23: ... Не го почиствайте под течаща вода 18 Извадете резервоара Завъртете ключалката и го издърпайте 19 Изпразнете резервоара и изплакнете с чиста вода Затворете резервоара отново 20 Издърпайте подложката от микрофибър от бутилката за пулверизиране и я почистете под течаща вода Микрофибърната подложка може да се почиства в пералня но не използвайте омекотител за тъкани 21 Оставете уреда да изсъхне преди...

Page 24: ...ка Обърнете използваните гумени чистачки Издърпайте остриетата от корпуса Навлажнете ги с вода или препарат Обърнете гумените остриета и ги поставете отново Свалете острилата на гумената чистачка след като тя се износи Ако водата изтича от смукателната глава изпразнете резервоара за вода Внимание Не отваряйте батерията тъй като това може да причини късо съединение или токов удар Не излагайте батер...

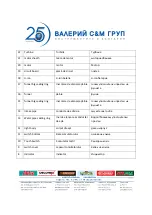
Page 25: ...rub винт 33 screw șurub винт 32 disconnect button buton de deconectare бутон за разскачване 31 left body corpul stâng ляв корпус 30 screw șurub винт 29 left button бuton din stanga ляв бутон 28 spring аrc пружина 27 sealing ring inel de etanșare уплътнителен пръстен 26 trail cover capac conductă Покритие тръба 25 suction pipe conducta de aspirație смукателна тръба 24 Turbine shield Сcutul turbinei...

Page 26: ...pâlnie фуния 15 funnel big sealing ring inel mare de etanșare pâlnie голям уплътнителен пръстен на фунията 14 intake pipe conducta de admisie смукателна тръба 13 Water pipe sealing ring Inel de etanșare a conductei de apă Водоотблъскващ уплътнителен пръстен 12 right body corpul dreapt десен корпус 11 switch bottom Baza comutatorului oснова на ключа 10 Touch Switch Comutator tactil Сензорен ключ 9 ...

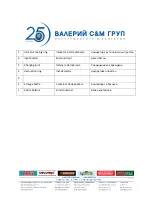
Page 27: ...н пръстен 6 right button butonul drept десен бутон 5 Charging joint Îmbinare de încărcare Съединение за зареждане 4 decoration ring inel decorativ декоративен пръстен 3 2 Storage bottle Container de depozitare Контейнер за боклука 1 bottle bottom Fund container Капак контейнер ...

Page 28: ......

Page 29: ......

Reviews: