background image

5

© Vallox Oy - All rights reserved

MAINTENANCE

The R model is shown in the figures. 

In the L model, the parts are mirrored.

BEFORE BEGINNING 

MAINTENANCE WORK

When you open the door of Vallox 101 MC, the safety 

switch (S) cuts the power. Despite this, disconnect the 

power supply plug anyway. Always disconnect the power 

plug before starting maintenance on the Vallox 101 MC.

FILTERS

When the maintenance reminder becomes activated, 

check the cleanliness of the filters and replace them if 

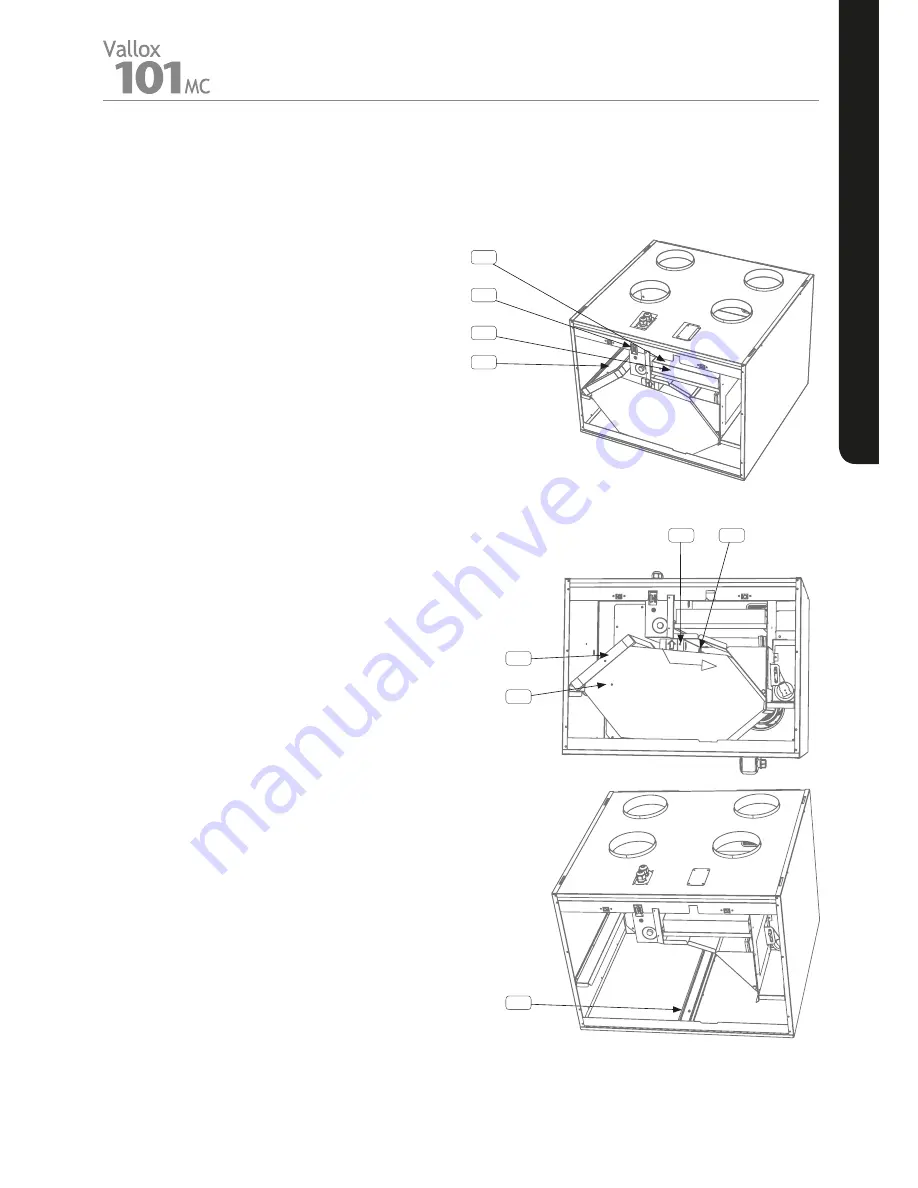
required. The Vallox ventilation unit has three air filters: 

•  Class G4 coarse filter (A) filters insects, heavy pollen 

and other relatively large foreign objects out of the 

outdoor air. 

•  Class F7 fine filter (B) filters microscopic pollen and 

dust particles out of the supply air. 

•  Class G4 coarse filter (C) filters the extract air and 

keeps the heat recovery cell clean. 

Using original Vallox filters ensures the best operation 

of the ventilation unit and the best filtering results. The 

filter replacement interval depends on the ambient dust 

concentration. It is recommended that the filters be 

replaced every spring and autumn, or at the very least 

once a year.

HEAT RECOVERY CELL

Check that the heat recovery cell (D) is clean roughly 

once a year when the filters are being replaced. Clean by 

washing as required.

•  Remove the sealing strip (E) above the heat recovery 

cell in the direction of the arrow. Also remove the 

extract air filter (C).

•  Lift the heat recovery cell and pull it out of the unit.

IMPORTANT! Handle the cell carefully! For example, do 

not lift the cell by the layers. The cell layers are very thin 

and easily damaged.

If the heat recovery cell is dirty, clean it by immersing it in 

water containing a small amount of a mild detergent. Rinse 

the heat recovery cell clean with a water spray. When all 

the water has drained from between the layers, the heat 

recovery cell can be installed.

•  Ensure that the lower support (F) is in place between 

the knobs at the bottom of the unit before the heat 

recovery cell is installed. 

•  Push the heat recovery cell in place. Also push the 

sealing strip (E) in place so that the strip is supported 

by the corner bracket (G) at the rear. Lastly, install the 

extract air filter (C) in place.

S

A

B

C

E

G

C

D

F

Summary of Contents for 101 MC L

Page 1: ...Manual MANUAL Ventilation unit Document D4686 Valid from 02 10 2017 Updated 12 2 2018 Model Vallox 101 MC R Vallox 101 MC L Type 3740...

Page 2: ...uced sensory physical or mental capabilities or whose lack of knowledge and experience do not ensure safe operation of the unit Such persons can use the unit under supervision or by following the inst...

Page 3: ...the heat recovery cell is bypassed when the outdoor temperature is above 14 C The heat recovery will be turned on when the outdoor temperature falls below 12 C In the AUTO position the unit will oper...

Page 4: ...outdoor air is faulty Check the sensor and the wires replace as required 6 The supply air fan has stopped Check the wiring of the fan re place the fan as required 7 The extract air fan has stopped Ch...

Page 5: ...bient dust concentration It is recommended that the filters be replaced every spring and autumn or at the very least once a year HEAT RECOVERY CELL Check that the heat recovery cell D is clean roughly...

Page 6: ...rille the supply air fan must first be removed from the unit To remove the fan disconnect the quick connector H of the supply air fan T and or the extract air fan P cables Push the fan cables and the...

Page 7: ...ting season begins e g during autumn maintenance check that the condensing water outlets in the bottom pool are not clogged To check this pour some water into the pool Clean as required Water must at...

Page 8: ...rical connection 230V 50Hz 8 3A power plug Enclosure protection class IP34 Post heating radiator Power 1500 W Preheating radiator Additional heating radiator Fans Supply air Extract air 0 115 kW 0 9 A...

Page 9: ...1 23 30 35 41 44 51 53 56 20 20 20 20 20 21 22 24 26 29 LW dB LWA dB A 58 64 67 71 74 75 78 80 82 84 62 59 61 64 67 69 72 73 75 77 41 50 54 60 64 65 67 70 73 75 39 43 45 50 54 55 57 58 59 62 Sound pre...

Page 10: ...ink between connectors 3 and 5 from the female side of the control panel connector Post heating control PWM level adjustment 4 5 6 Protective earth to a separate block 7 8 9 1 Supply air fan 2 3 Extra...

Page 11: ...nnector GND S GND S MC VENTILATION UNIT Four terminal connector MV VENTILATION UNIT GND AN I RM I RM O E I LED E O PROGRAMMING CONNECTORS OF THE MOTHERBOARD CONTACT DATA GUARD FUNCTION NORMAL SITUATIO...

Page 12: ...RS 485 Common RH optional 946147 Nomak 2x2x0 5 0 5 0 10V LED G G0 Y1 Y2 DI1 A1 Y3 A2 Y4 U1 A B C S DI2 G0 Vallox Procontrol 949034 S LED S B term CONFIG Control signal S Cooker hood or boost switch 11...

Page 13: ...0 11 84 84 35 30 35 7 14 kpl 550 30 25 25 30 Wall mounting plate 283 164 6 604 Bottom edge of the wall mounting plate The top surface of the side panel of the unit can be installed against the finishe...

Page 14: ...ate Installing the ventilation unit to the ceiling mounting plate Remove the unit door Lift the unit and take the wires through the opening in the ceiling mounting plate Lift the ventilation unit agai...

Page 15: ...k water seal Installation height 53 mm installation space 73 mm outer diameter of the duct 12 mm Location of the condensing water outlets R and L models If the Vallox Silent Klick water seal does not...

Page 16: ...8225 6 HR cell 933260 7 Lower support for the HR cell 4102504 8 Upper support for HR cell 3467200 9 Filter frame extraction 978226 10 Filter G4 extract 978227 NO Part Product number 11 Bypass flap ass...

Reviews: