4EXP70EN - 9/2023
10
5.2 Flow direction and support
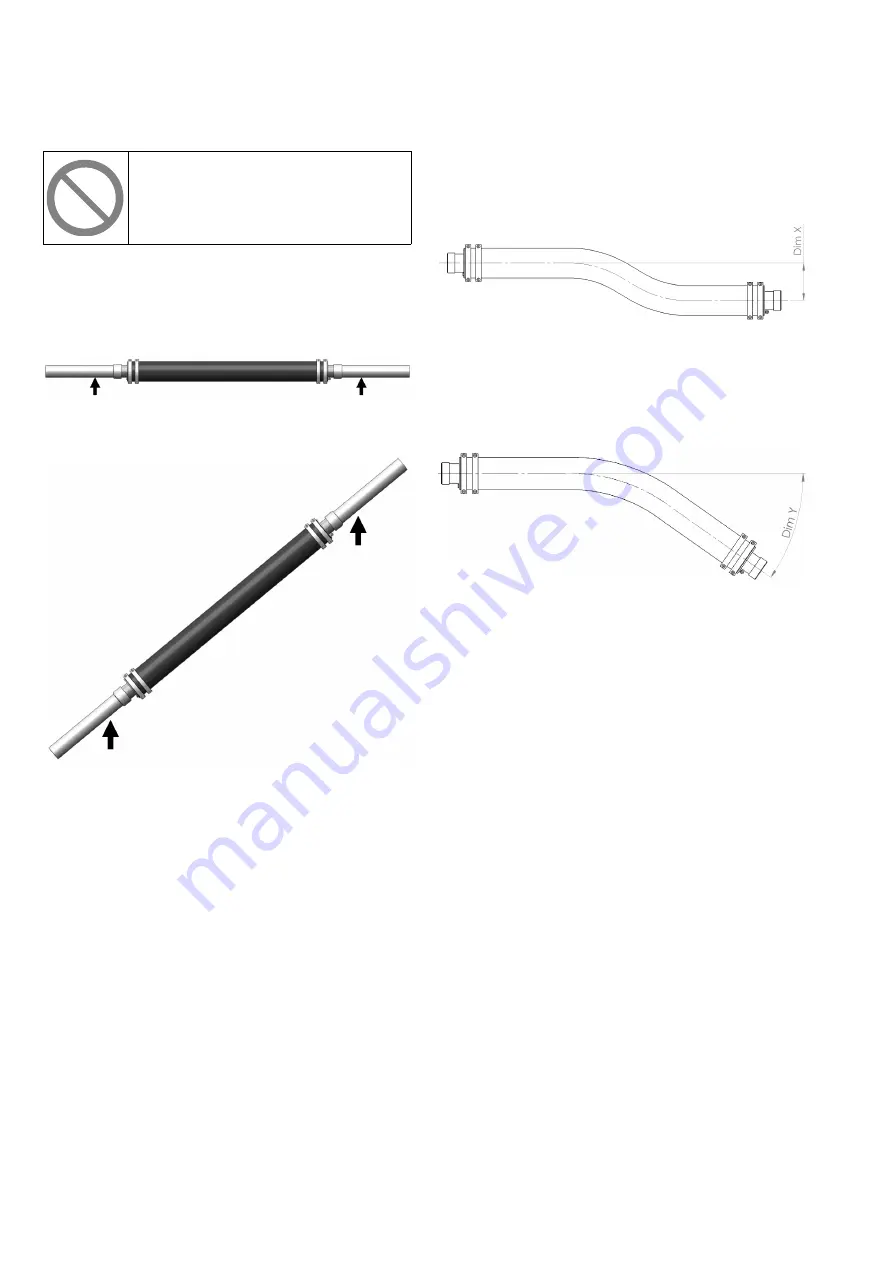
Do not step on a dampener installed in horizontal or
angled position.
The dampener does not have an intended flow direction;
therefore it can be freely installed to the pipeline.
The pipeline needs to be supported before and after the
dampener.
Figure 5. Pipeline supports in horizontal installation.
Figure 6. Pipeline supports in angled installation.
5.3 Dampener installation
At least the following must be ensured before Expulse
dampener installation:
• The pipeline is isolated from the process and there is no
pressure in it.
• The pipeline is empty, clean, and cooled down.
• The pipeline connectors are with proper distance to
enable installation of dampener.
• The connector size is correct.
• The pump is locked in OFF position.
• The dampener is not pressurised.
1. Lift the dampener on place with appropriate lifting
equipment.
2. Apply pipe tape or hemp on the connector threads.
3. Tighten the connectors between the dampener and
pipeline.
Figure 7. Maximum dimension between the pipeline
center axes.
Dim X = 1 x DN size, for example for DN65 dampener
dimension X is 65mm (2.56 in).
Figure 8. Maximum angle between the pipeline center
axes.
Dim Y = 10º
6 Operation
6.1 Commissioning and decommissioning
Before the dampener is operated within the pipeline, ensure
that it has been installed in accordance with this manual and
applicable safety regulations.
The following must also be ensured:
• Parameters on the type plate are suitable for the process
and environment
• The dampener is used for the purpose specified at the
time of sales
1. Turn on the pump and drive it at the design pressure.
2. Slowly pressurise the dampener through the valve (part
7). Use compressed air with no oil. The maximum filling
air pressure is 6 bar (0,6 MPa).
3. Observe the effects and add more pressure until the
wanted dampening effect is reached. Normally the
needed pressure is 25-40% from the pipeline pressure.
Summary of Contents for Flowrox Expulse Series
Page 17: ...17 4EXP70EN 9 2023...
Page 18: ...4EXP70EN 9 2023 18...
Page 19: ...19 4EXP70EN 9 2023...


