4
4
4
4
Installation
Important! This appliance must be earthed.
Important! This appliance must be earthed.
Important! This appliance must be earthed.
Important! This appliance must be earthed.
The stove is supplied with a 3 pin 13A fused rewireable plug with a 1mm
2
3core mains cable.
If the plug is not suitable for your socket, remove the plug and fit an appropriate plug.
If in doubt,
consult a qualified electrician.
The wires in the mains lead are coloured in accordance with the following code:-
Green & Yellow = Earth
Blue = Neutral
Brown - Live
As the colours of the wires in the mains lead may not correspond with the coloured markings
identifying the terminals in your plug, fit the wires as follows:-
The wire which is coloured
Green & Yellow
must be connected to the terminal in the plug which is
marked with the letter
E
or by the earth symbol or coloured
Green
or
Green & Yellow
.
The wire which is coloured
Blue
must be connected to the terminal which is marked with the
letter
N
or coloured
Black
.
The wire which is coloured
Brown
must be connected to the terminal which is marked with the
letter
L
or coloured
Red
.
If the mains cable is damaged then, for your safety, it must be replaced with an approved cable by
your Valor authorised service agent or a qualified electrician.
The stove is supplied fully assembled except for the coals or logs.
Place the stove in its proper location.
Open the stove doors.
IMPORTANT
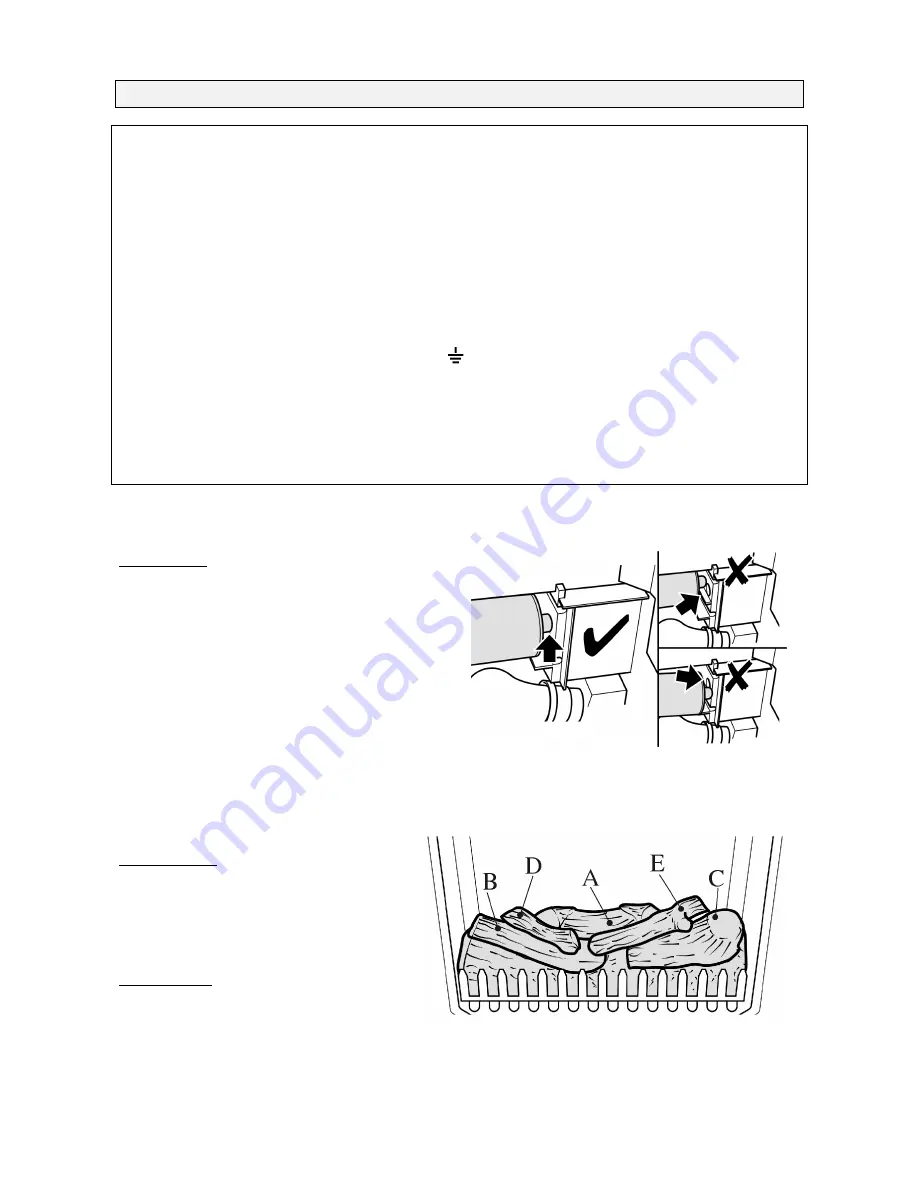
: Before using the fire for the first
time please check that the flame effect drum is
correctly positioned. The drum can sometimes
become dislodged during transit.
To check:
•
Lift out the plastic fuel support
•
You will see two lamp bulbs with the drum
above them.
•
The drum has a spring loaded axle at its right
hand end. This should fit into the hollow
recess in the black plastic holder. See figure
1a.
•
If the drum is out of position simply push it
back into the recess.
•
Replace the plastic fuel support.
Coal versions
: A plastic glove is supplied
for use when handling the coals.
Open the
bag containing the coals. Using the plastic
glove supplied, place the coals on and in
front of the plastic fuel support. Arrange
the coals to your liking. You do not have
to use all the coals.
Log versions
: Place logs “A”,”B” and “C”
into the recesses in the plastic fuel
support. See figure 1b. Logs “D” and ”E”
can be placed wherever you prefer (Figure
1b gives one suggestion).
Close the stove doors.
Route the mains cable to the socket. Plug in and switch on at the socket.
Figure 1a
Figure 1b


