background image

5

Cleaning

To clean the barrier screen and the cast stove use a soft 

brush.

If the barrier becomes damaged, the barrier shall 

be replaced with the manufacturer’s barrier for this 

appliance.
To clean the stove glass window, refer to the owner’s 

manual supplied with the appliance.

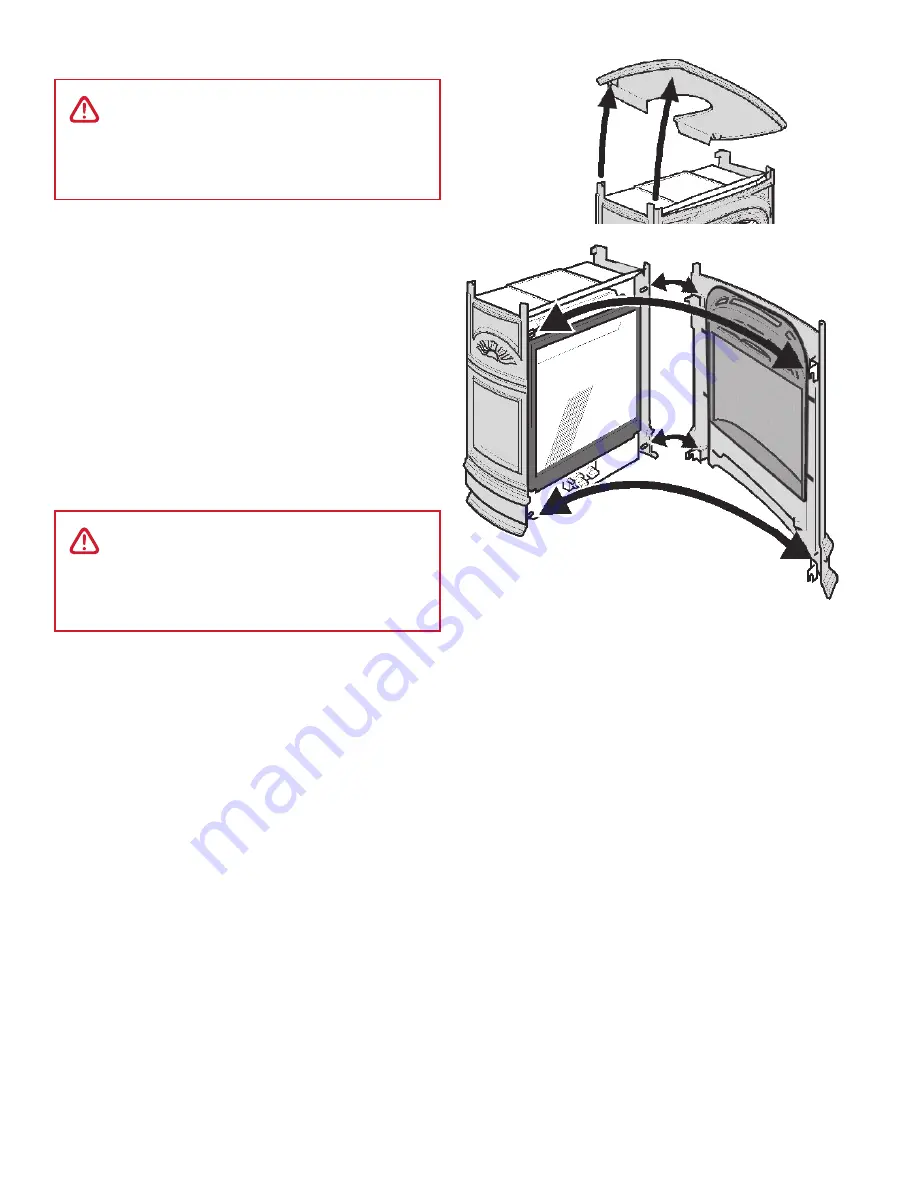
Removing the front unit

1.  Remove the top.
2.  Unhook the front unit. Lift it up by holding under the 

decorative grille.

Always securely replace the window and the front 

with barrier screen before lighting.

WARNING

Do not touch the barrier screen, the cast 

stove or the glass while they are hot! Let 

the stove cool first before cleaning it.

WARNING

For your safety, ensure the barrier screen 

is reinstalled on the cast stove after 

maintenance.

Summary of Contents for Portrait Series

Page 1: ...t FS Stove 531CSB is NOT compatible with the 530INI IPI insert engine Note This kit must be installed or serviced by a qualified installer service agency or gas supplier These instructions are to be u...

Page 2: ...must be installed on a metal or wood panel extending the full width and depth of the appliance Front Sides Pack Box 1 1 Front Casting unit with Barrier Screen 2 Side Casting units 1 Top Baffle 2 Stan...

Page 3: ...pipe Appliance outline Center line of appliance 9 7 8 250 mm Fixing points Dimensions Clearances Mantel Depth A Min Clearance B Up to 7 4 Above 7 up to 8 5 Above 8 up to 9 7 Above 9 up to 10 8 Above...

Page 4: ...Leave the bolts slightly loose to allow the side castings to move as necessary when the front casting is hooked on Note Lift the window lever handle to bolt to sides and then bend the lever handle bac...

Page 5: ...ed with the appliance Removing the front unit 1 Remove the top 2 Unhook the front unit Lift it up by holding under the decorative grille Always securely replace the window and the front with barrier s...

Page 6: ...0B228 1 12 Side Fixing Screw 535569 100D192 4 13 Side Fixing Washer 532529 320A219 4 14 Top Casting 569289 550K060AZ 1 15 Top Infill Casting 569299 540K053AZ 1 16 Hardware Kit spacers screws 4001220 4...

Page 7: ...n est PAS compatible avec les foyers encastrables 530INI IPI Note Ce kit doit tre install ou r par par un installateur qualifi une agence de service certifi e ou un fournisseur de gaz Ces instructions...

Page 8: ...les dimensions couvrent enti rement la largeur et la profondeur de l appareil Devanture et C t s bo te 1 1 Devanture en fonte avec Pare tincelles 2 C t s en fonte 1 D flecteur d air 2 carteurs muraux...

Page 9: ...36 914 mm des combustibles Voir table carteurs pour murs combustibles 1 1 4 32 mm 14 1 2 368 mm 13 1 4 336 mm E Patte du manteau voir table Manteau D 25 1 2 648 mm 16 406 mm MUR PLANCHER 7 1 2 190 mm...

Page 10: ...l g rement d viss s afin de permettre aux c t s de s ajuster lorsque la devanture sera install e Note Soulevez la poign e de la barre ressort de la fen tre pour fixer les c t s de fonte puis repliez l...

Page 11: ...vement de la devanture 1 Enlevez le dessus du po le 2 D crochez la devanture en la tenant sous la parure ornementale du haut Toujours remettre la fen tre la devanture avec le pare tincelles en place e...

Page 12: ...cteur d air 569209 340B228 1 12 Vis de fixation des c t s 535569 100D192 4 13 Rondelles de fixation des c t s 532529 320A219 4 14 Dessus de fonte 569289 550K060AZ 1 15 Plaque de remplissage 569299 540...

Reviews: