background image

EN-26                                                                      

Valor™ 7000


Series


5. LEGAL FOR TRADE 

When the scale is used in trade or a legally controlled application it must be set up, verified and 
sealed in accordance with local weights and measures regulations. It is the responsibility of the 
purchaser to ensure that all pertinent legal requirements are met. 
 

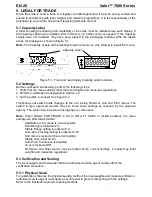
5.1 Capacity Label


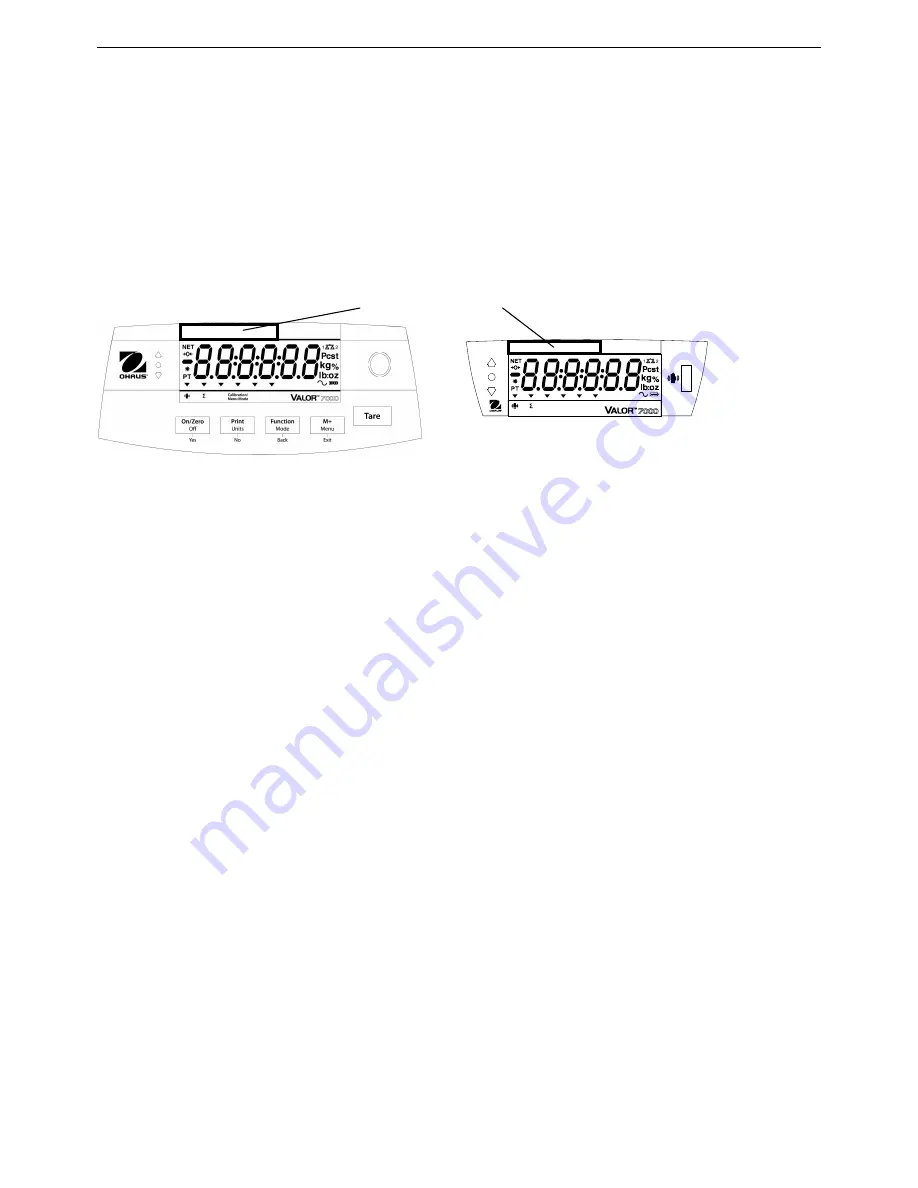
A label showing the capacity and readability of the scale must be installed near each display. If 
the Capacity Labels were installed prior to delivery, no further action is needed. If the Capacity 
Labels  were  not  installed,  they  have  been  placed  in  the  packaging  material.  Affix  the  labels 
above the displays as shown in Figure 5-1. 

Note:

 The Capacity Labels will be destroyed upon removal, so only attempt to install them once. 


Figure 5-1. Front and rear display Capacity Label locations 

5.2 Settings


Before verification and sealing, perform the following steps: 
1. Verify that the menu settings meet the local weights and measures regulations. 
2. Perform a calibration as explained in Section 4.2. 
3. Set the switch to Locked. See figure 5-2. 
 
The  Menu  Lock  switch  limits  changes  to  the  Cal,  Setup,  Readout,  Unit  and  Print  menus.  The 
switch  in  type  approved  models  may  set  some  scale  settings  as  required  by  the  approval 
agency. The switch may be secured using paper or wire seals.  
 

Note:

  When  LEGAL  FOR  TRADE  is  set  to  ON  (LFT  Switch  in  locked  position),  the  menu 

settings are affected as follows: 
 

Calibration (

C.A.L

) menu is not accessible 


Zero Range is locked at 2% 


Stable Range setting is locked at 1d 


Auto-Zero Tracking setting is locked at 0.5d 


Unit menu is locked at the current setting 


Stable Only is locked On 


Auto Print/ Continuous is disabled 


Lb:oz is locked at Off. 


IR  Sensor  and  Filter  menus  may  be  locked  at  the  current  settings,  if  required  by  local 


weights and measures regulations 

 
5.3 Verification and Sealing 

The local weights and measures official or authorized service agent must perform the 
verification procedure. 
 

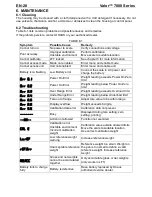
5.3.1 Physical Seals 

For jurisdictions that use the physical sealing method, the local weights and measures official or 
authorized service agent must apply a security seal to prevent tampering with the settings. 
Refer to the illustration below for sealing methods. 
 

Capacity Label 

Summary of Contents for V71P1502T

Page 1: ...Valor 7000 Series Instruction Manual...

Page 2: ......

Page 3: ...s Please follow these safety precautions Verify that the AC input voltage printed on the data label matches the local AC power supply Do not drop loads on the platform Make sure that the power cord do...

Page 4: ...d locations with excessive air current vibrations heat sources or rapid temperature changes Allow sufficient space around the scale 2 4 Leveling the Equipment The Valor Series has a level indicator as...

Page 5: ...2 will remain lit The scale can be operated during charging and the battery is protected against overcharging For maximum operating time the battery should be charged at room temperature During batte...

Page 6: ...tion Mode Back Short Press Selects function setting Long Press Selects active Mode Short Press in Menu returns to previous settings M Menu Exit Short Press Accumulates the weight and displays the accu...

Page 7: ...symbol 6 Pointer symbols 14 Kilogram gram symbols 7 IR Sensor symbol 15 Pieces symbol tonne symbol both not used 8 Accumulation symbol 16 Scale symbol not used The colored LED indicators on the left s...

Page 8: ...a hand or other object that is placed at a specified distance in front of the sensor locations The sensor activation distance will vary based on the reflective nature of the object If unwanted activat...

Page 9: ...e as a percentage of a reference weight 1 If required place an empty container on the pan and press Tare 2 Press and hold Mode until Percnt is displayed Clr ref clear reference will then display If no...

Page 10: ...ge the yellow LED will light If the sample is within the target weight range the green LED will light If the sample is over the target weight range the red LED will light Note Press Function to view t...

Page 11: ...r than the UNDER limit Add material to the scale until it is within the ACCEPT green range Negative Check Negative check is used to determine when the material removed from the scale is within the tar...

Page 12: ...aCC Press the Yes key to clear the stored data and return to current mode Notes The item must be removed from the pan before the next item can be accumulated Only stable weights are stored to accumul...

Page 13: ...et kg g lb oz lb oz End Reset Stable A Print Contnt Layout Data Tr End Reset Baud Parity Stop Handsh Alt Cm End L Cal L Setup L Read L Mode L Unit L Print L COM End Notes Some modes units may not be a...

Page 14: ...ic settings such as Capacity the current setting is displayed with all digits flashing Press the No button to begin editing The first digit is displayed flashing Press the No button to increment the d...

Page 15: ...the reading is stored The display will show done if the calibration was successful The scale returns to the previous application mode and is ready for use TABLE 4 1 Required Span Calibration Mass sold...

Page 16: ...ss loads within the accept limits are tared in Check weighing mode Beeper Signal Bp sIG Set how the beeper responds in Check Weighing mode OFF the beeper is disabled ACCEPT the beeper will sound when...

Page 17: ...ale performs tare operation PRINT scale performs print operation IR Adjust Ir Adj Set the distance at which the sensor will respond OFF disabled LOW around 50 mm 2 inches HI around 100 mm 4 inches Acc...

Page 18: ...y OFF disabled 0 5d the display will maintain zero until a change of 0 5 divisions per second has been exceeded 1d the display will maintain zero until a change of 1 divisions per second has been exce...

Page 19: ...led ON enabled Percent PerCNt Set the status OFF disabled ON enabled Check CHECk Set the sub mode OFF disabled WEIGH weight mode PERCNT percent mode End Mode End Advance to the next menu or return to...

Page 20: ...at the defined interval2 CONT printing occurs continuously ACCEPT printing occurs each time the display is within the Checkweigh accept range and stability criteria are met 1 When ON STAB is selected...

Page 21: ...eight is printed Header Set the status OFF disabled ON the Header is printed Note See section 7 3 1 for how to enter Header line Footer Set the status OFF disabled ON the Footer is printed Note See se...

Page 22: ...l 2 Double click Accessibility Options in Control Panel 3 Select the General tab 4 Check Use Serial Keys and click the Settings button 5 Select the Serial Port set the Baud rate to 9600 and click OK 6...

Page 23: ...200 19200 bps Parity paritY Set the data bits and parity 7 EVEN 7 data bits even parity 7 ODD 7 data bits odd parity 7 NONE 7 data bits no parity 8 NONE 8 data bits no parity Stop bit stOP Set the num...

Page 24: ...software controlled option which can lock menu settings to prevent tampering Default settings are bold Reset reset Reset the Lock menu to factory defaults NO no reset YES reset Lock Cal l CAL Set the...

Page 25: ...locked Lock Print l print Set the status OFF Print menu is not locked ON Print menu is locked Lock COM l COmM Set the status OFF COM menu is not locked ON COM menu is locked End Lock End Advance to t...

Page 26: ...able hook into the access hole at the bottom of the scale as shown refer to section 6 4 for optional hook Do not over tighten tighten finger tight Mount the scale onto an appropriate assembly that all...

Page 27: ...1 42 19 43 26 17 16 16 15 15 14 14 13 13 12 12 43 26 44 32 17 17 16 16 15 15 14 14 13 13 12 44 32 45 38 18 17 17 16 16 15 15 14 14 13 13 45 38 46 45 18 18 17 17 16 16 15 15 14 14 13 46 45 47 51 19 18...

Page 28: ...ion 4 2 3 Set the switch to Locked See figure 5 2 The Menu Lock switch limits changes to the Cal Setup Readout Unit and Print menus The switch in type approved models may set some scale settings as re...

Page 29: ...index by 1 when exiting the menu if one or more of the following menu settings are changed Zero Range Stable Range Auto Zero Tracking AZT Units kg g oz lb or lb oz or Stable Only The calibration even...

Page 30: ...xceeds Power On Zero limit Err 8 2 Power On Error Weight reading below Power On Zero limit Err 8 3 Over Range Error Weight reading exceeds Overload limit Err 8 4 Under Range Error Weight reading below...

Page 31: ...659 between 8 00 AM and 5 00 PM EST An OHAUS product service specialist will be available to provide assistance Outside the USA please visit our web site www ohaus com to locate the OHAUS office neare...

Page 32: ...0 001 lb 48 oz x 0 02 oz 3 kg x 0 001 kg 3000 g x 1 g 6 lb x 0 002 lb 96 oz x 0 05 oz 6 kg x 0 002 kg 6000 g x 2 g 15 lb x 0 005 lb 240 oz x 0 1 oz 15 kg x 0 005 kg 15000 g x 5 g 30 lb x 0 01 lb 480...

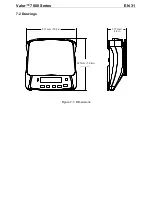
Page 33: ...Valor 7000 Series EN 31 7 2 Drawings Figure 7 1 Dimensions 311 mm 12 2 in 327 mm 12 9 in 117 mm 4 6 in...

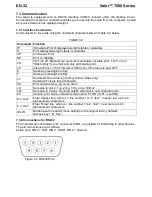
Page 34: ...ns auto print OFF Z Same as pressing Zero Key T Same as pressing Tare Key xT Download Tare value in grams positive values only Sending 0T clears tare if allowed PU Print current unit g kg lb oz lb oz...

Page 35: ...u is All Percent Mode Printout Description Comment 100 NET Result line If Printx Content Result is ON 12 34 kg G Gross value line If Printx Content Gross is ON and a tare value is entered 11 11 kg NET...

Page 36: ...e for verified weighing instrument Weighing Instruments verified at the place of manufacture bear one of the preceding marks on the packing label and the green M metrology sticker on the descriptive d...

Page 37: ...ine at europe ohaus com europe en home support weee aspx Thank you for your contribution to environmental protection FCC Note This equipment has been tested and found to comply with the limits for a C...

Page 38: ...been damaged by accident or misuse exposed to radioactive or corrosive materials has foreign material penetrating to the inside of the product or as a result of service or modification by other than...

Page 39: ......

Page 40: ...Avec des bureaux dans le monde entier Weltweite Gesh ftsstellen Con uffici in tutto il mondo www ohaus com 30048239 P N 30048239D 2014 OHAUS Corporation all rights reserved todos los derechos reservad...

Reviews: