background image

ValueHD Corporation 


Product Specification 

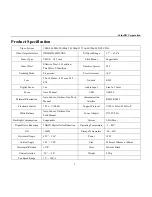
Video System 

1080i/60,1080i/50,1080p/30,1080p/25,720p/60,720p/50,NTSC PAL 

Video Output Interface 

HDMI,HD-SDI,CVBS 

Tilt Speed Range 

1.7° ~ 69.9°/s 

Sensor Type 

CMOS

1/2.7 inch 

Flick Mount 

Supportable 

Sensor Pixel 

Effective Pixel: 2.12 million; 

Total Pixel: 2.20million 

Number of preset 

245 

Scanning Mode 

Progressive 

Preset Accuracy 

≤0.1° 

Lens 

20x, f4.42mm ~ 88.5mm, F1.8 ~ 

F2.8 

Network   

RJ45 

Digital Zoom 

16x 

Audio Input 

Line In 3.5mm 

Focus 

Auto, Manual 

USB 

USB2.0 

Minimal Illumination 

Auto, Indoor, Outdoor, One-Push, 

Manual 

Communication 

Interface 

RS232,RS485 

Electronic shutter 

1/25s ~ 1/10000s 

Support Protocol 

VISCA, Pelco-D, Pelco-P 

White Balance 

Auto, Indoor, Outdoor, One 

Push,Manual 

Power Adapter 

DC12V/2.0A 

Backlight Compensation 

Supportable 

Current 

2.0A (Max) 

Digital Noise Reduction 

2D&3D Digital Noise Reduction 

Operating Temperature 

-5 ~ 40


S/N 

≥55dB 

Storage Temperature 

-20 ~ 60


Horizontal Angle 

60.7° ~ 3.36° 

Power   

12W 

Vertical Angle   

34.1° ~ 1.89° 

Size 

240mm x 144mm x 160mm 

Horizontal Rotation 

±170° 

Color 

Silver & Black 

Vertical rotation 

-30° ~ +90° 

Weight 

2.5Kg 

Pan Speed Range 

1.7° ~ 100°/s 


Summary of Contents for VHD-V500N

Page 1: ...VHD V500N HD Video Conferencing IP Camera User Manual V1 3 English ValueHD Corporation...

Page 2: ...bject the camera to rain or moisture Don t remove the cover Otherwise you may get an electric shock In case of abnormal operation contact the authorized engineer Never operating under unspecified temp...

Page 3: ...ation 11 8 Use IR Remote Controller 13 9 RS 232 Interface 16 10 Serial Communication Control 17 11 Menu Setting 32 12 Equipment Setup and internet connection 37 13 IPcamera visited controlled by LAN 3...

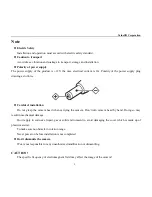
Page 4: ...Careful of installation Do not grasp the camera head when carrying the camera Don t turn camera head by hand Doing so may result in mechanical damage Don t apply in corrosive liquid gas or solid envir...

Page 5: ...n 4 Supplied Accessories When you unpack check that all the supplied accessories are included Camera 1PCS AC power adaptor 1PCS Power cord 1PCS RS232 cable 1PCS Remote controller 1PCS User manual Opti...

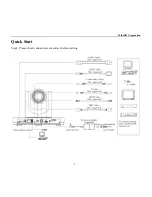
Page 6: ...ValueHD Corporation 5 Quick Start Step1 Please check connections are correct before starting...

Page 7: ...orking Mode Step3 Setting of the system select switch The option of video format VIDEO SYSTEM 0 8 1 9 2 1080i60 A 3 1080i50 B 4 720p60 C 5 720p50 D 576i 6 1080p30 E 480i 7 1080p25 F Network output HDM...

Page 8: ...rted then it return to the center the process of initialization is finished Note If the position preset 0 has been stored the position preset 0 will be called up after initialization Step6 Optional If...

Page 9: ...compression coding efficiency for high definition video conference terminals The camera applies 2D and 3D noise reduction at the same time based on motion estimation algorithm and effectively reduces...

Page 10: ...Line In 3 5mm Focus Auto Manual USB USB2 0 Minimal Illumination Auto Indoor Outdoor One Push Manual Communication Interface RS232 RS485 Electronic shutter 1 25s 1 10000s Support Protocol VISCA Pelco D...

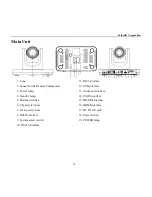
Page 11: ...12 USB interface 3 Power lamp 13 Audio out interface 4 Standby lamp 14 CVBS interface 5 Bottom switches 15 HD SDI interface 6 Tripod screw hole 16 HDMI interface 7 Fixing screw hole 17 DC IN 12V jack...

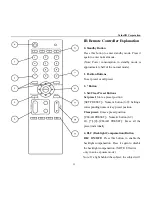
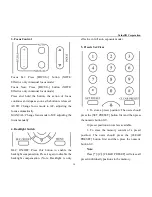
Page 12: ...reset Buttons Set preset Store a preset position SET PRESET Numeric button 0 9 Setting a corresponding numeric key preset position Clear preset Erase a preset position CLEAR PRESET Numeric button 0 9...

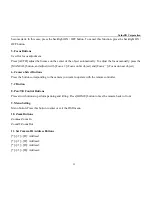
Page 13: ...it with Focus Focus on far object and Focus Focus on near object 6 Camera Select Buttons Press the button corresponding to the camera you want to operate with the remote controller 7 Button 8 Pan Tilt...

Page 14: ...second is required 2 When a button combination is required do it in sequence For example F1 means press first and then press and press F1 at last 1 Pan Tilt Control Move up Press Move down Press Move...

Page 15: ...4 Backlight Switch BLC ON OFF Press this button to enable the backlight compensation Press it again to disable the backlight compensation Note Backlight is only effective in full auto exposure mode 5...

Page 16: ...directly to recall stored preset positions and settings Note No action is executed if a relative preset position is not stored 7 Camera Selection Press the button corresponding to the camera you want...

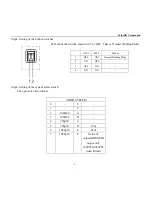
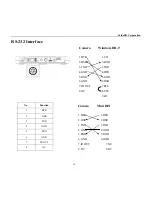
Page 17: ...CD 2 DSR 2 RXD 3 TXD 3 TXD 4 GND 4 DTR 5 RXD 5 GND 6 GND 6 DSR 7 IR OUT 7 RTS 8 NC 8 CTS 9 RI Camera Mini DIN 1 DTR 1 DTR 2 DSR 2 DSR 3 TXD 3 TXD 4 GND 4 GND 5 RXD 5 RXD 6 GND 6 GND 7 IR OUT 7 NC 8 NC...

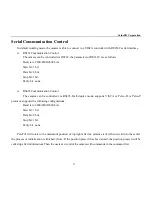
Page 18: ...n Control The camera can be controlled via RS485 Half duplex mode supports VISCA or Pelco D or Pelco P protocol supports the following configurations Baud rate 2400 4800 9600 bit s Start bit 1 bit Dat...

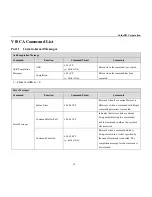
Page 19: ...Function Command Packet Comments Error Messages Syntax Error z0 60 02 FF Returned when the command format is different or when a command with illegal command parameters is accepted Command Buffer Full...

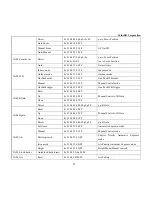
Page 20: ...2 Camera Control Command Command Function Command Packet Comments AddressSet Broadcast 88 30 01 FF Address setting IF_Clear Broadcast 88 01 00 01 FF I F Clear CAM_Power On 8x 01 04 00 02 FF Power ON...

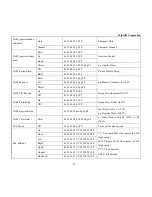
Page 21: ...05 FF One Push WB Trigger CAM_RGain Reset 8x 01 04 03 00 FF Manual Control of R Gain Up 8x 01 04 03 02 FF Down 8x 01 04 03 03 FF Direct 8x 01 04 43 00 00 0p 0q FF pq R Gain CAM_Bgain Reset 8x 01 04 04...

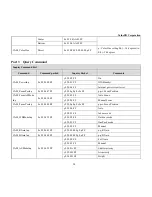
Page 22: ...04 3E 02 FF Exposure Compensation On Off Off 8x 01 04 3E 03 FF Reset 8x 01 04 0E 00 FF Exposure Compensation Amount Setting Up 8x 01 04 0E 02 FF Down 8x 01 04 0E 03 FF Direct 8x 01 04 4E 00 00 0p 0q...

Page 23: ...lip Horizontal On Off Off 8x 01 04 61 03 FF CAM_PictureFlip On 8x 01 04 66 02 FF Image Flip Vertical On Off Off 8x 01 04 66 03 FF CAM_RegisterValue 8x 01 04 24 mn 0p 0q FF mm Register No 00 7F pp Regi...

Page 24: ...sitivity High Normal Low Normal 8x 01 04 58 02 FF Low 8x 01 04 58 03 FF CAM_SettingReset Reset 8x 01 04 A0 10 FF Reset Factory Setting CAM_Brightness Direct 8x 01 04 A1 00 00 0p 0q FF pq Brightness Po...

Page 25: ...y0 50 0p 0q 0r 0s FF pqrs Zoom Position CAM_FocusAFMode Inq 8x 09 04 38 FF y0 50 02 FF Auto Focus y0 50 03 FF Manual Focus CAM_FocusPosInq 8x 09 04 48 FF y0 50 0p 0q 0r 0s FF pqrs Focus Position CAM_...

Page 26: ...D CAM_Nosise2DLevel 8x 09 04 53 FF y0 50 0p FF Noise Reduction 2D p 0 to 5 CAM_Noise3DLevel 8x 09 04 54 FF y0 50 0p FF Noise Reduction 3D p 0 to 8 CAM_FlickerModeIn q 8x 09 04 55 FF y0 50 0p FF p Flic...

Page 27: ...00 02 FF y0 50 ab cd mn pq rs tu vw FF ab Factory Code 00 VHD 01 MR 08 T cd Hardware Version mnpq ARM Version rstu FPGA Version vw Camera model 01 C Type 02 M Type 03 S Type VideoSystemInq 8x 09 06 23...

Page 28: ...04 A6 FF y0 50 00 FF Mode0 y0 50 02 FF Mode2 CAM_GainLimitInq 8x 09 04 2C FF y0 50 0q FF p Gain Limit CAM_DHotPixelInq 8x 09 04 56 FF y0 50 0q FF p Dynamic Hot Pixel Setting 0 0ff level 1 to 6 CAM_AFS...

Page 29: ...y0 50 0u 0u 0u 0u 00 00 0v 0v 0v 0v 00 0w 00 FF uuuu Zoom Position vvvv Focus Position w bit0 Focus Mode 1 Auto 0 Manual CAM_CameraBlockIn q 8x 09 7E 7E 01 FF y0 50 0p 0p 0q 0q 0r 0s tt 0u vv ww 00 xx...

Page 30: ...y0 50 00 00 00 00 00 00 00 0p 0q rr 0s 0t 0u FF p AF sensitivity q bit0 Picture flip 1 On 0 Off rr bit6 3 Color Gain 0h 60 to Eh 200 s Flip 0 Off 1 Flip H 2 Flip V 3 Flip HV t bit2 0 NR2D Level u Gai...

Page 31: ...0 SUM Set Preset 0xFF Address 0x00 0x03 0x00 Preset ID SUM Clear Preset 0xFF Address 0x00 0x05 0x00 Preset ID SUM Call Preset 0xFF Address 0x00 0x07 0x00 Preset ID SUM Auto Focus 0xFF Address 0x00 0x2...

Page 32: ...Set Preset 0xA0 Address 0x00 0x03 0x00 Preset ID 0xAF XOR Clear Preset 0xA0 Address 0x00 0x05 0x00 Preset ID 0xAF XOR Call Preset 0xA0 Address 0x00 0x07 0x00 Preset ID 0xAF XOR Auto Focus 0xA0 Addres...

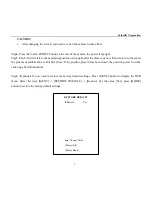
Page 33: ...ng figure Mode Exposure mode Optional items Auto Manual SAE AAE Bright ExpCompMode Exposure compensation mode Optional items On Off Effective only in Auto mode ExpComp Exposure compensation value Opti...

Page 34: ...1 1 000 1 1500 1 2000 1 3000 1 4000 1 6000 1 10000 Effective only in Manual SAE mode 3 COLOR Move the cursor to the Color item in the main menu and press home button COLOR menu appears as shown in the...

Page 35: ...AGE menu appears as shown in the following figure Luminance Brightness adjustment Optional items 0 14 Contrast Contrast adjustment Optional items 0 14 Sharpness Sharpness adjustment Optional items Aut...

Page 36: ...n NOISE REDUCTION menu appears as shown in the following figure NR2D Level 2D noise reduction Optional items Off Auto 1 5 NR3D Level 3D noise reduction Optional items Off 1 8 D HotPixel Dynamic bad po...

Page 37: ...nfrared switch Optional items On Off When set to On useless in 88 30 01 FF Command Net Mode Set the serial port control networking Optional items Serial Paral Baudrate Serial port baud rate Optional i...

Page 38: ...ValueHD Corporation 37 Optional items Yes No Note Press HOME button to confirm All parameter restore default Include IR Remote address and VISICAAddress Save Save Options Optional items Yes No...

Page 39: ...DirectX8 0 or more advanced version 2 Equipment Installation 1 Connect internet camera to your internet or to your PC directly via internet cable 2 Turn on DC12V power 3 The orange light of internet...

Page 40: ...to PC PC IP address need manual allocation PC IP internet segment must keep the same as IPC then IPC can be visited 1 2 Before connecting IP camera herein called IPC to internet IP address need to be...

Page 41: ...etc In IPCSearch window select the device IPC needed to be modified enter new IP in IP bar subnet mask in Mask bar port number in Port bar and the password default as admin click modify then the IPC a...

Page 42: ...port 80 user admin password admin 2 Visit Access IP Camera 2 1 Input http 192 168 1 136 to IE better with IE web browser others will cause little latency a login window pop up input login name admin...

Page 43: ...ValueHD Corporation 42 2 2 Input login name and password click Login then pop up below window...

Page 44: ...his equipment must install a player software Please click Download Player only for new user 2 3 Click to run the player will be downloaded and installed automatically 2 4 After player installation fin...

Page 45: ...IPC accessed controlled by manufacturer dynamic DNS Currently there 2 dynamic DNS Dyndns org 3322 org 1 1 Setup interchanger data 1 1 1 Open interchanger UPnP function Take TP LINK router as example o...

Page 46: ...below Server port number 80 as default IP address the IP address of the monitoring computer here take 192 168 1 126 as example Protocol ALL State Effective Click Save to confirm the mapping list will...

Page 47: ...e showing DNSIP address NOTE If DNS address not correct the camera cannot be connected to internet 2 Dynamic DNS visit camera 2 1 Set dynamic DNS to IPC Login IPC via web browser click Parameters Netw...

Page 48: ...example setup host computer name youdomain f3322 org camera port number 81 Access link should be http youdomain 3322 org 81 NOTE If camera port default as 80 then input port is unnecessary use host na...

Page 49: ...ss rtsp ip port 11 Main stream rtsp ip port 12 Sub stream When port set as rtsp default port value is 554 that can be omitted as rtsp ip 11 or rtsp ip 12 IP Camera parameter setup 1 Homepage introduct...

Page 50: ...it sound collected by computer to device and play out by audio part connected to the device click again to turn off 3 Picture storage rout selection 4 Video storage rout selection 1 3 Viewing Monitori...

Page 51: ...istant objects 3 Focus for zooming in for zooming out 4 Speed select corresponding speed and click direction button to realize PTZ speed up or speed down 5 Point When PTZ turn to expected position cli...

Page 52: ...ValueHD Corporation 51 1 7 Image Setup 1 Image adjust Pull the bar in the above box can adjust color hue brightness contrast saturation 2 Flip Mirror Image can be flipped or mirrored 3 Powerfreq...

Page 53: ...indoor outdoor 5 Black White On black and white mode Off color mode 6 Default Click Default button turn to default 7 Stream Select main flow or minor flow 8 Image fit size or screen size 2 Replay Cli...

Page 54: ...ValueHD Corporation 53 3 Media 3 1 Video Setup...

Page 55: ...bit flow is too big will cause video signal flow not to be transmitted normally the video effect will be worse 3 Maximum frame Under limited bandwidth circumstance lower the bit rate and framerate to...

Page 56: ...726 2 Input Gain volume definable 3 Output Vol No such function on hardware pls ignore this line shown on software interface 4 Main Stream Sub Stream On encoding with audio signal Off encoding without...

Page 57: ...OSD Setup 1 Time Stamp On Off Current time will be shown on up right corner when select on 2 Camera Name On Off The camera name you edited will be shown on up left corner 4 Parameter Setup 4 1 Network...

Page 58: ...tion guide HTTP Port IP address marks the device in network the device can run multiple network programs each program transmit the data via ports hence data transmit between port and port this port se...

Page 59: ...l can play video directly via VLC etc ONVIF Port Support ONVIF protocol default port as 1018 2 DDNS Select Provider 3322 org input 3322 org server login name account name and password Your domain name...

Page 60: ...uthority of writing and building sub directory 4 2 Event 1 Motion Detect If the user wants to monitor a area when an exception occurs in the region start alarm select motion detection Motion detection...

Page 61: ...ValueHD Corporation 60 1 Auto capture...

Page 62: ...ValueHD Corporation 61 2 Record 3 Cover Area Four regions optional after clicking region options move black box via the mouse to the region need to hide...

Page 63: ...min with the highest authority that can make any settings guest can only operate PTZ browsing video recording on PC and image capture etc without setting authority The default passwords are admin gues...

Page 64: ...ll current settings 4 Restore browse for saving the settings file click Apply you can restore all settings 5 Upgrade browse for updating the firmware file click Apply the device can be updated through...

Page 65: ...ValueHD Corporation 64 5 5 Storage Device Need TF card 5 6 System Log history...

Page 66: ...No operating in unstable lighting conditions otherwise image will be flickering No operating close to powerful electromagnetic radiation such as TV or radio transmitters etc Troubleshooting Image No...

Page 67: ...d by PC virus until the PC can be Ping 2 Disconnect IP Camera with network IP Camera and PC are connected according to the proper operations to re set the IP address 3 Check the server s IP address an...

Page 68: ...to ValueHD Corporation Cannot be cloned copied or translated without the permission of the company Product specifications and information which were referred to in this document are for reference only...

Reviews: