background image

IN8377 - 11 OF 12

Prior to proceeding past this point please take the time to read through 

the important note below.

01

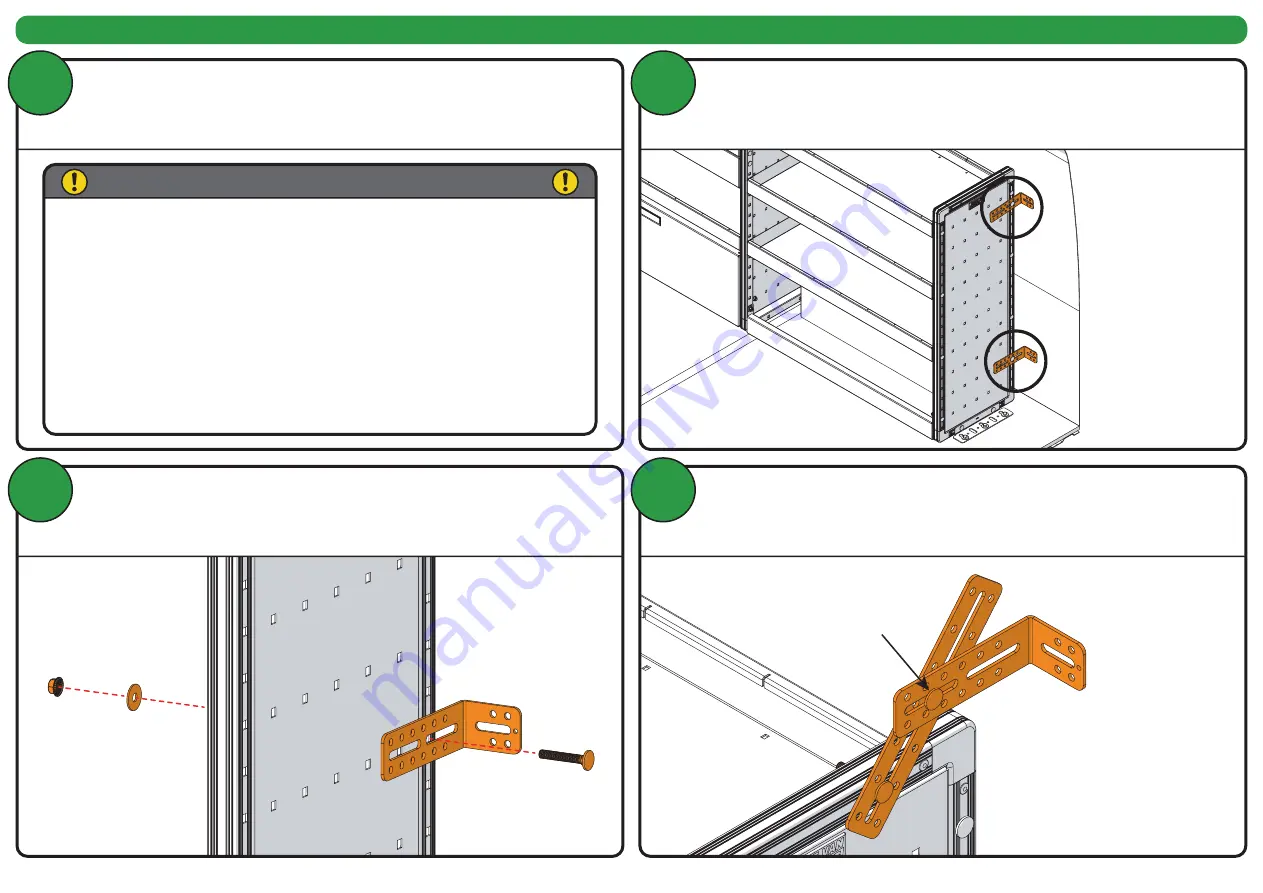
Each side panel requires two fixing brackets. Try to position one bracket 

towards the top of the unit, and the other bracket towards the bottom of 

the unit. Ensure the fixing brackets are positioned to pick up on the inner 

steel skin of the vehicle and are not against the outer skin.

02

RECOMMENDED SIDE FIXING METHOD (2 OF 3)

CAUTION

It is important that care is taken when drilling and fixing to your vehi-

cle.

You should note that it is the responsibility of the installer/s to ensure that when drilling holes into your 

vehicle to take fixings, care must be taken to ensure that the fuel line, tyres, fuel tank, wiring loom, 

exhaust, batteries, bodywork, and brake lines etc. are not damaged.

We advise customers to be extra cautious when fitting racking to electric or hybrid vehicles. For 

these vehicles, we strongly recommend employing an experienced installer to ensure the racking is 

properly affixed. Additionally, it is essential that you do not drill through the vehicle flooring if there are 

batteries or wires present underneath.

If in doubt refer to the vehicle manufacturer’s dealership.

Secure the fixing brackets (ME0919) to the unit in the required positions 

using M8x50 coach bolts, M8 washers and M8 flange nuts. If required, 

an extension bracket can be used as shown in step four.

03

If required, an extension bracket can be used as shown.

04

M8X16 COACH BOLT

M8 WASHER

M8 FLANGE NUT

Summary of Contents for IN8377

Page 1: ...1392 368 351 1 2 Attention For customers installing one of our vehicle specific bronze silver or gold packages please firstly consult instruction document IN8378 which showcases the recommended racki...

Page 2: ...nd adapt to any changes in vehicle dynamics B 02 After first fitting of the van racking and whenever the van racking is refitted to the vehicle racking accessories and loads shall be checked the first...

Page 3: ...document offers an overview with the flexibility to adjust the positioning of items according to your preferences 01 Thoroughly read this document as well as the instructions for any drawers drop down...

Page 4: ...COMPONENTS Open the KT5447 shelf fixing kit it will be packed in the same box as the shelf one kit per shelf This kit provides the fixings required to assemble the shelves to the side panels Quantiti...

Page 5: ...e Drawers can be positioned anywhere on the unit and one drawer requires the space of three side fixing holes as illustrated You can install the drawer once the shelves are fully assembled 04 When ass...

Page 6: ...s For multiple bay units ensure the middle side panel s label faces as depicted in the illustration 05 Adjust the position of your shelves to suit your requirements and then secure the shelves to the...

Page 7: ...M8X50 HEX BOLT ME0918 X1 SUITS STRAIGHT PANELS ME2058 X1 SUITS TAPERED PANELS IN8377 07 OF 12 Trade Van Racking can be attached to a vehicle using various methods including rivets nuts and bolts self...

Page 8: ...ICLE FLOOR FIXING METHOD 2 OF 3 CAUTION It is important that care is taken when drilling and fixing to your vehi cle You should note that it is the responsibility of the installer s to ensure that whe...

Page 9: ...ch bracket 06 Bolt down through the floor brackets using M8x50 hex bolts and M8 washers secure under the vehicle using M8 washers and M8 nyloc nuts Repeat process for each side panel 07 RECOMMENDED VE...

Page 10: ...e 01 RECOMMENDED SIDE FIXING METHOD 1 OF 3 SUPPLIED COMPONENTS This section will require the following parts All side panels must be secured to the side of a vehicle Quantities shown below are to suit...

Page 11: ...ake fixings care must be taken to ensure that the fuel line tyres fuel tank wiring loom exhaust batteries bodywork and brake lines etc are not damaged We advise customers to be extra cautious when fit...

Page 12: ...drill through the fixing bracket holes using a suitable drill bit for the fixing 05 Secure the fixing brackets to the side of the vehicle using M6x14 hex bolts M6 washers and M6 flange nuts Repeat pro...

Reviews: