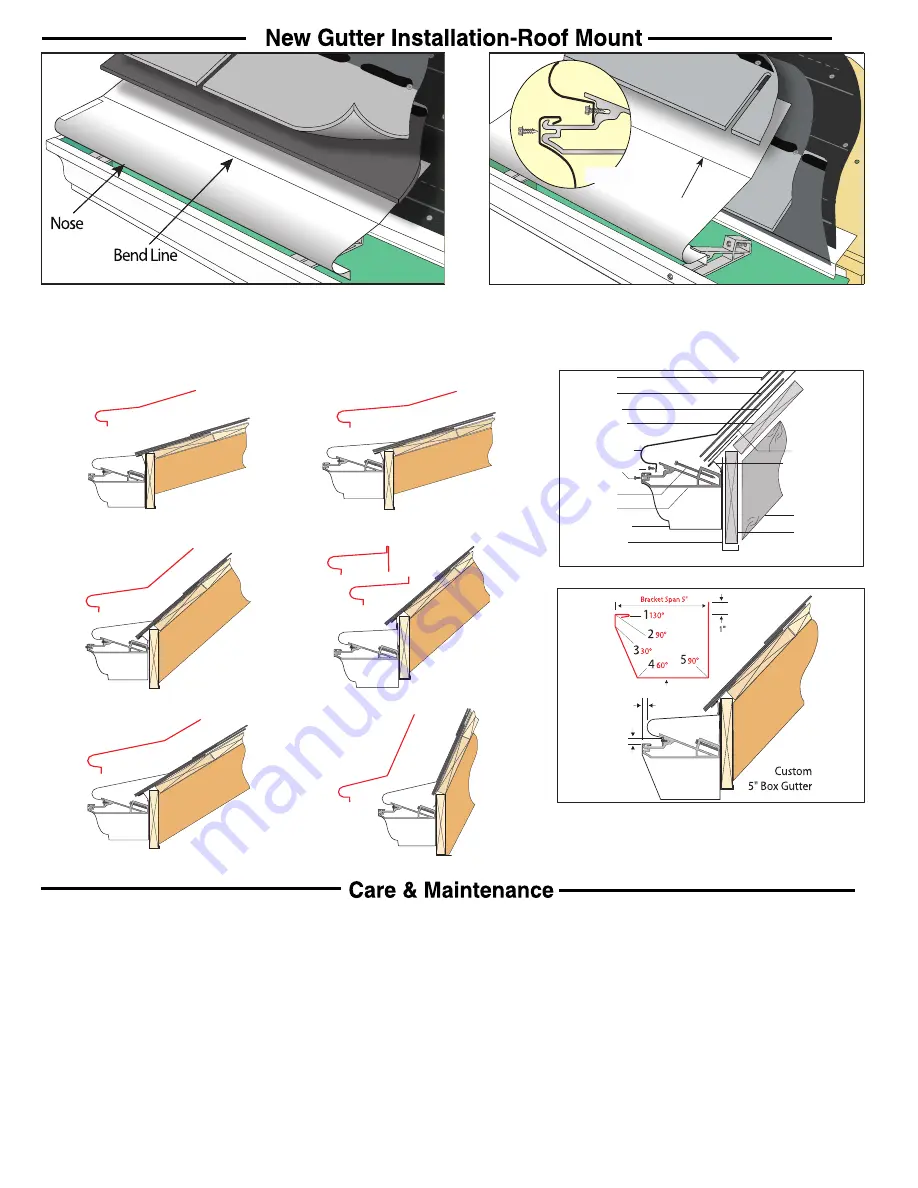
3/12 Pitch-Under Shingle
3/12 Pitch-Over Shingle
12/12 Pitch-Over Shingle
12/12 Pitch-Fascia Mount
8/12 Pitch-Over Shingle
18/12 Pitch-Mansard
Common Roof/Gutter/Fascia Profiles
Finish Side
3/8" Max.
7/16" Min.
1. Insert blank 1/2" into brake, lock in place. Bend 130° (max. bend on brake).
2. Remove from brake, turn around and reinsert to 3/4", lock in place. Bend 90°.
3. Unlock brake and slide out 3/4", and re lock. Make bend 30°.
4. Unlock brake and slide out approx. 3". Make bend 60°.
5. Unlock & slide out approx. 3.5 to 4". (to achieve 5" bracket span). Bend 90°.
Ogee Gutter
Gutter-Cover
Fascia Trim
Bracket
Shingle
Starter
Underlay
Rafter
Anchor
Stainless Screw
Drip Edge
Roof Board
Fascia
Shingle
Example Side Elevation
7-
Detail
Bend Line
L
ow Profile. Install gutters using brackets & anchor screws. Create a template based
on this profile remembering to keep a downward pitch from the bend line to the nose.
Install drip edge and underlayment, then sections of gutter-hood based on your template.
Install shingles even with bend line. Note: You may install hood under the 1st course of
shingles provided the gutter is low enough to maintain the downward pitch from the bend
line to the nose.
D
ome Profile. Install 1st course of shingles. Determine whether gutter-hood will
go under the 2nd or 3rd course of shingles. Create a template of this profile and
mark your bend line as previously described. With this particular design being more
visible , match the gutter color as closely as possible for seamless integration.
Your new Van Mark tool has been calibrated and adjusted at the factory and is ready to go. Follow these steps for optimum performance and installation of gutter-hood.
1. When mounting to your Van Mark brake, always ensure brake is level on stable footing.
1. For best results, use a screw gun with adjustable torque settings.
2. Never lean or place weight on tool once mounted as tipping can occur.
2. Pre install anchor screw into bracket until barely visible out the back.
3. Keep bending leaf hinge and slot free from debris (no. 17 & 23 on your parts list).
3. Hold bracket firmly in place while driving anchor screw into fascia.
4. Always remove tool from your brake before transporting to and from the job site.
4. Do not over-torque anchor screws and cover screws which can twist off heads.
5. Check all fasteners and knobs often and tighten as needed.
5. Do not set ladders against nose of gutter-hood as slipping or damage can occur.
6. Clean and lubricate tool with light spray-lubricant before use, or as needed.
6. Ensure you have adequate amount of brackets and anchor screws before starting job.
7. Keep hands and fingers away from moving parts while setting up and using tool.
7. For added durability and strength, increase the amount of brackets per section.
8. Never expose tool to rough loading/unloading, bumps and knocks as damage will occur.
8. Form gutter-hood blanks (without the roof pitch bend), at the shop between jobs.
9. For balance, always mount tool as close to the center of the brake as possible.
9. Download & print sales literature from Van Mark’s web site for customer presentations.
Although Van Mark undergoes extensive research on all our products, including the Trim-A-Gutter™ gutter-hood forming tool, it is the sole responsibility of the user for the correctness of
installing gutter-hood to any gutter, fascia and/or roofing system, whether new or retrofit construction. Use the instructions provided here, including the following profiles, as an example on
getting started with Trim-A-Gutter™. Van Mark cannot be held liable for any damages arising from the installation of gutter-hood, hardware, gutter, fascia and/or roofing. As with other Van
Mark tools, we recommend that you make practice shapes with scrap until satisfied with your results.
About Various Roofing Materials:
Some types of roofing systems exist which may limit, or prevent the use of some applications of gutter-cover due to their rough uneven surfaces. Examples would in-
clude shake, tile and slate, as well as their simulated counterparts. Applications of fascia mount, or gutter-cover installed under these materials may work well and is left to the discretion of the installer.
The Trim-A-Gutter
™
TAG
50
Tool
Installation Tips


