background image

VG-PB200W-C  200W  Bicolor  LED  Fresnel  Spot  light  User  Manual                                                VG-PB200W-C  200W  Bicolor  LED  Fresnel  Spot  light  User  Manual 

I

NSTALLING A 

N

ENUTRIK 

C

ONNECTOR ON A 

P

OWER 

C

ABLE


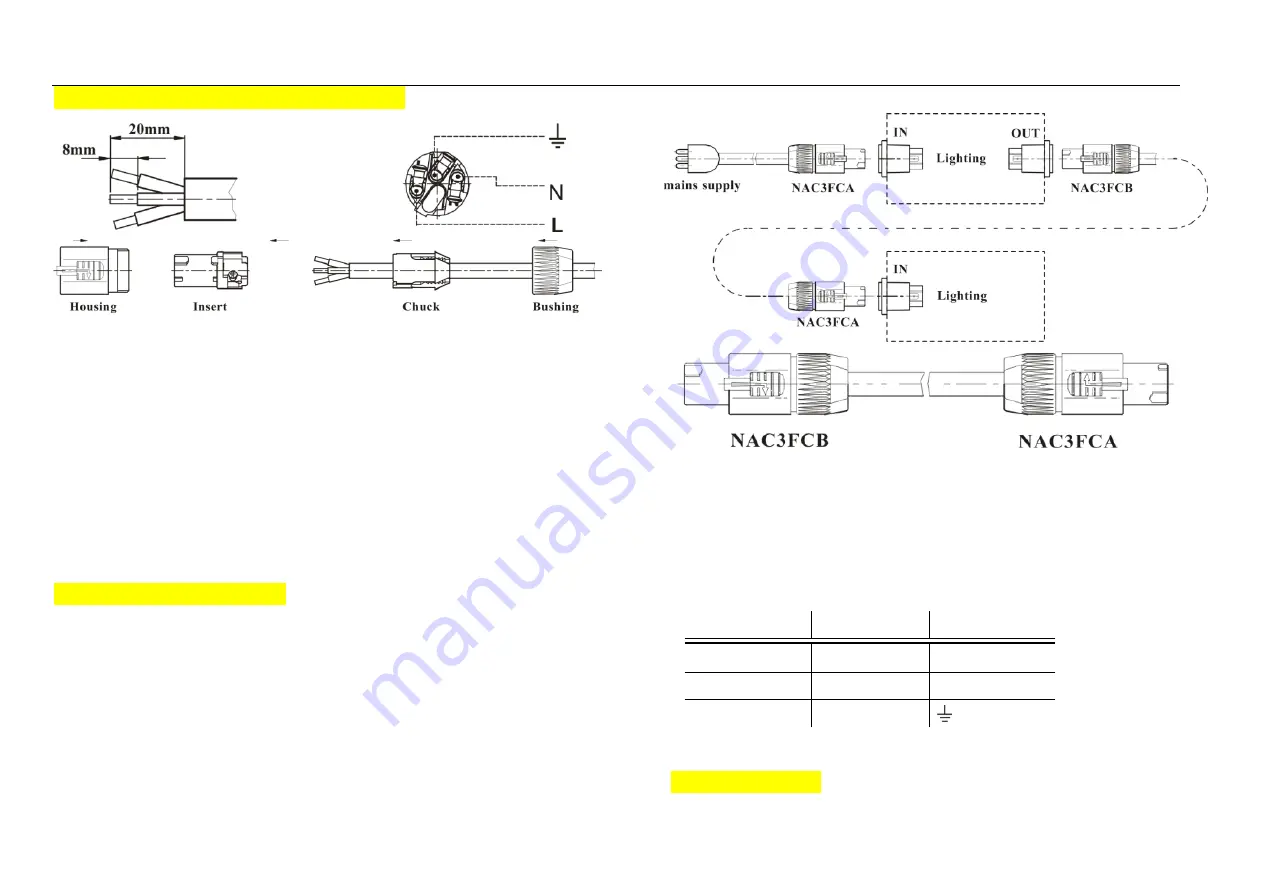
Put bushing and chuck onto the cable. 

Prepare cable as shown above. The power cable must is a three-conductor 2.5mm2 cable. 

Insert the wire into the terminals and fasten the clamping device by a flat screw driver. 

Push insert and chuck into housing (pay attention to the guiding keyway). 

Fasten bushing. 


The color-coding schemes and some possible pin identification schemes; if pins are not 

clearly identified, or if you have any doubts about proper installation, consult a qualified 

electrician.   


R

ELAYING 

P

OWER TO 

O

THER 

D

EVICES


The lightings can be linked in a chain by power cables which installed a blue and a 

light-gray connectors on the two ends. The light-gray connector connects to the power out 

socket of the first lighting, and the blue connector connects to the power in socket of the 

subsequent lighting, and so on.   


The power cable must is a three-conductor 2.5mm2 cable. 

When the voltage is 110V, Do not connect more than 10 lightings in total to AC mains 

power in one interconnected daisy chain.   

When the voltage is 220V, Do not connect more than 20 lightings in total to AC mains 

power in one interconnected daisy chain. 


P

HYSICAL 

I

NSTALLATION


This lighting can be placed on a horizontal surface such as a stage or clamped to a truss or 

Wire color 

Conductor 

Symbol 

Brown 

Live 

Blue 

Neutral 

Yellow/green 

ground 


05 

04 

Summary of Contents for VG-PB200W-C

Page 1: ...ht User Manual VG PB200W C 200W Bicolor LED Fresnel Spot light User Manual 200W Bicolor LED Fresnel Spot Light VG PB200W C CE RoHS User Manual Please read this user manual before using this product Keep it for further reference http www vangaa com ...

Page 2: ...ss COB LED chips beads matrix arrangement of large area through the whole aluminum shell to realize heat dissipation naturally we have designed this light This light has high brightness good head dissipation ultra quiet and other features It can satisfy the requirement of indoor movie filming for the lighting layout It is a good substitute of the traditional Fresnel spot light which is very suitab...

Page 3: ...chain When the voltage is 220V Do not connect more than 20 lightings in total to AC mains power in one interconnected daisy chain Before using the fixture check that all power distribution equipment and cables are in perfect condition and rated for the current requirements of all connected devices Always ground earth the fixture electrically Avoiding hit the Light when you are move or install the ...

Page 4: ...ed electrician RELAYING POWER TO OTHER DEVICES The lightings can be linked in a chain by power cables which installed a blue and a light gray connectors on the two ends The light gray connector connects to the power out socket of the first lighting and the blue connector connects to the power in socket of the subsequent lighting and so on The power cable must is a three conductor 2 5mm2 cable When...

Page 5: ...ape the current menu and save the selected item or parameter MAIN MENU The way into the menu as below 1 Press ENTER when the display show the title information 2 Press UP or DOWN button to choose the right menu which you need 3 Press ENTER into the menu 4 Press UP and DOWN button to set the parameter or setting 5 Press ENTER to save the setting 6 Press MENU SET button to back MENU MAP LCD SHOW Fun...

Page 6: ...mation 2 Press UP DOWN to choose the Mode menu then press ENTER into 3 Press UP DOWN to choose Alone scene menu then press to save 4 Press UP DOWN to choose Set auto mode Color Temperature menu then press ENTER into the option of color temperature 5 Press UP DOWN to choose Set auto mode Dimmer menu then press ENTER into the adjust function of the LED 6 Press UP DOWN to adjust the brightness 000 li...

Page 7: ...nly for indoor use when you install it by hanging please use the safety cable to ensure the safety If you have any questions please contact with our sales manager Ⅷ TECHNICAL SPECIFICATION Input power AC100 240V 50 60Hz Power consumption 250W Light sources 200W brand bicolor COB LED Lamps LED lifespan 50 000hours Dimmer 0 100 0 15 smoothly dimmer Beam angle 15 60degree Color rendering index 92Ra C...

Page 8: ...t light User Manual Unqualified person involved with installation operation and maintenance of this device is prohibited If any above mentioned problem happened or unknown problem happened please contact manufacturer or distributor for assistance Innovation Quality Performance Achieving Users Value 12 ...

Reviews: