background image

Complete Vang

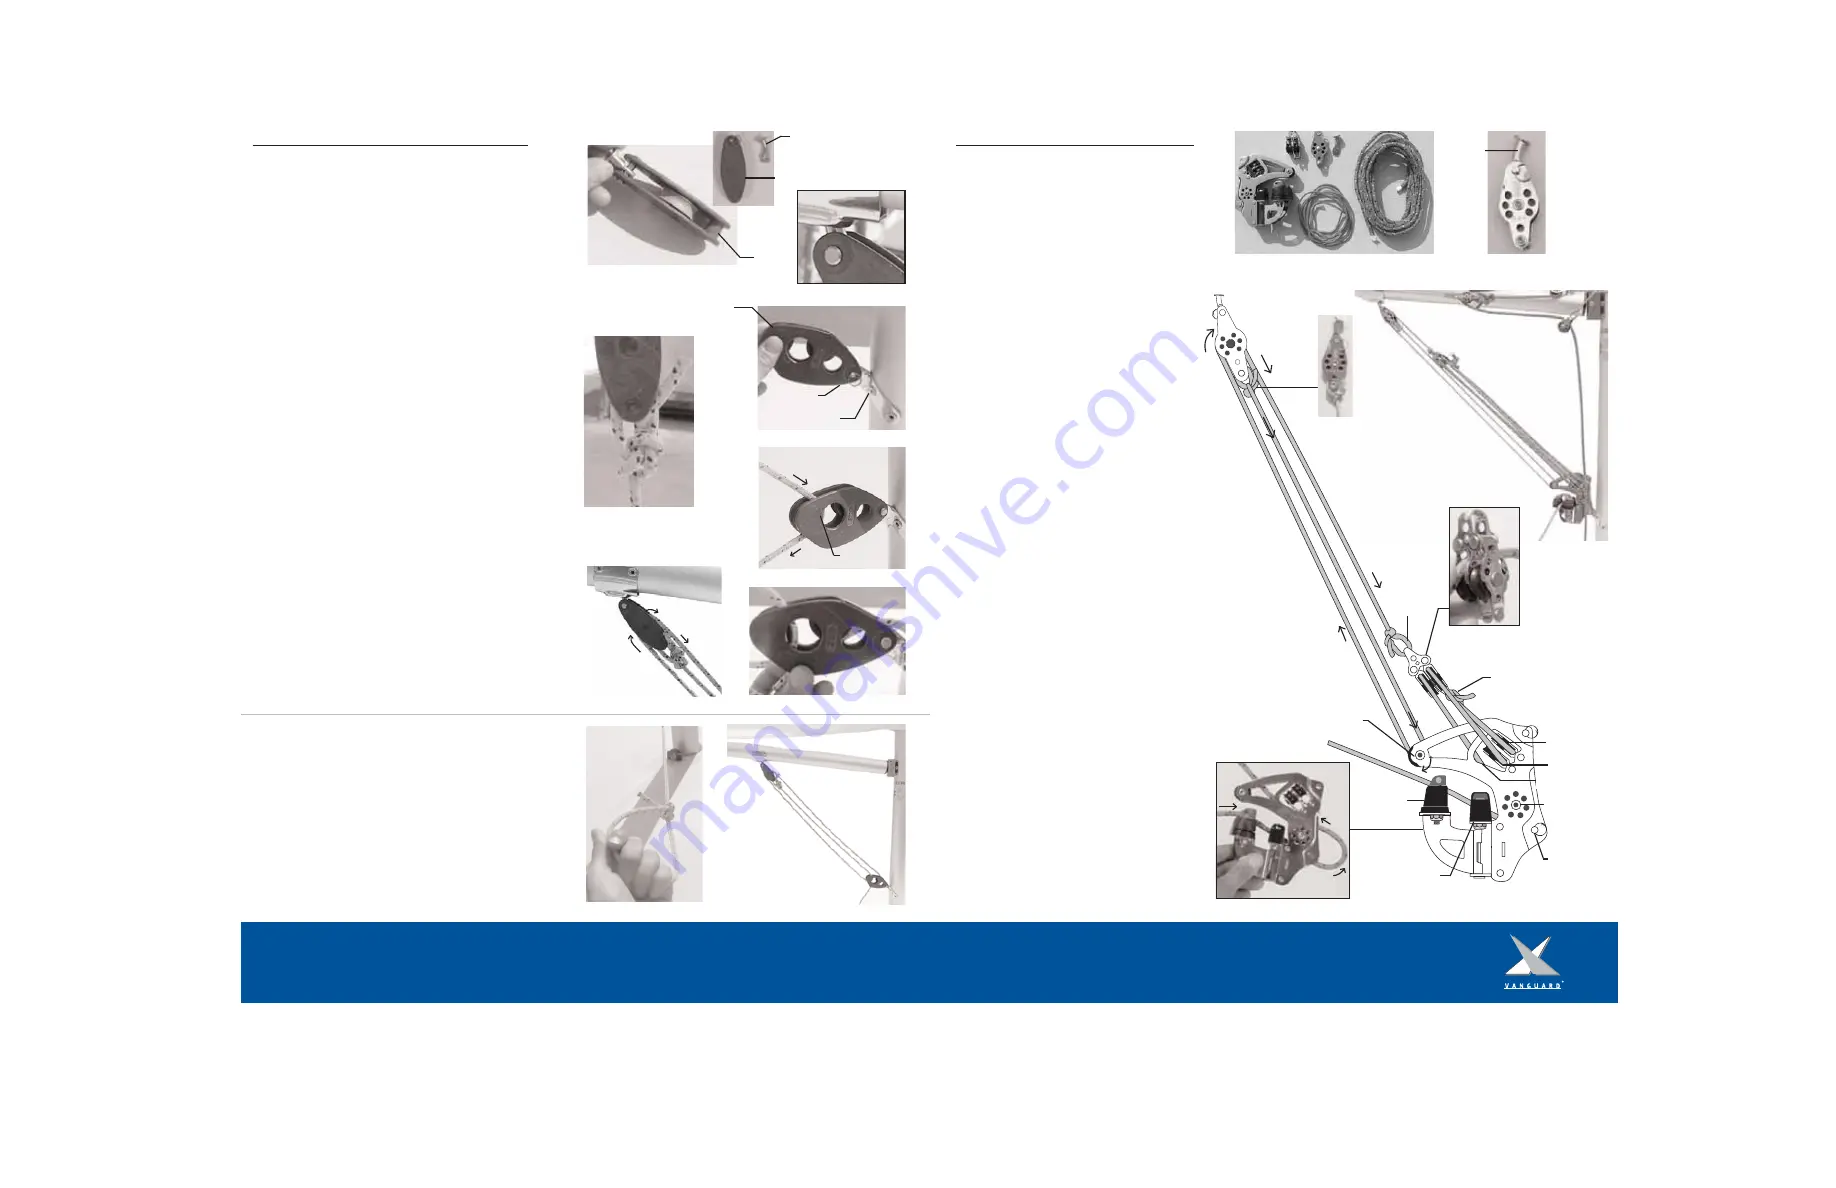
1. Locate the vang line from the delivery kit line bag.  Retrieve
the two vang blocks and vang key from the delivery kit.    

1. Attach the vang key to the micro block with
becket with the provided pin and ring
(Figure 51). 

2. Take the vang secondary line and lead it
through the cleat and fairlead of the lower vang
block/cleat assembly.  Continue the line around
the internal block and out by the external
sheave.  Pull several feet of line through the
cleat and fairlead in order to assemble the
purchase system (Figure 52). 

3. Lead the line clockwise through the small
double block with becket.  Making sure to go
around the block that does not contain the
becket (Figure 53).

4. Continue the line down through the lower
block on the vang block/cleat assembly and
back up and around the small double block with
becket.

5. Lead the line through the upper block of the
lower vang block/cleat assembly and complete
the purchase by tying the tail end of the line to
the becket of the small double block with a
stopper knot followed by a half hitch
(Figure 54). 

6. Attach the lower vang block/cleat assembly
to the mast tang with the provided pin and ring.

Rigging the Vang: Laser Standard Models

2. Take the smaller of the two vang blocks and remove the pin
and ring.  Insert the vang key and secure with the pin and ring
(Figure 42).  Hook the key into the vang slot on the underside of
the boom (Figure 43). 

3. Use the provided pin and ring to attach the larger of the two
vang blocks to the vang tang, located below the gooseneck on
the mast (Figure 44).  Make sure that the cleat is on the bottom
side of the block.  

4. Take one end of the vang line and tie a bowline to the becket
on the small vang block on the boom (Figure 45).  

5. Lead the line to the forward vang block and through the upper
sheave of the large vang block on the mast (Figure 46).

7. Lead the line around the inner block and down through the
teeth of the cleat located on the underside of the block (Figure
48).  Tie off the free end of the line with a bowline (Figure 49).

6. Lead the line back up and around the small vang block on the
boom and back down to the large mast vang block (Figure 47).

Rigging the Vang: Laser Pro Models

Becket

Vang Tang

Upper Sheave

1.

2.

3.

4.

5.

6.

From the delivery kit locate: (Figure 50) 

1. Lower vang block/cleat assembly
2. Small double block with becket
3. Single block with becket       
4. Vang key 
5. Vang primary line
6. Vang secondary line

Figure 50

Figure 47

Figure 48

Figure 46

Figure 44

Figure 45

Figure 42

Figure 43

Figure 49

Figure 51

7. Take the primary vang line and tie a bowline
to the becket of the single block with key
(Figure 55).      

8. Lead the line down to the sheave of the vang
block/cleat  assembly (Figure 56) and then back
up through the single block with becket.  

9. Tie a bowline to the top of small double
block with becket (Figure 57).    

10. Attach the vang key to the boom, making
sure that the key is curved towards the mast
(Figure 58).

Cleat

Internal Block

Upper Block

Lower Block

Tie off to

Becket

Figure 54

Fairlead

Figure 52

Figure 53

Attach

to mast

Figure 56

Figure 57

Figure 58

Figure 55

Complete Vang

Vang Key

Vang Key

Small Vang Block

Large Vang Block

Cleat

External Sheave

4.

1.

3.

2.

5.

Summary of Contents for Laser

Page 1: ...LASER GO FAST TIP 1 Read This Rigging Guide First Laser Rigging Guide Laser Radial Laser 4 7 ...

Page 2: ...1 1 Sail Numbers 2 Line Bag 3 Tiller with 33 extension 4 Rudder 5 Daggerboard 6 Battens 7 Boom 8 Upper mast 9 Large traveler block 10 Small traveler block 11 Large vang block 12 Small vang block 13 Vang Key 14 Mainsheet ratchet block 15 Spring 16 Bullseye fairlead 17 Clam cleat Depending of which Laser you have selected Laser Radial or Laser 4 7 you will have one of the following sails and corresp...

Page 3: ...ooking forward Starboard Right side of the boat when looking forward Gunwale Upper edge of a boat s side Leeward Direction away from the wind Windward Direction from which the wind is coming Bow Luff Foot of the Sail Clew Leech Boom Tack Port Side Tiller Mainsheet Starboard Side Traveler Stern Boom Vang Mast Daggerboard Rudder Cockpit Gunwale ...

Page 4: ...ard Models Tip Before replacing the screws be sure to dip them into a silicon based sealant to allow for a water tight and secure fit Hardware Installation Laser Pro Models Open end 2 In the delivery kit locate the cleat base with cleats Unscrew the two screws located by the daggerboard well Align the cleat base over the two holes and screw into place Figure 11 Make sure that the shorter of the me...

Page 5: ...line tie an overhand knot to secure the line Figure 22 5 With the tail end of the line lead it through the cleat and tie off with a bowline handle Figure 23 3 Make a loop in the port side of the line as if you were going to tie a bowline Figure 17 Keeping in mind that the free end of the port side line will be cleated off Take the starboard end of the line and complete the bowline by going through...

Page 6: ...he gooseneck pin into the forward end of the boom and walk aft exerting pressure towards the mast to keep it in place Figure 28 1 Locate the sail battens boom upper and lower mast from your delivery kit Remove your sail from the sail bag and have the three battens handy Your battens should comprise of Two long and one short Figure 24 2 Unfold the sail Starting from the head of the sail locate the ...

Page 7: ...the clew of the sail and then back through the fairlead Figure 30 3 Lead the line forward along the boom and cleat off at the clam cleat on the top of the boom Figure 31 Tie a bowline in the free end of the line Figure 32 Rigging the Clew Tie Down Laser Standard Grommet 3 Locate the outhaul retainer from the line bag and the two micro single blocks from the delivery kit Take one end of the outhaul...

Page 8: ...g tang located below the gooseneck on the mast Figure 44 Make sure that the cleat is on the bottom side of the block 4 Take one end of the vang line and tie a bowline to the becket on the small vang block on the boom Figure 45 5 Lead the line to the forward vang block and through the upper sheave of the large vang block on the mast Figure 46 7 Lead the line around the inner block and down through ...

Page 9: ...ngham primary line to the becket at the top of the cunningham double micro block with becket Figure 63 The Laser class rules state To secure the mast in the event of a capsize a loose retention line that will allow 180 degrees of rotation shall be tied between the block base and the vang tang or gooseneck Locate the mast retaining line from the delivery kit Tie a small bowline to the port loop on ...

Page 10: ...of the board Figure 72 5 When you are ready to launch place the daggerboard in the trunk with the shockcord facing towards the bow Take one end of the daggerboard retaining line around the starboard side of the mast and through the bow handle Take the other end of the line around the port side and connect the two brummel hooks Figure 69 Figure 70 Figure 71 Figure 72 Tip For the Laser Pro model ver...

Page 11: ...H dollies allow you to spend less time getting your boat to and from the water and more time on the water www seitech com Sail Care It is important to take proper care of your sail in order for it to last longer and perform to the standard that they were designed for Follow these simple tips to help extend the life of your sail 1 If you are sailing in salt water be sure to rinse out your sail with...

Page 12: ...__ __ Purchased From Date of Purchase Contact Name Phone Address City State Zip Code Hull Color Sail Registration Information if applicable Trailer VIN License Plate Number State Register in Registration Number State Register in Insurance Information Maintenance NOTES ...

Reviews: