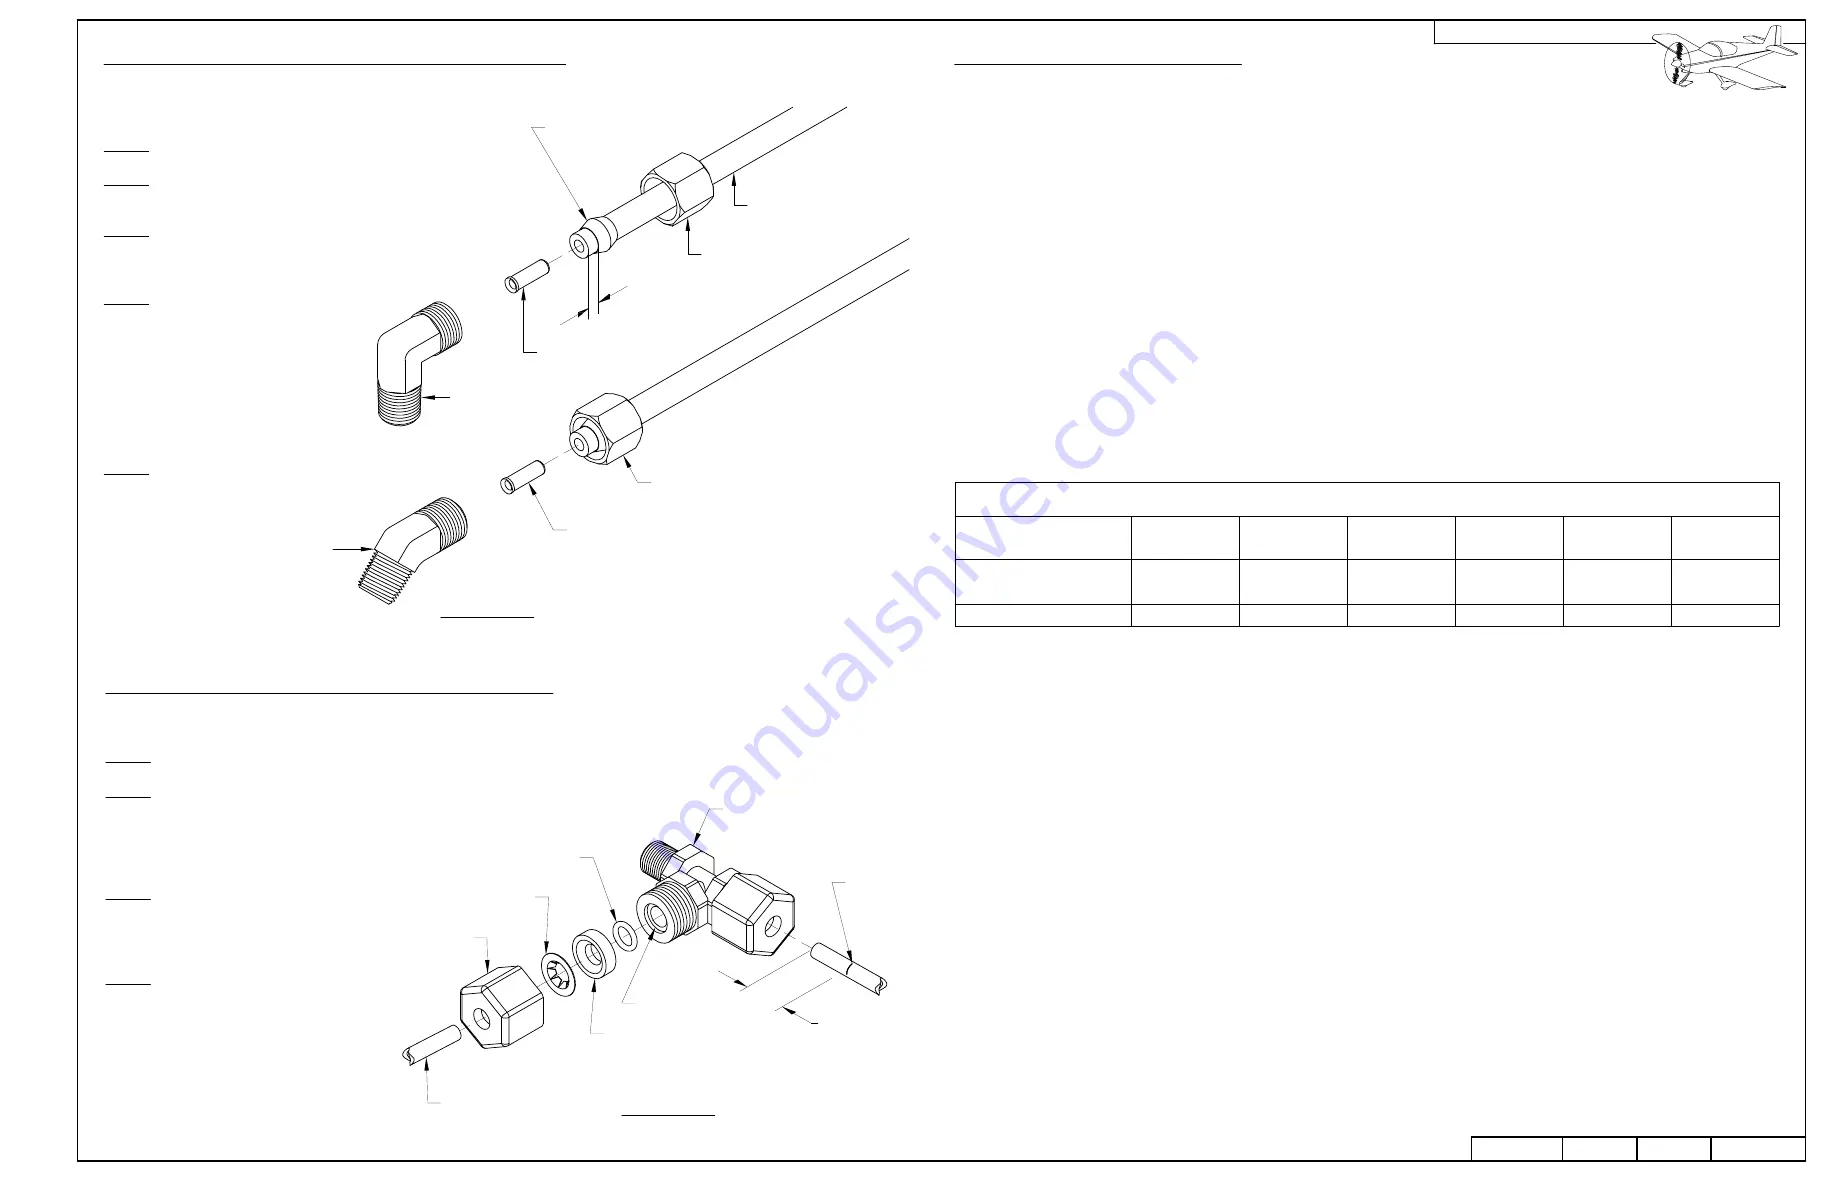
5.22 COMPRESSION FITTINGS IN PLASTIC TUBING
NUT WITH SLEEVE ATTACHED
(INCLUDED WITH ELBOW ASSEMBLY)
BRASS 45° ELBOW
BRASS INSERT
BRASS INSERT
FIGURE 1: COMPRESSION LINE END FITTINGS
BRASS ELBOW
SLEEVE (INCLUDED WITH
ELBOW ASSEMBLY)
APPROX.
.125
[3.2 mm]
PLASTIC TUBE
NUT (INCLUDED WITH
ELBOW ASSEMBLY)
Install compression fittings to plastic tubing using the
following steps:
Step 1: Drill #29 the inside of the tube.
Step 2: Blow out the tube using compressed air from
the end opposite the one which was drilled.
Step 3: Slide the nut and sleeve over the
plastic tube, then locate the sleeve about
1/8 inch from the end. See Figure 1.
Step 4: Press the brass insert into
the end of the plastic tube as far as
possible by pushing it against some
solid object. Place the end of the
assembly in boiling water for one
minute, then immediately press the
insert in the rest of the way until it
bottoms against the end of the
plastic tube.
Step 5: Tighten the nut finger tight,
then one full turn thereafter.
5.23 NYLON FLUID FITTINGS IN PLASTIC TUBING
FIGURE 2: MALE NYLON TEE
EXPLODED VIEW
MALE NYLON TEE
NYLON COLLAR
Install nylon fittings to PT-062X1/4 Plastic Tube using the following steps:
Step 1: Cut tube squarely and remove any burrs.
Step 2: Place insertion mark .625 [15.9 mm] from end of tube.
See Figure 2. Moisten marked end of tube with water.
NOTE: Nut, keeper, collar and O-ring are in
place on the fitting at this point.
Step 3: Install plastic tube into nylon
nut by pushing end of moistened
tube straight into the nut until the tube
bottoms on the tee's shoulder.
Step 4: Finger tighten nylon nuts.
Additional tightening should not be
necessary, but 1/4 additional turn may
be added if desired. DO NOT OVER
TIGHTEN nut or threads will strip
and fitting will not function properly.
A proper assembly will not show
insertion mark extending beyond the
nut. If insertion mark is visible, then
repeat steps 3 and 4.
NYLON
NUT
METAL KEEPER
O-ring SEAL
.625 [15.9 mm]
PLACE
INSERTION
MARK
HERE
5.24 DRILLING, TAPS AND DIES
Material alloy and hardness, as well as the makeup of the cutting tool determine the speed at which metal is
best drilled. For the purpose of this discussion, we assume that the drill used is High Speed Steel (HSS). Cutting
speed is stated in surface feet per minute or abbreviated as FPM and is a measure of the peripheral speed of the drill. Softer
materials can be cut at a higher speed than harder materials. Smaller drills have to turn faster than larger drills to achieve the same
FPM cutting speed.
For the most part, the materials we are concerned with in RV construction are aluminum and steel. The aluminum is of various
alloys, but we can use 200 FPM as a cutting speed for all of them. The steel is 4130 chrome molybdenum alloy. We can use a
cutting speed of 60 FPM for 4130.
Drilling most of the aluminum in RV construction can be done dry, without any oils or cutting fluid. When drilling holes more than
three diameters deep, a few drops of kerosene or Boelube helps. For holes larger than 1/4" in thin material a "Unibit" makes a
cleaner hole.
Steel is best drilled with at least some oil. Practically any oil, WD-40 etc. can be used. There is no need to get sloppy. Use just
enough oil to lubricate and carry off some heat. Drilling steel requires considerably more feed pressure, or thrust, than aluminum.
The chart below is general in nature. Interpolate speeds for sizes not listed. Notice the drill speeds for aluminum are higher than
any of our hand held drills are likely to go. This is why air drills are superior to electric drills when drilling aluminum. It is also
assumed that the drills are sharp and the setup is rigid, as in a drill press.
When drilling with a hand drill it is advisable to start the drill turning slowly, then increase the RPM after the drill is centered and
stabilized in the hole. Drill a straight hole by aligning the drill with its reflection in the shiny aluminum surface. The small drills that
we use in RV building are of the split point style and need special equipment to sharpen. As many as a dozen each of #30 and #40
will be needed to complete the project. Do not skimp on drill bits; when they get dull replace them.
See Section 5.19 for tips on drilling Plexiglass.
DRILLING TERMINOLOGY
Fundamentally, and unless otherwise noted, "drilling" shall be understood as comprising the following basic sequence of
procedures; having material(s) in hand, acquiring hole size and position from the drawing, transferring hole location to the part
through measurement or other means, marking the hole location, center-punching hole location, drilling through the material or
materials.
Match-drill refers to drilling a stack of two or more parts in which a hole is already located in the first part. Drilling through the
existing hole in the first part results in a matching hole(s) in the other part(s) in the stack.
Final-drill refers to drilling one or more parts that already have a hole in the location to be drilled. A final pass is made through the
existing hole with the specified size drill bit.
Deburr all drilled holes before dimpling or riveting.
Steel (60 FPM)
Material
Aluminum (200 FPM)
Drill Size
611
1748
0.375
2339
7796
1784
5946
#40
0.098
#30
0.128
1213
4198
0.189
Drill RPM
#12
917
3056
0.250
459
1528
0.500
PAGE
REVISION:
DATE:
VAN'S AIRCRAFT, INC.
09/24/13
1
RV-ALL
05-29
PT-062X1/4
PLASTIC TUBE
SHOULDER


