www.fmiproducts.com
125784-01D
30
OPERATION
Continued
And then
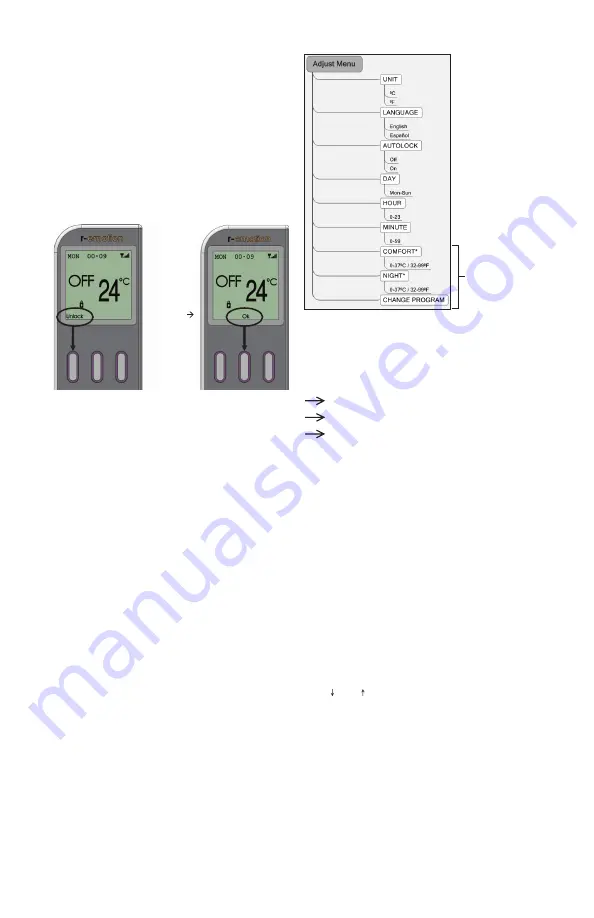
Figure 65 - Menu System
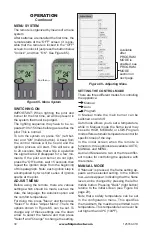
Figure 66 - Adjusting Menu
MENU SYSTEM
The remote is organized by means of a menu
system.
After batteries are installed the first time, the
remote starts at the ''OFF'' screen ( it is pos-
sible that the remote is locked in the ''OFF''
screen: to unlock it just press the button below
''Unlock'', and then ''OK''. See Figure 65).
SETTING THE CONTROL MODE
There are three different modes for controlling
the appliance:
Manual
Auto
Program
In Manual mode the main burner can be
switched on and off.
Auto mode allows you to set a temperature,
while in Manual mode the flame level may
be set to HIGH, MEDIUM, or LOW. Program
mode offers automatic temperature control for
specific times of the day.
In the initial screen when the remote is
turned on, three options are available: AUTO,
MANUAL and MENU.
Auto and Manual are two of the three differ-
ent modes for controlling the appliance with
the remote.
MANUAL MODE
If ''Manual'' is pressed, the flame setting ap
-
pears as the selected setting. In the bottom
row,
and
appear, indicating that the flame
level can be changed by pressing the left or
middle button. Pressing ''Back'' (right button)
returns to the initial screen (see Figure 64,
page 29).
Note that a safety temperature can be set
in the configuration menu. This specifies
the maximum the maximum permitted room
temperature. This temperature can never be
set higher than 40ºC (104ºF).
SWITCHING ON
IMPORTANT:
When lighting the pilot and
burner for the first time, air will be present in
the system that must be purged.
The lighting sequence may have to be re-
peated 10 to 15 times before gas reaches the
pilot. This is normal.
To turn the system on, press “On” (left but
-
ton) and “OK” (middle button). A beep from
the control module will be heard and the
ignition process will start. This will take up
to 20 seconds. Note that while in operation
the signal bars will disappear for a few mo-
ments. If the pilot and burner do not light,
press the “Off” button, wait 15 seconds then
repeat the ignition steps from the beginning
of this paragraph. Note: each ignition step is
accompanied by two short series of ignition
sparks at the pilot.
ADJUST MENU
Before using the remote, there are various
settings which should be made, such as the
date, the language, the autolock option and
the comfort temperature.
For doing this, press ''Menu'' and then press
''Select'' to chose ''Adjust Menu''. There the
options shown in Figure 66, can be set. To
change any of these settings use the down
arrow to select the feature and then press
"Select" and "Change" to change the setting.
Available
after
PROGRAM
MODE is
enabled, see
PROGRAM
MODE
section on
next page.

