10
Installation
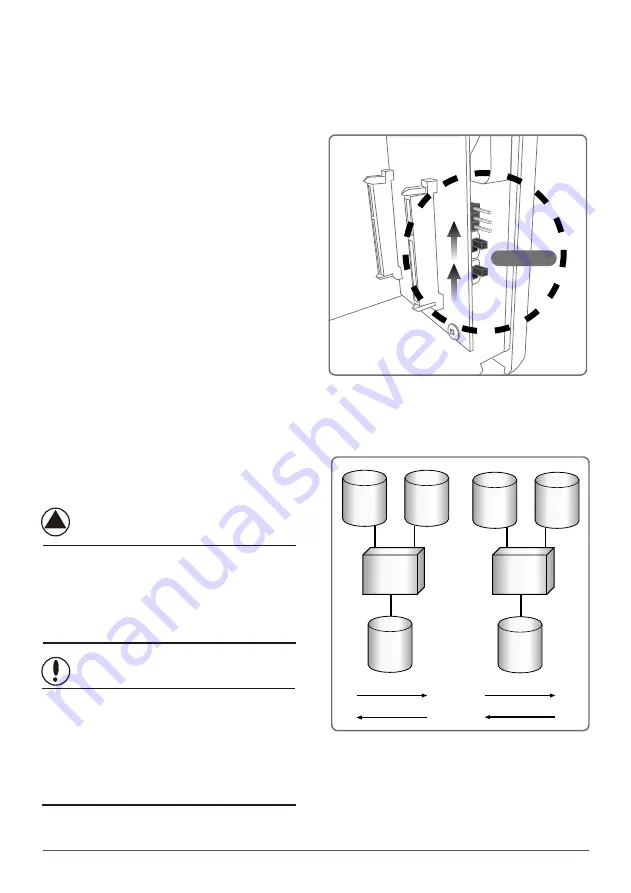
1. Adjust the switches as shown in Figure C.
Turn on the power and press the "adjusting
key" button. When the "JBOD" on the front
panel is lit, JBOD Mode is active and
complete.
Setting JBOD Mode:
NOTE :
This mode can combine two different capacities,
brands and models of hard drives as a single large
volume. It’s suitable for you to use the additional hard
disks of the computer to copy and save large files,
movies, music or videos etc.
WARNING :
JBOD mode can combine two different hard
drives as a single large volume. When one of
the hard disk is damaged, this can lead to all
the hard drives in the JBOD to show up with
corrupt or damaged data.
( Figure C )
( Figure C )
( Figure D )
( Figure D )
2. Please refer to 5.3
Raid 0
500GB
Raid 0
1000GB
250GB
NST-360MX
Port 0
Drive A
250GB
Drive B
Port 1
250GB
Drive A
750GB
Drive B
NST-360MX
Port 0
Port 1
Equal hard drives
Unequal hard drives
Striping across
Striping across
Adjusting key
Summary of Contents for NexStar-3 MX
Page 1: ...JBOD RAID 3 5 SATA...
Page 4: ...1 20 2 21 3 22 4 23 5 24 6 35 7 38 8 38 2...
Page 22: ...20 1 3 3 5 SATA 3 3 5 SATA SATAI II JBOD 4TB RAID 3 3 5 SATA 3 5 SATA NST 360MX SR...
Page 25: ...4 23 3 MX 3 5 SATA 1 2 JBOD RAID 0 RAID 1 USB 2 0 eSATA SATA...
Page 26: ...5 5 1 24 3 3 5 SATA 1 3 MX 2 3 MX 3 SATA A A B B C C...
Page 27: ...25 4 3 5 6 D D E E F F...
Page 33: ...31 5 3 1 2 Individual Mode JBOD Mode...
Page 34: ...32 RAID 0 Mode RAID 1 Mode...
Page 35: ...33 3 G G H H I I 4 5 1...


