background image

NOTE : 

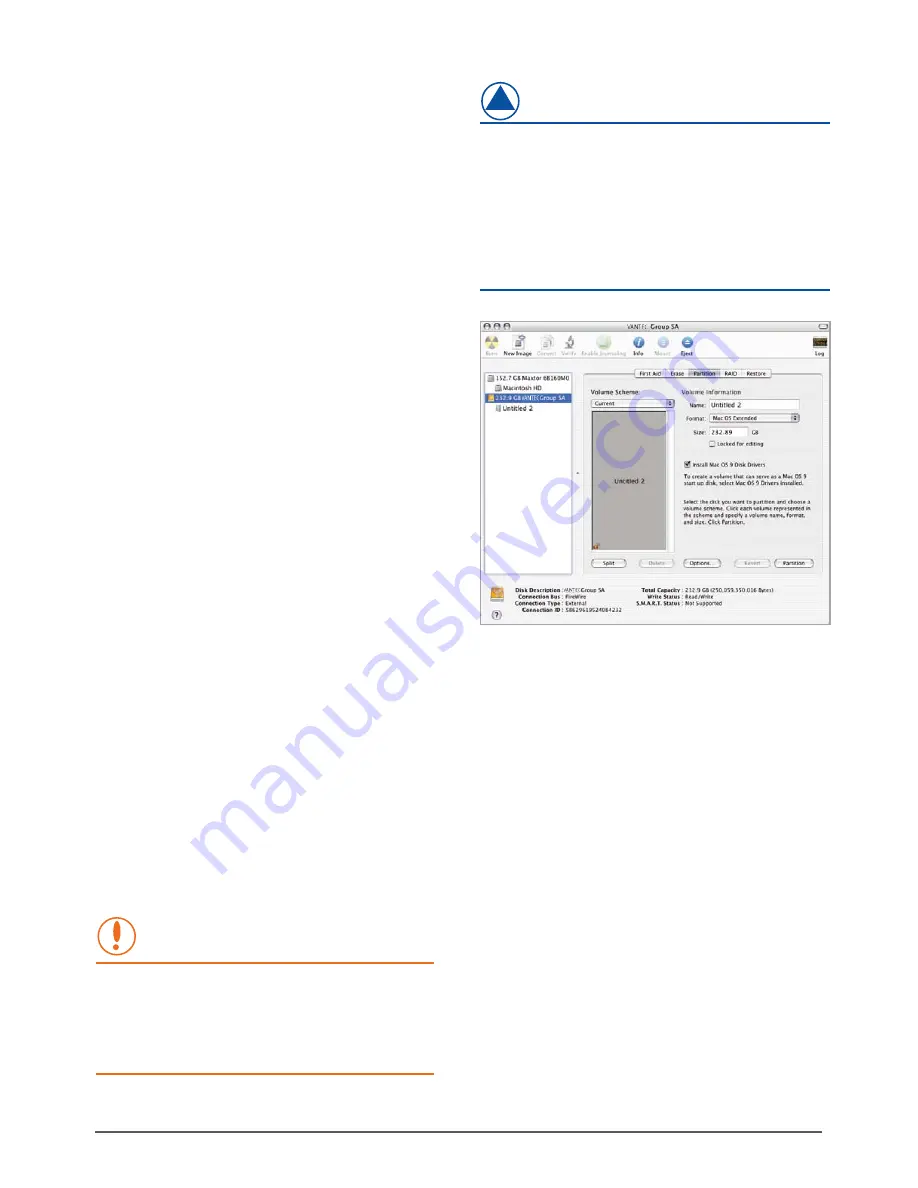
Creating a New Partition 

12

Formatting for Mac Users

WARNING : 

( figure 7-E )

Connect the device to the computer. Once 

connected please turn on the device.

Select Utilities from the Go menu in the 

Finder menu bar.

Select Disk Utility which is in the Utilities 

Folder.

When the Disk Utility window is open, select 

the volume labeled Vantec Desktop Hard 

Disk from the list of available hard drives on 

the left side of the window.

Select the Partition tab.

From the Volume Scheme menu, choose the 

desired number of partitions (Mac OS 10.x 

gives you the option of dividing the drive 

into at most 16 partitions). You may adjust 

the size of each partition using the slide bar 

between the partitions in the Volume 

Scheme area.

In the Volume Information section, enter the 

desired name for each volume (partition). 

You may choose one of the following 

volume format (Mac OS Extended, Mac OS 

Standard, UNIX File System, or MS-DOS).

Once you have finalized the volume options, 

click Partition. An alert message should 

appear, click Partition again.

Mac Disk Utility will format and partition the 

disk according to your settings. When 

partitioning is complete, your drive will be 

ready for use.

(1)

(2)

(3)

(4)

(5)

(6)

(7)

(8)

(9)

If  the  hard  drive  will  not  mount  on  your  system, 
format  the  drive  into  FAT32  or  NTFS  partition 
through a PC system first. Once formatted, connect 
the NexStar Enclosure to your Mac and run the Disk 
Utility  Tool  again.  The  Disk  Utility  Tool  should  be 
able  detect  the  hard  drive  and  allowing  you  to 
format or mount the hard drive.

Following these steps will erase the Hard Disk. If 

you  have  data  that  you  want  to  protect  or 

continue to use, please backup your data before 

performing these steps.

Summary of Contents for Nexstar 3 Super Speed

Page 1: ...U S E R S M A N U A L...

Page 2: ...s Manual 6 Installation Screws TRADEMARKS MS DOS Microsoft Windows NT 2000 XP Vista 7 are trademarks of Microsoft Corporation Apple Macintosh and Mac are trademarks of Apple Computer NexStar is a regi...

Page 3: ...5 HDD Enclosure NexStar 3 SuperSpeed External 3 5 HDD Enclosure NexStar 3 SuperSpeed External 3 5 HDD Enclosure 3 System Requirements 04 4 Parts Layout 05 5 Installation 5 1 Hardware Installation 06 6...

Page 4: ...speeds of up to 5 Gbps With its mirror finish and sleek curves the Vantec NexStar 3 SuperSpeed USB 3 0 External Hard Drive Enclosure stands out from the crowd The sturdy drive cage protects your hard...

Page 5: ...SB 3 0 HD Capacity Up to 2 TB Power Supply AC Adapter Material Aluminum Dimension 206 x 123 x 33mm Attractive Mirror Finish Design Aluminum Casing Cools Down Your Hard Drive Maximum Transfer Rates Up...

Page 6: ...10 4 greater 1 For USB 2 0 speeds the system must support USB 2 0 specifications 2 For USB 3 0 speeds the system must support USB 3 0 specifications 1 For USB 2 0 speeds the system must support USB 2...

Page 7: ...4 Parts Layout Parts Layout 5 NexStar 3 SuperSpeed USB 3 0 External 3 5 HDD Enclosure Hard Drive Caddy Aluminum Housing LED Cable SATA Power Connector...

Page 8: ...umpers to MASTER or SINGLE DRIVE ONLY Please refer to the manufacturer s documentation of your hard drive for further information on your jumper settings Remove the side of the NexStar 3 SuperSpeed wi...

Page 9: ...e caddy and secure the hard drive with the screws provided Installation 7 figure 5 1 B 1 Connect the SATA and power connector to the hard drive as pictured 3 Insert the drive caddy back into the alumi...

Page 10: ...s the new volume should appear on desktop On a Windows PC the new volume will appear under My Computer Your NexStar 3 SuperSpeed External Hard Drive is now ready for use 1 2 3 4 5 If you can see the U...

Page 11: ...op The system should prompt It is now safe to remove the USB device If not wait for any programs still using the device to finish and try again You may now safely turn off and disconnect the NexStar 3...

Page 12: ...information on formatting or partitioning the hard drive Right click on My Computer and choose Manage Under Storage on the LEFT pane select Disk Management Windows should now give you the option to in...

Page 13: ...primary and the recommended file system is NTFS Please note that Windows 2000 XP Vista 7 limits FAT32 partitions to only 32GB Windows Disk Management will format and partition the disk according to y...

Page 14: ...tion section enter the desired name for each volume partition You may choose one of the following volume format Mac OS Extended Mac OS Standard UNIX File System or MS DOS Once you have finalized the v...

Page 15: ...1 year limited warranty 90 day parts If your unit should become defective within that time frame please go to www vantecusa com for information on how to receive warranty exchange or repair Cosmetic d...

Reviews: