background image

5. Installation: 

NexStar External 3.5” HDD Enclosure:

5.1. Hardware Installation:

Installing the hard drive:

1) Set the hard drive jumpers to MASTER or SINGLE DRIVE ONLY.  Please refer to 

the documentation included with your hard drive for information on how to 
accomplish this.

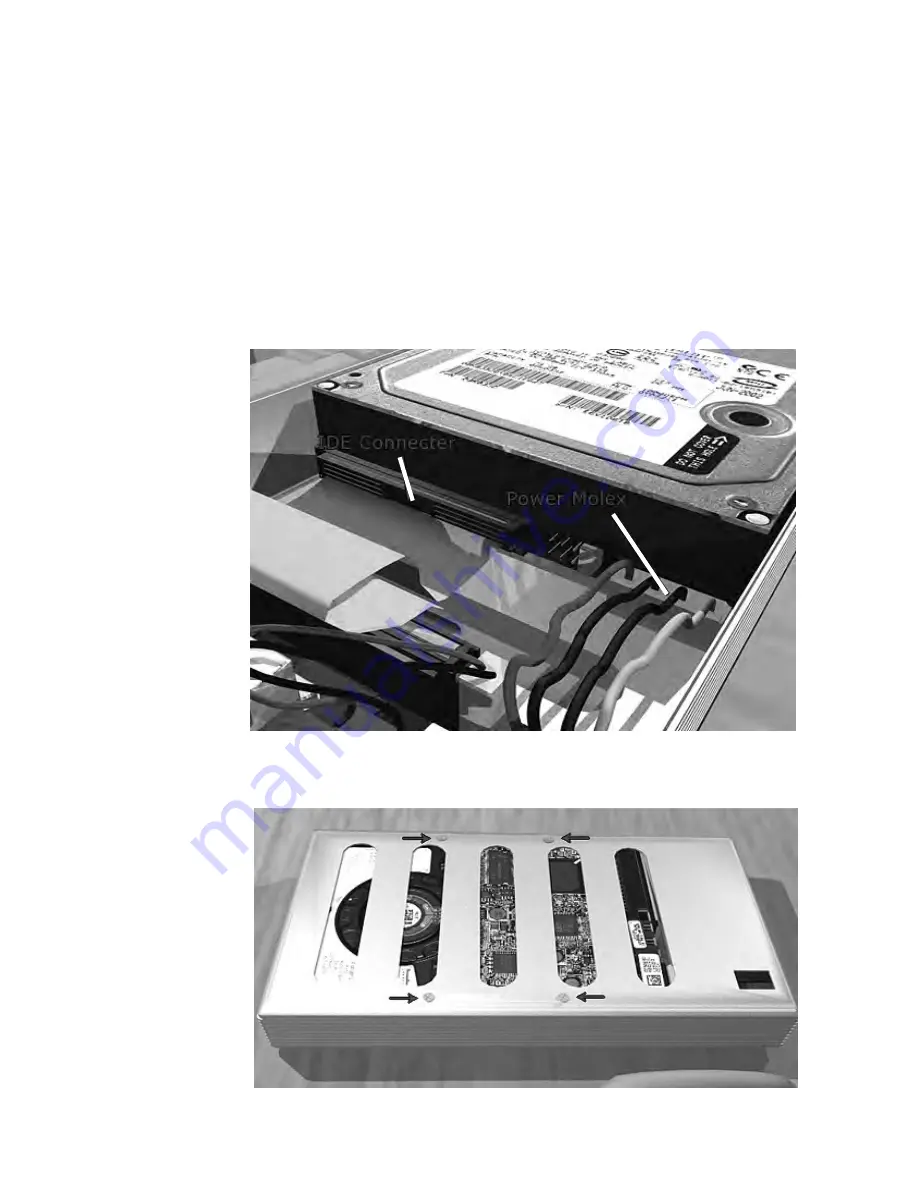
2) Connect the IDE Connector and the Power Molex from the NexStar to your 

hard drive (see image below).

3) Using the included screws (larger ones), screw the hard drive onto the case 

through the holes on the bottom of the body (see image below).

IDE Connector

Power Molex

6

Summary of Contents for NEXSTAR NST-350U2

Page 1: ...E X T E R N A L 3 5 H A R D D R I V E E N C L O S U R E w w w v a n t e c u s a c o m U S E R M A N U A L...

Page 2: ...re Power Adaptor Power Cable USB Cable FireWire Cable NST 350UF Only Vertical Stand Screws TRADEMARKS MS DOS Microsoft Windows 95 98 NT 2000 ME XP are trademarks of Microsoft Corporation Apple Macinto...

Page 3: ...s Layout NexStar External 3 5 HDD Enclosure pg 5 5 Installation NexStar External 3 5 HDD Enclosure 5 1 Hardware Installation pg 6 5 2 Driver Installation pg 9 6 Disconnecting the NexStar NexStar Exter...

Page 4: ...is an ideal way to add an extra hard drive to your system without having to open your system and deal with jumpers and cables The NexStar also features a sturdy housing with aluminum covers to dampen...

Page 5: ...0 g Casing Material Aluminum Alloy Features Aluminum Covers To Reduce Heat Transfer Rates Up to 12Mbps With USB 1 1 Transfer Rates Up to 480Mbps With USB 2 0 Transfer Rates Up to 400Mbps With FireWir...

Page 6: ...rocessor and greater Microsoft Windows 98SE ME 2000 XP or Mac OS 8 6 and greater USB equipped system For USB 2 0 speeds the system must support USB 2 0 specifications For FireWire the system must supp...

Page 7: ...5 4 Parts Layout NexStar External 3 5 HDD Enclosure A Case Body B Bottom Cover C Top Cover D Vertical Stand...

Page 8: ...ase refer to the documentation included with your hard drive for information on how to accomplish this 2 Connect the IDE Connector and the Power Molex from the NexStar to your hard drive see image bel...

Page 9: ...le between your thumb and index finger and gently pull at the sides until the cable comes loose To remove the power cable grasp the sides of the plug and pull 4 Hook the bottom cover in place to cover...

Page 10: ...8 6 Place the NexStar on the stand in the orientation pictured below...

Page 11: ...y for use 5 2 Driver Installation Windows ME XP 2000 NST 350U2 NST 350UF 1 No drivers are necessary when using Windows ME XP 2000 If the hard drive does not appear under My Computer be sure to partiti...

Page 12: ...the system tray as well If the drive does not appear you may need to partition your hard drive first FireWire NST 350UF Combo Drive 1 If this is the first time you are using the NexStar unplug the Nex...

Page 13: ...t be installed on your system If it is not you can download the USB Mass Storage Support 1 3 5 from the Apple Software Updates website http www apple com support 3 Follow the direction associated with...

Page 14: ...prompt It is now safe to remove the USB device If not wait for any programs still using the device to finish and try again 4 Turn off the NexStar 5 Unplug the USB Firewire cable from the system Mac O...

Page 15: ...ght click on My Computer and choose Manage 2 Under Storage on the LEFT pane select Disk Management 3 Windows should now give you the option to initialize the disk If not locate the new drive right cli...

Page 16: ...ive you want to initialize 5 Click Initialize To format your hard drive with Mac OS Extended format a method of formatting hard drives that allows for more efficient use of hard drive storage space fo...

Page 17: ...me to the new drive 5 Click on Erase 6 Once complete your new hard drive should be mounted on your desktop Note If the hard drive will not mount on your system format the drive with a FAT32 or NTFS pa...

Page 18: ...l between the NexStar and the computer Q Why is the data on my hard drive corrupted A Connecting your hard drive to the NexStar is just like connecting a hard drive to the inside of your computer The...

Page 19: ...tted the hard drive in the FAT32 file system FAT32 limits the file sizes to 4GB maximum The NTFS file system does not have this limitation Q Why am I getting Delayed Write Errors in Windows XP 2000 A...

Page 20: ...nd missing parts are not covered under this warranty Please check the contents of the unit to make sure you received all parts Also check for any cosmetic flaws If any parts are missing or if there ar...

Reviews: