background image

VARI-590H

 2.4.3.2.4  Function 4 – side-discharge mowing

While side-discharge mowing is the grass thrown through the side discharge chute. The cut gras is not finely chopped as by mulching

and is equally displayed on the grass strip. 

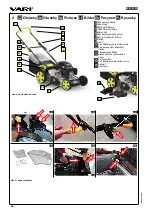
Lift the rear cover and push the mulching wedge into the rear discharge channel  

Pict.


> 1  

. Lock the mulching wedge with the

chassis and the nose on the bottom side of mulching wedge grip must snap into the opening on the chassis 

> 2 

 and lower the rear cover.

Lift sideward flap for side discharge 

Pict.


6


> 1 

, mount the discharge channel for side discharcheon the support pin of the side flap 

> 2

and lower the side flap – the side flap lies on the discharge channel 

> 3


.

Adjust the mower only with a stopped engine and standstill blade.

When side-discharge mowing go through the overgrowth so that you have always the uncuted grass on the left side of
the machine. 

 2.5  Maintenance, servicing and storage

Stop the engine and unplug the spark plug before any repairing or maintenance operations.

Do not touch rotating blade.

Refuel in a well-ventilated area with the engine stopped.

Make sure that all nuts, bolts and screws are kept well tightened to keep the lawnmower in a safe operating condition.

Never store the lawnmower with a tank with gasoline in an enclosed area where gasoline fumes could reach a strong
heat source or a flame.

Allow the engine to cool down before you store your lawnmower in any storage place.

In order to reduce any risk of fire, clean the lawnmower and particularly the engine, the muffler, the fuel tank. Suppress
all grass traces or leaves or excess of grease.

Check the grass catcher frequently for wear or deterioration.

Replace worn or damaged parts for safety.

If the fuel tank has to be drained, this should be done outdoors.

In order to be happy with our product in the long-term, it is necessary to give it adequate maintenance and servicing care. Regular

maintenance reduces deterioration and ensures proper functioning. 

Follow all instructions concerning maintenance and adjustment schedule. It is recommended that you keep a record of the amount of its

working time and conditions (for service needs). It is recommended to let one of our authorised service centres take care of the after-
season maintenance, as well as regular maintenance if you are not sure about your technical skills.

Read carefully the engine manual. Check regularly the oil level and add some oil or replace it if necessary.
Frequently check the lawnmower and ensure that all grass deposits are removed from beneath the deck.
Lubricate regularly the wheel axle and the bearings with grease.
Check often the blade, in order to obtain a clean work. The blade should always be sharp and well balanced.
 At regular intervals check the tightening of all bolts and screws. Wear off or badly tightening nuts and bolts can involve some important

damages to the engine or the frame.

If the blade hits violently an obstacle, stop the lawnmower and bring it to agreed service station.

Check the nut tightening the blade before each cutter use. 

 2.5.1  Blade

The blade is made of pressed steel, in order to obtain a clean work sharpen the blade frequently, around every 25 hours of work. Be

sure that the blade is always well balanced; a badly balanced blade can involve harmful vibrations 

Pict.


8

.

You must only use the blade supplied by the manufacturer.

To remove the blade, unscrew the blade screw, check the blade support and change all parts if they are worn out or damaged 

Pict.


7

.

When reassembling the blade, make sure that the cutting edges face in the direction of the engine rotation 

Pict.


9

. The blade screw

must be tightened with a tightening torque of 37 N.m with a dynamometric tool.

 2.5.2  Engine oil exchange

Follow the engine user manual instructions. If you use the cutter in a dusty environment, shorten the exchange period by half. When

pouring the oil out of the engine tilt the cutter on its filler and oil dipstick side or dismantle the whole engine.

Seek authorised service in case you lack appropriate manual skills.

23

R

ev

iz

0

5

/2

0

1

5

Summary of Contents for 590H

Page 1: ...osiarka do trawy VARI 590H CZ esky p vodn n vod k pou v n EN English translation of the original instructions PL Polsky t umaczenie oryginalnej instrukcji SK Slovensky p vodn n vod na pou vanie DE Deu...

Page 2: ...raz tko SK Dod vate pe iatka EN Supplier stamp DE Lieferant Stempel RU PL Dostawca piecz tka CZ M sto pro nalepen identifika n ho t tku SK Miesto pre nalepenie identifika n ho t tku EN Stick the iden...

Page 3: ...it spolehliv po adu let 1 1 1 Z kladn upozorn n U ivatel je povinen sezn mit se s t mto n vodem k pou v n a db t v ech pokyn pro obsluhu stroje aby nedo lo k ohro en zdrav a majetku u ivatele jako i...

Page 4: ...en rotuj c m pracovn m n strojem Maxim ln obvodov rychlost je 77 14 m s 1 Dbejte proto na to aby se ostatn osoby pohybovaly p i pr ci tohoto stroje v bezpe n vzd lenosti mo nost odletu se en ho porost...

Page 5: ...tin vy n n zemn ch v mol k ovin apod Je zak z no odstra ovat ve ker ochrann za zen a kryty ze stroj Se te jen za denn ho sv tla nebo za dobr ho um l ho osv tlen Zkontrolujte e jsou v echny rouby a mat...

Page 6: ...o kryt sekac ho stroj no e a ke kter mu jsou p ipojeny v echny d le it sti stroje Ve ker ovl dac prvky 1 2 a 3 jsou um st ny na d tk ch 8 d tka jsou k asi p ipevn na pomoc roubov ho spojen 11 a jsou s...

Page 7: ...ky brzdy se motor zastav Nevzdalujte se od stroje 1 4 2 2 Rozjezd pojezd stroje Pro zapnut pojezdu slou p ka 1 na Obr 1 P ku zm kn te a k madlu 16 d tek a stroj se ihned rozjede vp ed Sou asn se zm kn...

Page 8: ...d tr vy a zachycen ch ne istot 1 4 3 2 2 Funkce 2 se en se zadn m v hozem Se en prov d jte bez nasazen ho sb rn ho ko e kryt zadn ho vyhazovac ho otvoru 10 na Obr 1 usm r uje se enou tr vu do dku za s...

Page 9: ...e zamez te jeho rychl mu opot eben a zajist te spr vnou funkci v ech jeho st Dodr ujte v echny pokyny kter se t kaj interval dr by a se izov n stroje Doporu ujeme V m v st si z znam o po tu pracovn ch...

Page 10: ...da Obra te se na autorizovan servis Motor obt n startuje nebo ztr c v kon Do n dr e se dostaly ne istoty nebo voda nebo je v n vy p l benzin Vypus te palivo a vy ist te n dr Napl te n dr ist m erstv m...

Page 11: ...en ivotnosti Po vybalen stroje jste povinen prov st likvidaci obal dle n rodn ch z kon a vyhl ek o nakl d n s odpady P i likvidaci stroje po skon en ivotnosti doporu ujeme postupovat n sleduj c m zp s...

Page 12: ...6 2 Adresa dovozce a m sta fin ln mont e stroje VARI a s Telefon 420 325 607 111 http www vari cz http katalognd vari cz Opolansk 350 Fax 420 325 607 264 Libice nad Cidlinou 289 07 esk republika E mai...

Page 13: ...instruction our product will serve you reliably for many years 2 1 1 Basic warning The user must be familiar with this user guide and follow all machine operation instructions so that there are no ris...

Page 14: ...he cut stand or solid objects chipping off Since the recommended noise and vibration levels are exceeded follow the following instructions when operating the machine protect your ears with appropriate...

Page 15: ...eck that all nuts bolts and screws are well tightened Before mowing place the grass bag in its position Before mowing make sure that the blade and the blade fixing screw are securely fastened When cut...

Page 16: ...andlebars 8 Handlebars are attached to the frame with a bolted connection 11 and are inclinable using the handlebar s arresting lever 12 Handles 16 secure a firm grip and machine handling during work...

Page 17: ...rake control lever Do not go away from the machine 2 4 2 2 Putting the machine in motion To put the machine in motion use lever 1 on Pict 1 Press the lever all the way to the handle 16 and the machine...

Page 18: ...arge opening from grass and stuck dirt 2 4 3 2 2 Function 2 rear discharge mowing Mowe with remowed grass bag the cover of rear discharge chute 10 on Pict 1 lays the cutt grass into rows behind the la...

Page 19: ...deterioration and ensures proper functioning Follow all instructions concerning maintenance and adjustment schedule It is recommended that you keep a record of the amount of its working time and cond...

Page 20: ...the service centre Other defect Visit the service centre Engine is difficult to start or loses power Dirt water or stale petrol in fuel tank Drain fuel and clean tank Fill tank with clean fresh fuel...

Page 21: ...ommend to follow these instructions when disposing of the machine after its service life termination Dismount all machine parts that can still be used Empty oil from gearbox and engine into an appropr...

Page 22: ...sis cover of cutting arrangement 8 Handle 9 Engine 10 Cover of rear discharge chute 11 Screw attachment of handlebars mounting 12 Handlebars arrest lever 13 Sideward flap 14 Mulching wedge 15 Cover of...

Page 23: ...ycz cych obs ugi kosiarki Umo liwi to unikni cie mo liwych zagro e dla zdrowia i mienia zar wno u ytkownika jak r wnie innych os b Zalecenia dotycz ce bezpiecznej pracy zawarte w instrukcji nie opisuj...

Page 24: ...budowlany itp kt re mog by odrzucone lub mog uszkodzi maszyn Je li nie mo na ich usun nale y omin te miejsca Maszyna wyposa ona jest w wiruj ce narz dzie robocze Maksymalna pr dko obwodowa wnosi 77 14...

Page 25: ...zutowego Rys 12 Ostrze enie nie u ywaj kosiarki bez prawid owo osadzonego deflektora lub kosza Niebezpieczna przestrze zakaz wk adania r k lub n g mo liwo zranienia Table 19 Symbole bezpiecze stwa 3 3...

Page 26: ...eniu koszenia 3 3 1 1 Parametry techniczne Opis Jednostka VARI 590H D ugo w cznie z uchwytami kierownicy mm 1600 Szeroko mm 550 Wysoko w cznie z uchwytami kierownicy mm 1100 Masa kg 35 Maksymalna szer...

Page 27: ...sznika i prze o y j do uchwytu 4 znajduj cego si po prawej stronie uchwytu kosiarki krok 3 3 Metalow ram kosza 5 wsun do kosza Rys 2 krok 4 podnie os on tylnego otworu wylotowego 10 krok 5 i zamontowa...

Page 28: ...n ostro no w czasie przebywania pod podniesion kosiark Zabezpiecz po o enie kosiarki przed samowolnym ruchem Zachowaj podwy szon ostro no podczas czyszczenia przestrzeni roboczej N jest ostrym narz dz...

Page 29: ...c krok 3 Przy mulczanowaniu nale y U ywa ostry n Regularnie kosi traw Nie kosi mokrej trawy Nastawi maksymalne obroty silnika Kosi z pr dko ci poruszania si Regularnie czy ci blokad tylnego wyrzutu wn...

Page 30: ...zypadku gdy stwirdzenia wewn trznych odg os w uderzania no a o tward przeszkod nale y zatrzyma kosiark i przekaza j do autoryzowanego serwisu Przed ka dym uruchomieniem kosiarki nale y sprawdzi stan d...

Page 31: ...ienie odleg o ci elektrod w wiecy zap onowej Nastawi odleg o na 0 7 0 8 mm Zanieczyszczony filtr powietrza Oczy ci filtr PATRZ INSTRUKCJA OBS UGI SILNIKA Inna usterka Zwr ci si do autoryzowanego serwi...

Page 32: ...arki wszystkie cz ci kt re mog by jeszcze wykorzystane Spu ci z przek adni i z silnika olej do odpowiedniego zamykanego naczynia i odda do miejsca odbioru odpad w34 Zdemontowa cz ci z tworzywa sztuczn...

Page 33: ...ysoko ci koszenia 7 Podstawa obudowa mechanizmu tn cego 8 Uchwyt 9 Silnik 10 Klapa tylnego otworu wyrzutowego 11 Z cze rubowe mocowania uchwyt w 12 D wignia zabezpieczenia uchwyt w 13 Klapa bocznego o...

Page 34: ...ko 6 P ka nastaven v ky se en 7 asi kryt sekac ho stroj 8 d tka 9 Motor 10 Kryt zadn ho vyhazovac ho otvoru 11 roubov spojen p ipevn n d tek 12 P ka aretace d tek 13 Klapka bo n ho vyhazovac ho otvor...

Page 35: ...VARI 590H Krok 1 Obr 3 Startov n motoru 2 Obr 4 Nastaven v ky se en Krok 1 2 3 Obr 5 Sestaven seka ky pro mul ov n Krok 1 2 3 Obr 6 Sestaven seka ky pro bo n v hoz 39 Revize 05 2015 ELVA ZAJ C...

Page 36: ...oji Obr 11 Bezpe nostn piktogram garantovan hladina hluku Um st n na stroji Um st n na stroji 40 Revize 05 2015 Obr 8 Brou en a vyv en no e Obr 7 Sestava no e Obr 10 Bezpe nostn piktogram sdru en samo...

Page 37: ...Text a ilustrace 2013 VARI a s Text and illustrations by 2015 VARI a s Text i ilustracie 2014 VARI a s VL 182 2014 rev 05 2015...

Reviews: