background image


BDR-595D Adela


10 

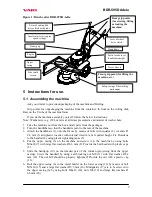
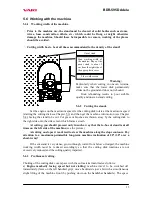
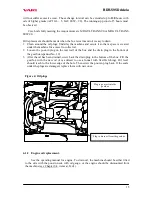
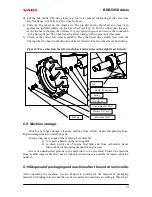
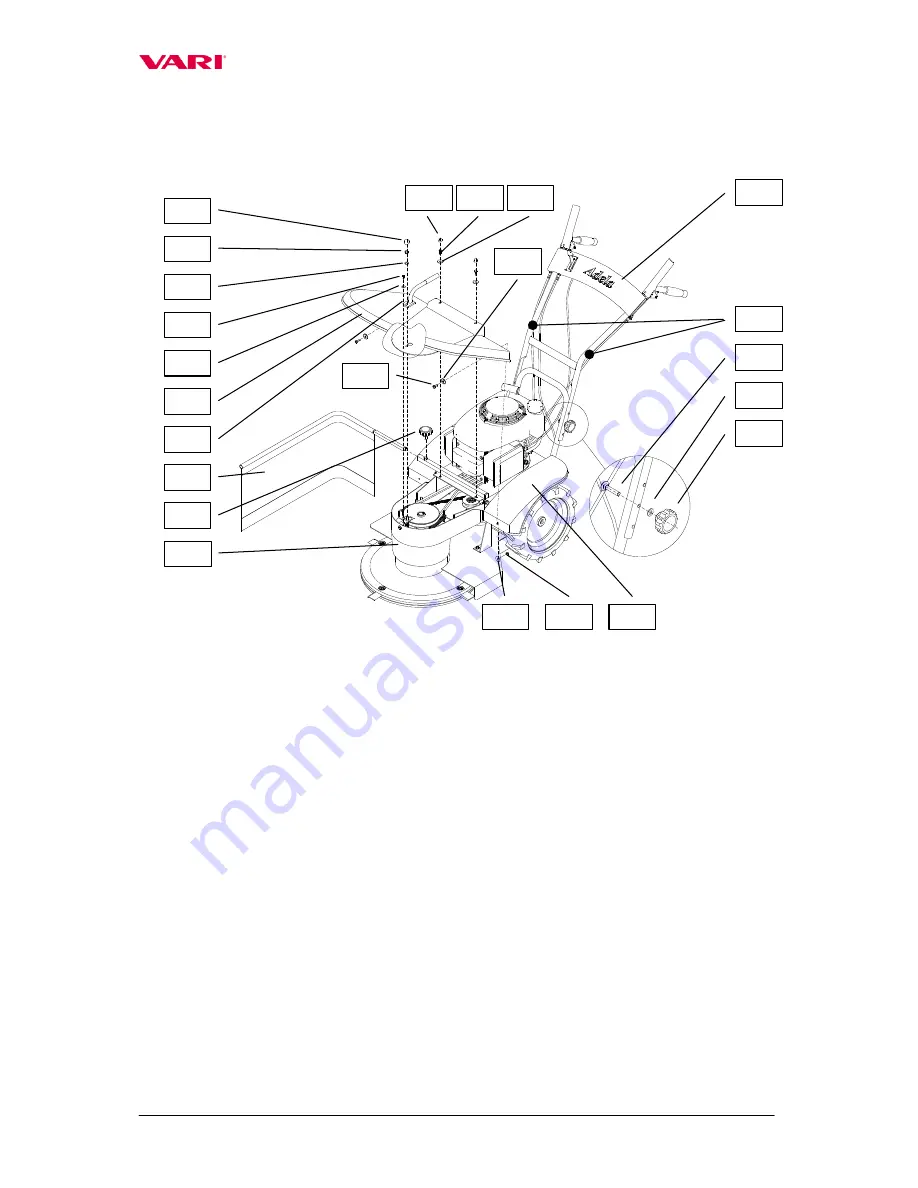
7.  Slide the apron with the holder (21) into a holder in the frame above the right mudguard 

and secure it by tightening the plastic rosette 

 with the bolt (22). 


5.2  Putting the machine into operation. 




The  machine  may  be  delivered  without  engine  fillings  (in  dependence  on  different 
national regulations)! 




First  thoroughly  read  the  instruction  for  engine  use!  You  can  prevent  a  possible 
damage to the engine. 


1. 

Check oil volume in the engine and/or fill the engine with the prescribed oil grade and 
volume. Fill the tank with the prescribed amount and type of petrol. 

2. 

Move  the  accelerator  lever  into  the  front  position  (

„CHOKE“

).  Start  the  engine  by 

pulling on the manual starter (instructions for starting see guidelines for engine use). 

3. 

Let the new or cold engine running on choke for about 30 seconds (accelerator lever in 
the

 „CHOKE“ 

position), then move the accelerator lever into the position 

„MAX“

. In 

this position let the engine running for about 30 seconds. 




Do not leave the machine alone when doing this.


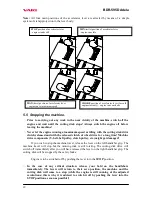
5.3  Starting the cutting disk. 




When  starting  the  engine,  the  two  levers  on  the  handlebars  must  be  in  the  off 
position. 


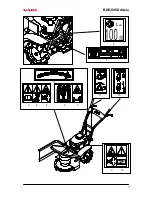
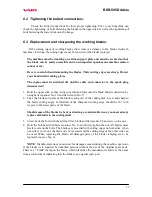
Figure 2: Machine assembly 

10 

11 

12 

13 

16 

15 

20 

19 

17 

21 

22 

18 

20 

14 

Summary of Contents for BDR-595 D Adela

Page 1: ...Brush cutter BDR 595 D Adela Instructions for use...

Page 2: ...14 6 1 Machine lubrication 14 6 1 1 Gearbox oil replacement and refilling 14 6 1 2 Engine oil replacement 15 6 1 3 Table of machine lubrication 16 6 2 Tightening the bolted connections 17 6 3 Replacem...

Page 3: ...on the machine purchase for the case of a loss or theft of the original record Type BDR 595 D Name of the product Adela Engine type HONDA GCV160 Machine Serial no Year of manufacture Engine Serial no...

Page 4: ...ine can be operated only by persons in good mental and physical condition For the professional use of the machine the machine owner is obliged to ensure a work safety training and provide instructions...

Page 5: ...must be cleared of solid bodies such as stones wires loose construction debris etc which could be flinging up or which might damage the machine If these cannot be removed don t work the places The ma...

Page 6: ...kinds of the machine repair adjustment lubrication and cleaning are to be made with the machine switched off and spark plug cable disconnected 3 2 Declared and guaranteed noise and vibration values D...

Page 7: ...BDR 595D Adela 7 LwA 2 1 8 3 4 5 6 7 11 12 9 10...

Page 8: ...meet the requirements of standards EN 12733 a CSN EN 12733 The norms put a crucial emphasis on the safety of the operator who must not be hit by stones or other objects flung by the machine s rotating...

Page 9: ...w it to the machine by using bolts M6x20 7 with large flat washers 6 6 mm 8 Provide the bolt heads with plastic caps 9 5 Slide the handgrip 10 on the treaded part of the column projecting from the upp...

Page 10: ...volume Fill the tank with the prescribed amount and type of petrol 2 Move the accelerator lever into the front position CHOKE Start the engine by pulling on the manual starter instructions for startin...

Page 11: ...arts turning press the lever fully to the handrail and hold it firm Note In a new or cold engine a few of the cutting disk starts may result in engine stalling The phenomenon will disappear after the...

Page 12: ...stop but the mowing disk is still rotating The cutting disk drive will switch off immediately after you will have released the lever on the right handlebar grip The cutting disk will be stopped by th...

Page 13: ...o the right side onto the side screen which forms a swath At cutting you should proceed only in such a way that the to be cut stand is at all times on the left side of the machine see the picture At c...

Page 14: ...ensure a long term satisfaction with our product it must be given proper care and maintenance Regular maintenance of the machine will prevent its early wear ensuring at the same time a correct functio...

Page 15: ...r wall of the box and the drain plug in the bottom of the gearbox spanner No 19 3 After the oil has been drained screw back the drain plug in the bottom of the box Fill the gearbox with the new oil it...

Page 16: ...5 2 Brake lever seating near the front belt pulley accessible after disassembly of upper casing min 2x yes grease engine oil 5 3 Machine lubrication During season After season Lubricant Figure no All...

Page 17: ...rel spanner No 16 and flat wrench No 17 2 Take the blade and parts of the blade seating out of the cutting disk Level and sharpen the blade cutting edges Inclination of the sharpened cutting edge shou...

Page 18: ...uld in no case be dismounted from the steering on the engine b Unscrew three safety nuts spanner No 13 on the engine flange and pull the engine out from the machine frame upwards Never use force to pu...

Page 19: ...the accelerator lever back onto the handlebars e Put the V belt into the groove in the belt pulley on the engine f Check the operation of the tightening pulley and adjustment of guide lamination With...

Page 20: ...the adjustment Litz wires in the pulley Bowden and in the Bowden of wheel drive clutch must be without slackness slightly tense In order to make the litz wires tense adjustment bolts have to be screwe...

Page 21: ...2 see Fig 8 Litz wire is fallen out from tightening pulley lever Put the litz wire back to its place V belt is fallen behind tightening pulley or down from belt pulley Put the belt back to its place V...

Page 22: ...ng and washing the machine proceed to observe valid regulations and legislation on the protection of water courses and other water resources against pollution or contamination with chemical substances...

Page 23: ...e clean the machine from all dirt debris and plant residues Repair damaged paint on machine parts For any long time storage of the machine it is advisable a to conserve blades on the mowing disk b to...

Page 24: ...e type machine serial number and year of manufacture 2 Ordering number given by manufacturer and its name in the part list 3 Number of ordered pieces separately for each item 4 Precise address telepho...

Page 25: ...BDR 595D Adela 25 9 1 Machine casing...

Page 26: ...8545 045 196 506 1 16 Right mudguard 632 0 8545 046 196 505 1 17 Lower cover 632 0 8545 068 196 549 1 18 Bolt M5x10 SN 02 1103 25 195 525 2 19 Bolt M6x16 SN 02 1103 25 189 552 5 20 Bolt M6x20 SN 02 1...

Page 27: ...BDR 595D Adela 27 9 2 Handlebars...

Page 28: ...ake bowden cable 622 9 8074 046 196 517 1 7 Lever stop 632 0 8065 002 196 519 2 8 Lever pin 632 0 9311 157 196 520 2 9 10 Bolt M5x10 SN 02 1103 25 195 525 2 11 Bolt M8x50 SN 02 1319 25 189 593 2 12 Nu...

Page 29: ...BDR 595D Adela 29 9 3 Cutting disk drive...

Page 30: ...0 088 0632 FEVOZ Slavi n 184 553 1 22 Bolt M6x14 SN 02 1151 25 189 557 6 23 Bolt M6x45 SN 02 1103 25 195 523 1 24 Bolt M6x30 SN 02 1103 25 184 552 1 25 Bolt M10x20 SN 02 1103 55 1512527 4 26 Nut M6 SN...

Page 31: ...BDR 595D Adela 31 9 4 Wheel drive...

Page 32: ...Nut M8 SN 02 1492 25 104 622 3 15 Nut M16x1 5 SN 02 1412 25 189 560 2 16 Washer 5 1 SN 02 1740 05 127 512 6 17 Washer 5 3 SN 02 1702 15 189 581 6 18 Washer 8 2 SN 02 1740 05 104 574 8 19 Washer 8 4 S...

Page 33: ...BDR 595D Adela 33 9 5 Gearbox...

Page 34: ...044 196 511 1 15 Box 632 0 3253 045 196 510 1 16 Felt 632 0 9520 045 189 528 1 17 Spring 632 0 9746 047 189 527 1 18 Bolt M4x10 SN 02 1143 50 196 521 4 19 Pin 5x12 SN 02 2150 196 522 2 20 Pin 5x20 SN...

Page 35: ...for the whole period of warranty The manufacturer does not answer for defects of the product resulting from current wear or from the product s use for purposes other than specified Warranty extinctio...

Page 36: ...elivery Date of repair Brief description of the defect Replaced parts new warranty of months Parts Repair made by Service shop stamp and signature 2nd Warranty service Machine model Serial No Date Rep...

Reviews: