CB-800
CB-1000
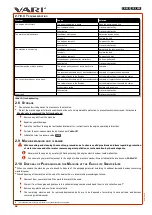
2.5.9 R
OTATING
THE
SWEEPING
ROLLERS
AXIS
•
To adjust the brushes sideways, use the long lever
5
in
Fig. 3
, located in the machine’s axis.
•
The lock allows for a total of 5 positions for rotating the brushes – see
Fig. 12
Always switch off the brush drive and the machine travel before changing the sideways brush setting.
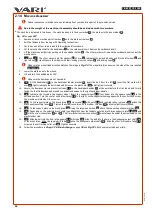
1.
Apply pressure to the handle to lighten the front of the machine.
2.
Raise the
swivel lever
1
, until the
lever tube
2
slides out from the
locking groove
3
.
3.
Push the lever sideways to tilt the sweeping rollers
4
by the desired angle.
4.
Release the lever so that it fits into the appropriate locking groove.
2.5.10 R
EMOVING
DIRT
•
Select the
slower
travel speed for better cleaning of the area (see
Chap.2.5.6 Travel Speed Selection
on
page 30
and in
Fig. 5
).
•
Always proceed in strips over the area to be cleaned.
•
Do not continue cleaning the area if a large amount of dirt has accumulated:
(a) The sweeping rollers will start to shift dirt into the area behind the sweeping rollers; or
(b) leave a trail in the area under the gearbox.
•
Remove dirt from the area into a suitably sized container or other storage area (e.g. trailer bed, container, etc.).
Always observe the local waste handling regulations. Dirt from surfaces does not belong in the municipal waste
stream, but in areas designated by the local authority for the disposal of hazardous waste.
•
Always sweep dirt without using a collection box with the brushes turned sideways (see
Chap. 2.5.9 Rotating the sweeping rollers
on
page 31
and
Fig. 12
). Choose the position according to which side you wish to push the dirt away. For small amounts of dirt,
choose the first sideways position -
15°L
or
15°R
. For greater amounts of dirt, always choose the extreme position -
30°L
or
30°R
.
•
When sweeping dirt away from kerbs, set the middle position of the sweeping rollers -
0°
(see
Chap. 2.5.9 Rotating the sweeping
on
page 31
and in
Fig. 12
) and slightly increase the bristle pressure (see
Chap. 2.5.8 Setting the pressure of the
on
page 30
and in
Fig. 12
).
•
Due to the assumptionof a big amount of dirt, do not proceed in excessively long stretches, interrupting the cleaning periodically when:
The sweeping rollers will start to shift dirt into the area behind the sweeping rollers; or
leave a trail in the area under the gearbox.
•
When sweeping using the collection box on open areas, use the central position of the sweeping rollers –
0°
(see
page 31
and in
Fig. 12
), you will use the maximum sweeping width of the machine.
•
When sweeping with the collection box at walls, use the first sweeping roller rotation position -
15°L
or
15°R
.
•
Stop cleaning the area and empty the contents of the collection box when:
(a) the area behind the sweeping rollers is not completely clean or
(b) the sweeping rollers will start to shift dirt into the area behind the sweeping rollers; or
(c)
leave a trail in the area under the gearbox.
2.5.11 S
NOW
REMOVAL
•
The sweeping brush is only intended for clearing freshly fallen snow during/after "normal" non-calamitous snowfall or for cleaning areas
with melting snow. The type of bristles used does not allow the removal of trampled snow, icy or frozen snow.
It is always recommended to clear snow with an additional snow plough
OR-80
or
, which can also clear
freshly fallen snow up to 10 cm. Use
snow chains
as well.
Please also read carefully the chapter on
2.4.4 Recommendations for the Winter Operation of the Machine
on
page
•
Select the
faster
travel speed (see
Chap.2.5.6 Travel Speed Selection
on
page 30
and in
Fig. 6
) for better sideways snow removal
dynamics with the plough and thus a better clearing of the area.
•
Adjust the bristle pressure according to
Chap. 2.5.8 Setting the pressure of the sweeping rollers
on
page 30
and in
Fig. 12
.
•
Snow must be
always
swept with the sweeping rollers turned sideways (see
Chap. 2.5.9 Rotating the sweeping rollers axis
page 31
and in
Fig. 12
).
•
Select the position according to which side you wish to push the dirt away:
(a) For small amounts of snow, choose the first sideways position -
15°L
or
15°R
.
(b) for small amounts of snow, choose the first sideways position -
30°L
or
30°R
.
(c)
When using the
OR-80
snow plough or
ROR-1000
always use the extreme positions -
30°L
or
30°R
, the snow slides better
sideways on the plough.
•
Always proceed in strips over the area to be cleaned.
•
If a big amount of snow accumulates, do not continue clearing the area, when:
57
Separate accessories available for purchase, not included in the basic equipment of the machine!
58
Separate accessories available for purchase, not included in the basic equipment of the machine!
31
re
vi
ze
1
2/
20
21

