background image


TRIMMER-50 


TRIMMER-60 


21

The replacement procedure is as follows:


a)


Drain


petrol from the engine tank. Dismount the accelerator lever (2x spanner No. 

8) from the handlebars. 

Bowden cable should never be dismounted from the 

control on the engine! 

b)


Unscrew three safety nuts (spanner No. 13) on the engine flange and pull the engine 
out from the machine frame upwards. Never use force to pull the engine


from the 

frame!


!   Never put the engine on the side. Oil might get into the exhaust or into the air 
cleaner. The best engine seating is with the lower flange dwelling on two lintels 
which are at least 7 cm high. 

 
c)


Dismount the upper casing (spanner No. 8, spanner No. 13). Dismount the bolt  in 
front of the driven belt pulley (spanner No. 10). Take the old V-belt off and replace 
it with a new one. V-belt marking is GATES A52 BareBack.. It is also possible to 
use an equivalent V-belt made by other manufacturers at a size of A13x1320 Li 
(Li=internal belt length). However, the belt must be made without rubber on belt 
sides! Only this belt model will guarantee that the string head drive start will be 
continuous at engaging the clutch. 


!   Should a different belt model be used, the machine manufacturer  does not bear 
any liability for the correct and full functioning of the gear and for damage caused 
by the incorrect belt type! 
 

d)


Put  the engine back to its place, slide the belt into the groove in the belt pulley on 
the engine and check if the belt passes correctly around the guides. Screw the engine 
by using three safety nuts with flat washers. Screw the accelerator lever back onto 
the handlebars.  

 
e)


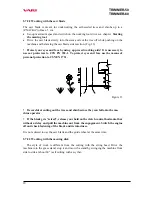
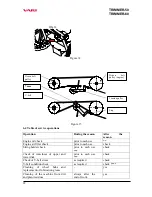
Check the operation of the tightening pulley. With the horizontal bar on the 
handlebars being completely pressed down, the pulley must ensure a sufficient belt 
tension (spring on the litz wire  being extended by about 10 mm as compared with 
the normal condition). Possible corrections are to be made by means of the 
adjustment bolt (see Fig.14). Use two spanners No. 10 or No. 9. With the lever 
switched off, the pulley must be leaning against the stop on the engine plate (Fig. 15 
top) and the litz wire in the Bowden of the tension pulley can be slightly slack. In 
the case that the adjustment bolt is completely unscrewed and it is necessary to 
tighten the V-belt, the spring on the cable can be hooked into the front hole on the 
tension pulley arm and to set-up the belt tension once again. 

 
f)


Screw the bolt back in front of the driven belt pulley and mount back the upper 
casing. 


Summary of Contents for Trimmer 50

Page 1: ...String mower TRIMMER 50 TRIMMER 60 Instructions for use ...

Page 2: ... 3 Adjusting the mowing height 5 6 4 Tilting of the machine 5 6 5 Problems at cutting 5 7 Advised accessories 5 7 1 Guide wheel 5 7 2 Mowing disks and saw blades 5 7 2 1 Assembly of disks 5 7 2 2 Working with the saw blade 5 7 2 3 Working with the mowing disk 6 Maintenance care and storage 6 1 Lubrication 6 1 1 Engine oil replacement 6 1 2 Lubrication points 6 1 3 Lubrication and assembly of wheel...

Page 3: ...chase for the case of loss or theft of the original record Type TRIMMER 50 TRIMMER 60 Engine type TECUMSEH CENTURA 55 LX T HONDA GCV 160 Machine serial number Engine serial number Date of delivery sale Supplier Address Telephone Fax Notes The product s design meets requirements of the Act No 22 1997 Gaz and complies with all relating legislation decrees regulations directives and norms Manufacture...

Page 4: ...ensure a work safety training and provide instructions on machine control for operators and to keep records on these trainings and briefings Should some instructions in the manual be intelligible you are encouraged to contact your dealer or directly the manufacturer of the machine The contact address and telephone fax connection are to be found at the end of the manual Instructions for use supplie...

Page 5: ...ts of the machine drive V belt belt pulley clutch pulley etc might be damaged Prior to each employment of the machine check its parts working mechanism or its casing in particular for possible damage or loosening Possible defects must be rectified immediately Repairs are to be made only with the original spare parts Before using the machine the stand must be cleared of solid bodies such as stones ...

Page 6: ...it until the petrol evaporates Removal of any protective equipment and machine casings is forbidden Safe slope accessibility of the machine is 10 Maximum inclination of engine at work is 20 for a longer time and 30 for a shorter time up to 1 minute All kinds of machine repair adjustment lubrication and cleaning are to be made with the machine switched off and the spark plug cable disconnected 3 2 ...

Page 7: ...ited danger of limb injury 2 Keep a safe distance from the machine danger of injury flying material fragments 3 Instructions for use to be thoroughly studied prior to machine use 4 During the machine maintenance the conductor should be disconnected from the sparkplug Self stickers for signalling health protection and controls 1 Protection of eyes and hearing Location Left rear part of the plate fo...

Page 8: ...ularly interrupted with breaks of at least x minutes see values in the table and the total time of this work must not exceed y minutes see values in the table per worker and shift Work procedures must be modified so that the breaks leading to the interruption of exposition are logical 2 At the time of these breaks which are required for health protection reasons the operator must not be exposed to...

Page 9: ...aw blade inch mm 12 305 inch m m 12 305 Max diameter of mowing disk cm 35 cm 35 Diameter of central hole in the disk mm 25 4 mm 25 4 Thickness of blades mm 2 5 4 mm 2 5 4 Travel wheel tyre type solid rubber type solid rubber Engine TECUMSEH CENTURA 55LX T HONDA GCV 160 Cylinder volume cm3 195 cm3 160 Max output at RPM kW min 1 4 360 0 kW min 1 4 1 3600 Max torque at RPM N m min 1 8 4 2 500 N m mi ...

Page 10: ...head with two strings whose design makes it possible to adjust the cutting height by realigning distance rings The strings are fastened by passing them through the string holder and tightening Other working attachments that can be used in place of the string head are saw blade and mowing disks with 3 4 teeth which are to be installed on the machine through the friction overunning clutch onto the s...

Page 11: ... 2 Loosen the plastic rosebits of handlebars joints and turn the handlebars so that the handrails point to the rear of the machine Adjust the height of the handrail grip so that it can be easily reached tighten the rosebits 3 Fasten the Bowdens to handlebars by means of plastic tightening tapes 4 Make the engine ready for operation according to the manual for its use The machine is delivered witho...

Page 12: ...resented in the operating manual for engine use 2 Set up maximum engine rotations by means of accelerator lever 3 Grasp the handlebars with your left hand and pull the control horizontal bar to the handlebars with your right hand until the string head starts turning Hold the horizontal bar near the grip at working The start of the string head can be accompanied with rattle or whistle due to a part...

Page 13: ...could not move to the side due to the friction of support disk on the surface Never let the engine running at maximum speed or idling with the string head drive gear clutch switched off for a long time Machine drive components V belt belt pulley clutch pulley etc might get damaged In the case of any critical situation release your hold on the handlebars immediately The horizontal bar will return t...

Page 14: ...erved the machine will be forced to sides due to the contact of the rotating string head with the ground The phenomenon can be rectified by adding a guide wheel Leading the string head low above the ground provides for a good balance of the machine 5 6 2 String installation procedure 1 Cut a string length of max 45 cm TRIMMER 50 or 50 cm TRIMMER 60 from the coil and freely bend the string to have ...

Page 15: ...ring head protective casing 5 6 3 Adjusting the mowing height The adjustment is to be made with the engine switched off and the spark plug cable disconnected The machine is equipped with a string head which enables adjustment of 3 mowing heights The mowing height adjusted by the manufacturer is the lowest one Mowing height adjustment procedure 1 Put the machine onto a firm base so that you have a ...

Page 16: ... and in the case that the arrestment pin does not fall in swing the machine slightly until the pin falls in Return the machine into its working position Tilting to the left Tilting to the right Figure 10 Figure 11 5 6 5 Problems at cutting If the engine is markedly loosing speed engine is choking the engagement width and the travel speed should be accommodated to the density and height of the gras...

Page 17: ...5 7 2 1 Assembling the disks Be careful when exchanging the working tools The cutting edges are sharp Protect your hands with the working gloves The exchange should always be made with the engine switched off and the spark plug cable disconnected 1 Loosen and unscrew the bolt holding the string head and dismount the string head including the distance rings 2 Insert the steel hub friction washer mo...

Page 18: ...ct eyes and face use the means of personal protection to CSN EN 1731 Figure 13 Be careful at cutting out the trees and shrubs since they can fall onto the ma chine operator If the blade gets seized release your hold on the clutch control horizontal bar without a delay and pull the machine out from the engagement Switch the engine off and check fastening of the blade and its intactness It is not ad...

Page 19: ...urrent maintenance the after season maintenance should be entrusted to one of our authorized service workshops 6 1 Lubrication 6 1 1 Engine oil replacement When replacing oils follow the basic hygienic principles regulations and laws on environment protection The information on the oil replacement can be found in the operating manual for engine use To drain oil either tilt the machine onto the sid...

Page 20: ...KAL MD Spray WD40 6 2 Tightening of bolted connections Check the tightening of bolted connections Prior to each use of the machine check the bolt fastening the string head to the shaft for tightness check the tightness of bolts fastening the string holder to the string head 6 3 Replacement of V belt and adjustment of tension pulley The V belt should be replaced according to its wear cracked sides ...

Page 21: ...ifferent belt model be used the machine manufacturer does not bear any liability for the correct and full functioning of the gear and for damage caused by the incorrect belt type d Put the engine back to its place slide the belt into the groove in the belt pulley on the engine and check if the belt passes correctly around the guides Screw the engine by using three safety nuts with flat washers Scr...

Page 22: ...er check prior to each use check Check of intactness of upper and lower disk prior to each use check Check of V belt stress as required check V belt condition check as required check Cleaning of wheel hubs and replacement of lubrication grease yes Cleaning of the machine from dirt and plant residues always after the end of work yes Obr 14 Driven belt pulley 7 mm V belt Driven belt pulley engine Te...

Page 23: ...g disconnected 6 6 Storage Prior to a longer storage clean the machine from all dirt debris and plant residues Repair the damaged places on painted machine parts Prevent the access of unauthorized persons to the machine Protect the machine from weather impacts but don t use the air tight protection due to a possibly increased corrosion under it 6 7 Liquidation of packaging and machine after servic...

Page 24: ...ephone number fax number or e mail address 5 If you are not certain about the correct identification of the component send the damaged component either to the nearest service shop or to the manufacturer In the case of any confusions concerning the spare parts or technical issues the VARI a s commercial customer service or technical departments are prepared to answer all your inquiries 8 Contact to...

Reviews: