959D Leak Detector
1-5
1.3 Preparation for Operation
NOTE
Before operating the 959D Leak Detector, read and understand
the warranty and safety information in the preface of this
manual.
Be sure all packing materials have been removed from the 959D and that appropriate
power connections are available before setting up the leak detector. Remove the exhaust
plug from the TriScroll pump if it has not already been removed.
If you have purchased optional equipment for the 959D, set it up in accordance with the
operations manuals that were supplied with the equipment.
1.4 Installation
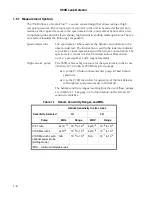
The 959D Leak Detector is delivered completely assembled as ordered. Locate the 959D
close to its power source and be sure there are at least 4 inches of clearance for proper ven-
tilation and sufficient room for the operator to safely maneuver to perform testing.
Cart-mounted leak detectors are completely mobile and can be moved quickly and conve-
niently around an entire plant or other facility on short notice. Additional ventilation
requirements for your specific application, as discussed in Section 1.4.3 “Clean Room Use
of the Leak Detector”, must also be provided at this point.
CAUTION
Allow at least a 4 inches of clearance to ensure that air flows
freely around the leak detector. Do not block the exhaust fans
at the rear of the leak detector.
1.4.1 Electrical Connections
The 959D cart-mounted system operates from a single AC power source and can be config-
ured for:
❑
115 VAC, 50/60 Hz, 20 Amps or
❑
220 VAC, 50/60 Hz, 10 Amps
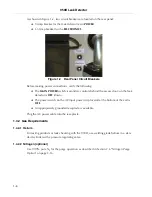
The 959D cart has a power strip equipped with a single 3-prong cable that attaches to an
appropriate power line. The TriScroll roughing pump does not have a power on-off switch;
it turns on when the leak detector is powered up from the AC input power strip located on
the cart.
WARNING
Use only the power cord provided with your leak detector. The
use of extension cords is not recommended and could result in
damage to the equipment and loss of warranty.
Summary of Contents for 959D
Page 16: ...959D Leak Detector 1 2 D R A F T 9 1 3 0 2 Figure 1 1 Model 959D Leak Detector ...
Page 28: ...959D Leak Detector This page intentionally left blank D R A F T 9 1 3 0 2 ...
Page 48: ...959D Leak Detector This page intentionally left blank D R A F T 9 1 3 0 2 ...
Page 68: ...959D Leak Detector This page intentionally left blank D R A F T 9 1 3 0 2 ...
Page 78: ...959D Leak Detector This page intentionally left blank D R A F T 9 1 3 0 2 ...
Page 81: ......

