959D Leak Detector
3-4
DRAFT
9/13/02
3.2 Cleaning the Test Port
Clean the test port periodically depending upon your application.
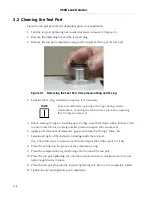
1. Turn the test port tightening nut counterclockwise to loosen it (Figure 3-1).
2. Remove the tightening nut and the test port plug.
3. Remove the test port compression ring and O-ring from the top of the test port.
Figure 3-1
Removing the Test Port Compression Ring and O-ring
4. Examine the O-ring, and clean or replace it as necessary.
NOTE
Varian recommends replacing all O-rings during routine
maintenance or during any maintenance procedure requiring
that O-rings be removed.
5. Before reusing O-rings or installing new O-rings, wipe them down with a lint-free cloth
to ensure that there is no foreign matter present to impair the vacuum seal.
6. Apply a small amount of Apiezon L grease and wipe the O-rings “shiny” dry.
7. Examine all parts of the test port, including inside the test port.
Use a VacuSolv wipe to remove any dirt or foreign matter. Allow parts to air dry.
8. Place the O-ring into the groove of the compression ring.
9. Place the compression ring and O-ring onto the top of the test port.
10. Place the test port tightening nut onto the test port and turn it clockwise until it is just
tight enough to stay in place.
11. Place the test port plug into the test port tightening nut. Be sure it is completely seated.
12. Tighten the test port tightening nut completely.
Summary of Contents for 959D
Page 16: ...959D Leak Detector 1 2 D R A F T 9 1 3 0 2 Figure 1 1 Model 959D Leak Detector ...
Page 28: ...959D Leak Detector This page intentionally left blank D R A F T 9 1 3 0 2 ...
Page 48: ...959D Leak Detector This page intentionally left blank D R A F T 9 1 3 0 2 ...
Page 68: ...959D Leak Detector This page intentionally left blank D R A F T 9 1 3 0 2 ...
Page 78: ...959D Leak Detector This page intentionally left blank D R A F T 9 1 3 0 2 ...
Page 81: ......

