Maintenance
03-914642-00:6
7-3
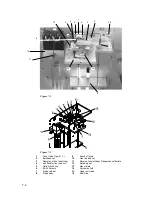
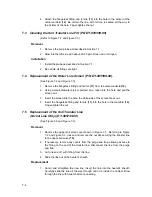
2. With a 1/4" wrench, loosen the nuts on the sample out line (3) and on the
helium flush line (5). Remove the lines from the probe.
3. With a 5/16" wrench, loosen and remove the bulkhead nut (2) with line, on
the helium purge gas / water in line.
4. Loosen the two #4-40 screws (6) securing the probe retainer (7). Slide the
cover back exposing the probe body (8). Pull the probe body up, out of the
housing and out of the knockoff plate (9).
Replacement
1. Insert the probe into the mount plate (13) and down through the knockoff
plate (9), (needle sparge only). (Soil probe will not insert through knockoff
plate).
2. Push the body of the probe (8) into the heated housing, slide the retainer
forward, tighten the two # 4-40 screws (6).
3. Attach the sample out line (3) and the helium flush line (5).
4. Attach the 5/16" nut (2) to the bulkhead fitting for the helium purge/water
supply line.
5. Be certain all fittings are tight, snug and 1/4 turn.
6. Replace the cover.
7.2
Removal and Replacement of the Water Probe
(Refer to Figure 7-2 and Figure 7-3.)
Removal
1. With a 5/16" wrench, loosen and remove the brass nut securing the
pressurizing gas line (10).
2. Remove the blue plastic nut with reverse ferrule (11) securing the water line.
3. Loosen the retaining nut (12) securing the probe to the mount plate (13).
4. Lift the probe up and out.
Replacement
1. Slide the tip of the probe into the hole in the mount plate (13) and into the
hole in the knockoff plate (9).
2. Finger-tighten the retaining nut (12).
3. Attach and tighten the 5/16" brass nut securing the pressurizing gas line (10)
to the bulkhead fitting.

