CP-3800 GC Operator’s Manual
111
4
Remove the signal and ignitor probes from the detector tower.
DO NOT
rotate the probes as you disconnect them from the electrical contacts in the
tower. Place the probes on a clean surface such as a lint-free laboratory
tissue.
5
Remove the two 8-32 x 2-3/4-inch tower mounting screws from the top of
detector tower.
6
Remove the tower assembly from the detector oven, lifting straight up until
clear of the flame tip. Remove the collector tube and insulator from the
detector tower. Avoid contamination of the ceramic insulator and probes. If
the detector is not completely cool, use a metal tool (such as tweezers or a
hooked wire) to remove parts from the tower assembly. Place parts on a
clean Kimwipe®. Never place them on a counter or painted surface.
7
Remove the flame-tip assembly from the detector base. Take care not to
break the ceramic flame tip tube or the Vespel®/graphite or graphite ferrule.
8
Remove and discard the aluminum seal washer from the detector base.
Always use a new aluminum seal washer each time you reassemble the
detector. Note that the aluminum seal washer may remain in the detector
tower when the tower is removed from the base.
Reassemble
the FID
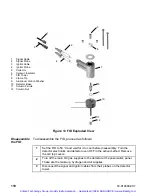
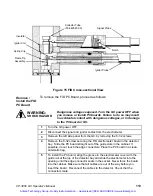
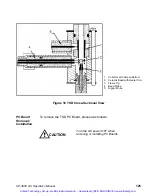
Refer to Figure 13 to reassemble the FID detector. To reassemble the
FID, proceed as follows:
1
If you removed the detector oven from the plenum, restore the oven to its
former position and reinstall the four screws holding the oven to the plenum.
2
Install the flame tip in the detector base. The FID and TSD flame tips are
identical.
•
If you are installing the flame tip with a new Vespel/graphite ferrule,
tighten the assembly finger-tight plus an extra 1/6-turn.
•
If you are installing the flame tip assembly with a used graphite ferrule,
tighten about 1/3-turn past finger tight.
3
The Vespel/graphite ferrule supplied with the GC has a maximum
temperature limit of 350 °C. If it is necessary to operate the detector above
350 °C, you may need to replace the Vespel/graphite ferrule with a graphite
ferrule.
4
Install a new aluminum seal washer onto the shoulder of the detector base.
To ensure a reliable tower seal, use a NEW aluminum washer each time you
install the detector.
5
Place the detector tower on the detector base and secure it with the two 8-
32 x 2-3/4-inch tower mounting screws. Alternately tighten these screws a
½-turn as the tower tightens into place.
CAUTION
Handle the ceramic insulator and probes with tweezers to avoid
contamination.
Artisan Technology Group - Quality Instrumentation ... Guaranteed | (888) 88-SOURCE | www.artisantg.com

