64
03-914648-00:7
Septum
Purge
Calibration
With type 1 EFC, the septum purge calibration routine should be carried out
when the instrument is first set up or a new column is installed. Press the
SETUP key and choose the Edit Setup Option. Select the Setup EFC menu
option for the specific type 1 EFC and press the “Septum Purge Calibrate”
softkey. Enter the desired pressure by typing in the number and pressing
the ENTER key. After a few seconds the following messages will be
displayed: “Enter Septum Purge Flow Rate”. Measure the septum purge
flow rate and adjust the septum purge valve (located behind the column
oven door) to the desired flow, enter this value in the appropriate field.
Press “Save and Edit” softkey to exit setup.
Manual Pneumatics
Tools and
equipment
needed
•
Bubble or electronic flowmeter, e.g., Varian Intelligent Digital
Flowmeter, P/N 01-900115-00
1
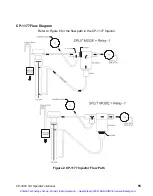
Turn the CP-1177 Split Flow Controller (on the GC pneumatics
panel) counterclockwise to open the split flow controller.
2
Adjust the Back Pressure Regulator (on the GC pneumatics panel)
to establish a positive column head pressure (monitored on the
pressure gauge).
Note:
Set the column head pressure based on the column
installed in the GC. For example, for a 30M x 250 µm ID column,
set the column head pressure to 12-15 psig to achieve
∼
1 mL/min
column flow rate at 50
°C oven temperature (helium).
3
Connect the flowmeter to the split vent on the left side of the GC
and measure the split vent flow rate. Turn the Split Flow Controller
valve to adjust the split vent flow rate to 50 mL/min.
4
Adjust the Septum Purge Needle valve to adjust the septum purge
flow rate to 3 - 5 mL/min. Readjust the split vent flow rate to
50 mL/min.
5
Before heating the column, purge the system with carrier gas for
10 - 15 minutes.
Artisan Technology Group - Quality Instrumentation ... Guaranteed | (888) 88-SOURCE | www.artisantg.com

