DOC: 03-925461-00
DESC: Assy, PFPD Ignitor W/Cable
PAGE:
REV
5 of 7
1
PREPARED BY: Sax Makthepharack REVISED BY:
CONTROL: INDUSTRIAL ENGINEERING
REV. DATE:
SHOWN
-
01 - 13 - 00
Bob Vickroy
1.4.3
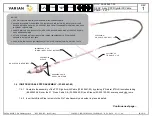
Slide the Sleeve over the Pin Tube Assembly and heatshrink in place not shown.
1.4.4
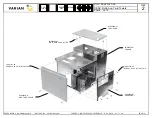
Place the PFPD Ignitor with Cable into a fixture T-8958 and apply epoxy where indicated with the Ignitor Coil pointed downward.
While the epoxy is not yet cured, slide the 8” Natural #7 GLS Insulation tubing until it flush with the Ignitor Connector.
1.4.5
Remove the PFPD Ignitor With Cable from fixture T-8958 and place into fixture T-8959 to bake for approximately 40 minutes.
1.4.6
Remove the PFPD Ignitor With Cable from fixture T-8959, then fold
(tuck)
the end of 8” Natural #7 GLS Insulation tubing into
itself and install 4” LG Cable Tie (22-119650-00) where shown.
1.4.7
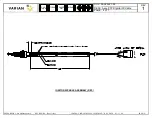
Obtain Label with completed PFPD Ignitor with Cable Assembly part number (03-925461-00) and placed over the existing label
on the 31” Probe Cable S/A. Write 3800 on the new label for reference.
1.5
IGNITOR COIL INSTALLATION - (03-925161-00)
1.5.1
After the PFPD Ignitor with Cable Assembly is completed, weld Ignitor Coil (03-925167-00) to the Ignitor Connector Assembly.
1.5.2
Check and make sure the setting on the Synchronous A.C. Welding Control as indicated: Set Timing switch to
1-99
Cycles/Spot,
Repeat Rate to
10,
Current
50
and Transformer Tap
High.
1.5.3
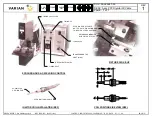
Insert Ignitor Coil (03-925167-00) into the PFPD Ignitor with Cable Assembly Pin Tube Assembly. Insert the Ignitor through the
large block of the fixture and place the Ignitor Coil over the Pin of the fixture.
Note: Prior to welding check to make sure that the Ignitor Probe Insert is aligned with the outer edge of the fixture.
1.5.4
After applying weld on both of the Ignitor Coil, remove the assembly from the fixture and apply weld on each of the Pin Tube
Assembly/Ignitor Coil separately on opposite side of the fixture.


