Power Connection
Make sure the vacuum connection is properly made
(
→
"Vacuum Connection").
n
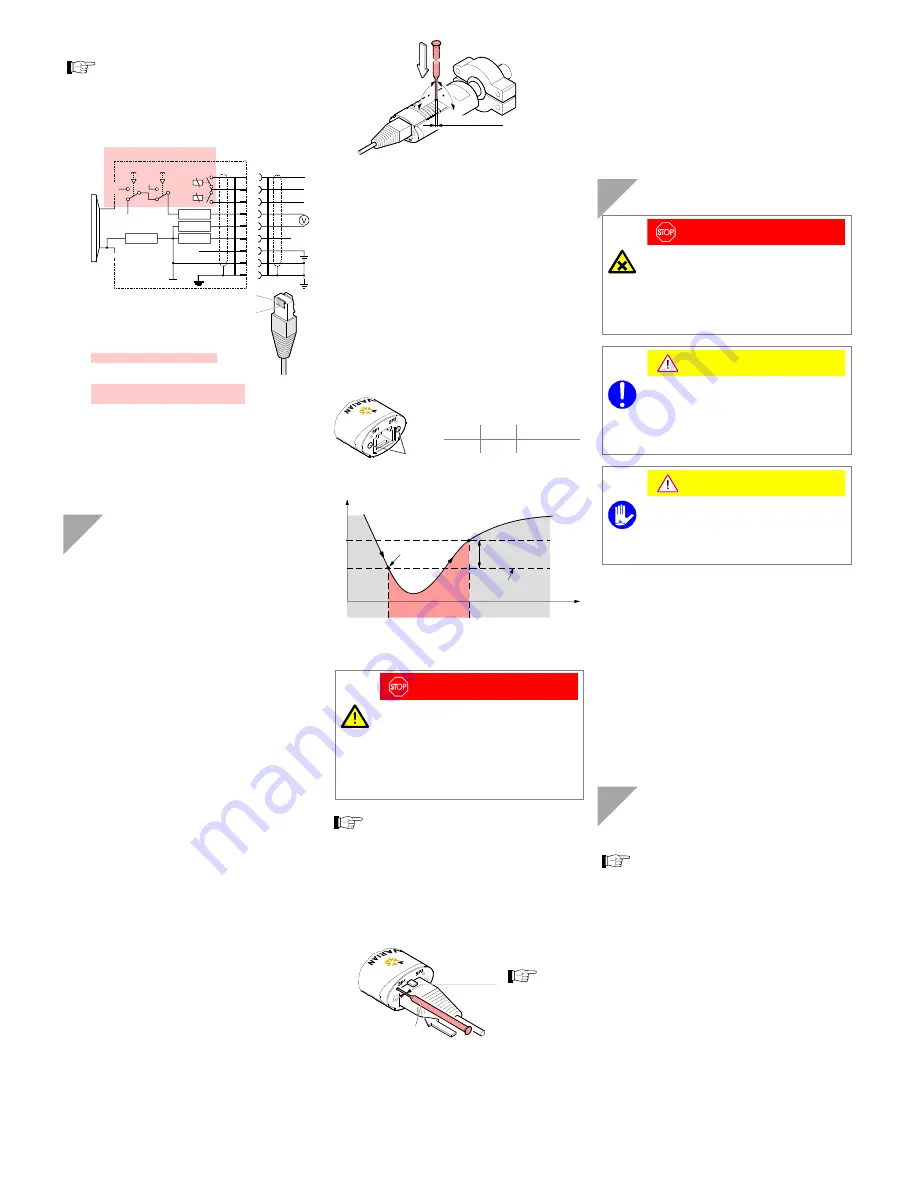
If no sensor cable is available, make one according to
the following diagram.
7
3
5
4
1
2
8
6
27k
Ω
+
4.7
Ω
4.7
Ω
1M
Ω
+
–
+
–
Ident
SP2
SP1
<SP1> <SP2>
SP2
SP1
Measurement
signal
Gauge with switching functions
Electrical connection
Pin 1
Supply
Pin 2
Supply common, GND
Pin 3
Measurement signal
or
thresholds
SP1/2
Pin 4
Gauge identification
Pin 5
Signal common
Pin 6, 8 Relay SP2, closing contact
Pin 7, 8 Relay SP1, closing contact
8-pole
FCC-68
connector
1
8
o
Connect the sensor cable to the gauge and the control-
ler.
Operation
When the supply voltage is applied, the measurement signal
is available between pins 3 and 5 (relationship between
measurement signal and pressure
→
"Technical Data").
Allow a stabilization period of at least 10 minutes. It is advis-
able to operate the gauge continuously, irrespective of the
pressure.
Gas Type Dependence
The measurement value is gas dependent. The pressure
reading applies to dry air, O
2
, CO and N
2
. For other gases, it
has to be corrected (
→
"Technical Data").
If the gauge is operated with an VARIAN controller, a cali-
bration factor for correction of the actual reading can be ap-
plied (
→
of the corresponding controller).
Adjusting the Gauge
The gauge is factory calibrated. Due to long time operation or
contamination, a zero drift could occur. Periodically check the
zero and adjust it if necessary.
For adjusting the zero, operate the gauge under the same
ambient conditions and in the same mounting orientation as
normally.
The gauge is adjusted to default values. However, it can also
be adjusted to other pressure values, if the exact pressure
value is known (reference measurement).
n
If you are using a seal with centering ring and filter,
check that they are clean or replace them if necessary
(
→
"Deinstallation").
o
Activate the gauge and operate it at atmospheric pres-
sure for at least 10 minutes.
p
Press the button with a pin (max. ø1.1 mm) and the
ATM adjustment is carried out: The gauge is adjusted
to 1000 mbar (10 VDC) by default. By pressing the
button >5 s the pressure value is increased towards
1200 mbar (or, by pressing it again, decreased towards
500 mbar) until the button is released or the limit is
reached.
max. ø1,1 mm
ATM
HV
q
Evacuate to p << 10
-4
mbar (recommended) or to a
pressure in the range of 10
-4
… 10
-2
mbar and wait at
least 2 minutes.
r
Press the button with a pin and the HV adjustment is
carried out: The gauge is adjusted to 1.2×10
-4
mbar
(1.1 VDC) by default. By pressing the button >5 s the
pressure value is increased toward 1×10
-2
mbar until
the button is released or the limit is reached.
Switching Functions
The setpoints are adjustable within a pressure range of
2×10
-3
… 500 mbar (voltage range of 2.67 … 9.61 VDC).
Each switching function provides a floating relay contact
(
→
"Electrical Connection").
LEDs
The status of the switching func-
tion is indicated by a LED.
Status
LED Relay
off off
deenergized
Measurement signal
(Pressure p)
Time t
Me
asu
reme
nt value
Off
On
Hysteresis (10%
of threshold value)
Off
Threshold value
Setpoint
Adjusting the Setpoints
DANGER
DANGER: malfunction
If processes are controlled via the signal output,
keep in mind that by pressing a button <SP> the
measururement signal is suppressed and that
the corresponding threshold value is output in-
stead. This can cause malfunctions.
Press a button <SP> only if you are sure that no
damages can arise from a malfunction.
The status of the relay and LED is not affected by
pressing the button.
n
Press the button <SP1> with a pin (max. ø1.1 mm):
The gauge changes to the switching function mode and
outputs the current lower threshold value at the
measurement value output for about 5 s. When the
button is kept depressed for more than 5 s, the
threshold setting is modified until the button is released
or until the limit of the setting range is reached.
max. ø1,1 mm
Keep the button
depressed
The upper thresh-
old is 10% above
the lower one
(hysteresis).
o
When the button is pressed again within 5 s the thresh-
old setting is adjusted in the reverse direction.
p
Release the button. The gauge resumes operation after
5 s and the connected controller displays the current
measurement value.
The adjustment procedure for <SP2> is the same as de-
scribed for <SP1>.
Deinstallation
DANGER
DANGER: contaminated parts
Contaminated parts can be detrimental to health
and environment.
Before beginning to work, find out whether any
parts are contaminated. Adhere to the relevant
regulations and take the necessary precautions
when handling contaminated parts.
Caution
Caution: vacuum component
Dirt and damages impair the function of the vac-
uum component.
When handling vacuum components, take ap-
propriate measures to ensure cleanliness and
prevent damages.
Caution
Caution: dirt sensitive area
Touching the product or parts thereof with bare
hands increases the desorption rate.
Always wear clean, lint-free gloves and use
clean tools when working in this area.
n
Vent the vacuum system.
o
Put the gauge out of operation.
p
Unplug the sensor cable.
q
Remove the gauge from the vacuum system and install
the protective lid.
Maintenance, Repair
In case of severe contamination or a malfunction, the sensor
can be replaced.
Gauge failures due to contamination or wear and
tear, as well as expendable parts (filament), are not
covered by the warranty.
VARIAN assumes no liability and the warranty becomes null
and void if any repair work is carried out by the end-user or
third parties.


