2000 MS Hardware Maintenance
110
Mass Spectrometer Maintenance
NOTE: The orientation of the trap components is important. Make sure that all
parts are free of particles, lint, etc.
1. Replace the gate conductor, tab-down into position.
2. Replace the wavy washer on the gate conductor. The washer orientation is
not important.
3. Replace the gate so that the flat, shiny surface faces the washer.
4. Replace the filament (single-hole) electrode in the oven.
5. Replace one of the quartz spacers so that the notch faces the filament
(single-hole) electrode.
6. Replace the RF electrode, followed by a quartz spacer. The notch in the
quartz spacer should face up towards the exit (seven-hole) electrode.
NOTE: Make sure that the notch in the quartz spacer and the notch in the exit
end cap are aligned.
7. Replace the exit (seven-hole) electrode so that the notch on this electrode
faces the side of the trap labeled with the side-ways T.
8. Slide the clamping plate under the screws on the top of the trap oven
assembly.
9. Visually check the transfer line hole, making sure that notches in the quartz
spacer and exit endcap electrode are aligned and centered in the trap oven.
10. Tighten the screws.
Re-install the Trap Oven
To replace the trap oven assembly, proceed as follows:
1. Gently slide the trap assembly onto the heater post and thermo well, taking
care not to bend the endcap contact springs.
CAUTION
Do not rotate the assembly more than 2 degrees; otherwise, you may damage
the contact springs.
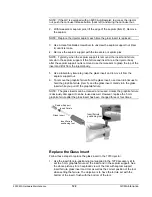
2. To set transfer line hole height to the analyzer flange, place the nub of the
center disk into the hole created by the notches in the quartz spacer and the
exit (seven-hole) electrode, then
3. Rotate the alignment tool so that the feeler disk touches or almost touches
the analyzer flange. Proper alignment is achieved when the feeler disk
touches the analyzer flange and the alignment tool is perpendicular to the
flange.
4. Replace the Belleville washer so that the crown side is facing upwards.
NOTE: When re-installing the trap assembly, make sure that you orient the
Belleville washer crownside up. Tighten the nut until the Belleville washer is flat,
i.e., until the nut bottoms out.


