background image


22 


routes which are slippery (e.g. covered in leaves, snow or ice). 

  When driving in a circle or turning on hills or downward slopes, there can be an increased 

tendency to tip over to the side due to the changes in the centre of gravity. Therefore perform 
these driving manoeuvres with increased caution and only with slow speed. If required, the driving 
manoeuvre must not be done or only with the help of an assistant. 

  When crossing roads, intersections and crossings, extreme caution is needed. Crossing rails in 

the road or at level crossings must never be undertaken when travelling parallel to them, as 
otherwise the wheels could become caught and thus result in the Varibike trike to tip over or being 
unable to manoeuvre. 

  When driving on ramps and lifting equipment on vehicles, extreme caution is needed. During the 

lifting or lowering of a ramp or the lifting equipment, the brake should be operated. This prevents 
your Varibike trike from rolling away. 

  The grip of the tyres on the road is reduced in the wet. There is a higher risk of slipping. Adjust 

accordingly your driving, braking and steering behaviour. 


Safety instructions for obstacles 

  Driving on steps with the Varibike trike is forbidden. 

  Obstacles like curb stones, for example, should always be negotiated driving forwards and by 

using the minimum speed required. 


The ground clearance determines the negotiable obstacle heights. When driving straight ahead 
he ground clearance is 9 cm.


Notes on components


The following section contains information on the most important components of 
your Varibike trike. The emphasis is on practical information.


Frames


Varibike trike frames are handmade from premium quality aluminum alloys. 
The frame is the heart of your Varibike trike. All Varibike trikes are 
constructed with frames to match the stresses of their intended use. 

Excessive stresses, accidents or falls may lead to potentially 

dangerous frame damage. If you should detect damage to your frame, or if you 
have had an accident or fall, please contact your dealer as soon as possible!


Steering 

The steering on VARIBIKE TRIKE consists of the front frame and the rear frame that are pivotable connected by an 
axle. The steering angle is limited by a limit stop between the front and the rear frame.  

Rear brake  

The rear brake aside the seat can also be used as parking brake by pressing the brake lever and than move the red 
lever in one of the notches in the brake lever holder. Check if the rear parking brake has enough braking force to 
brake the Varibike trike. 
To disengage the parking brake just push the brake lever of the rear brake and than release it again. 


For braking always use both brakes, the front brake and the rear brake.


Safety instructions for brakes 

  Before every ride, test your brakes while stationary with normal operating force. The wheels that 

are braked by the brakes must not be able to move when the brakes are applied. 

  At regular intervals, check that all connections, lines and all screw connections of the brake 

system are tightened securely.  

Summary of Contents for Trike

Page 1: ...Seat and seat frame 23 Drive system 23 Freewheels 23 Gear unit 24 Chain ring unit 24 Bottom bracket 24 Chain 24 Synchron chain 25 Torques of components screws 26 TRANSPORTATION 26 ADJUST TO YOUR BODY...

Page 2: ...ons modifications and repairs of all kinds Have fun with your Varibike trike best wishes from your VARIBIKE TEAM ABOUT THIS MANUAL If you do not follow these instructions this can lead to dangerous ri...

Page 3: ...particularly if you purchased it with optional features This user s manual is only valid for Varibikes it does not apply to bikes intended for use in areas governed by traffic regulations Purpose of V...

Page 4: ...ribike trike to extreme conditions in excess of these can lead to damage and personal risk Neither Varibike nor their representatives may be held liable for any damage or personal injury caused by ina...

Page 5: ...wheels each with its axle M12x130mm into the holes of the rear frame The disc rotor of the right wheel shows towards the frame Tighten the broad nut A with a torque of 15Nm Screw on by hand the secon...

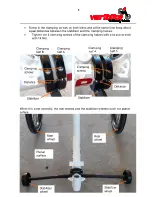
Page 6: ...6 Option Mount the stabilizer Choose a planar surface for the mounting of the stabilizer on the rear frame Put the stabilizer under the rear frame Rear frame Stabilizer Planar surface...

Page 7: ...7 Put on the clamping halves on top The clamping half A must be close to the welding of bracket for the seat Clamping half A Welding Bracket for seat Stabilizer Clamping half B...

Page 8: ...screws of the clamping halves with a torque wrench with 14 Nm When it is done correctly the rear wheels and the stabilizer wheels touch the planar suface Clamping screws Clamping screws Distance Dist...

Page 9: ...persons One person is holding the front frame The other person is holding the rear frame Put the front frame and the rear frame together Put some grease on the steering axle and put the steering axle...

Page 10: ...ile pushing The steering axle must be completely in the hole the upper end of the steering axle must be planar with bracket of the front frame Tighten the 2 clamping screws with a torque wrench with 8...

Page 11: ...our rear Tighten the clamping screw of the mirror Option Water bottle holder Mount the water bottle holders with screws M5 with a torque wrench with 3Nm The upper water bottle holder has one nut M6 an...

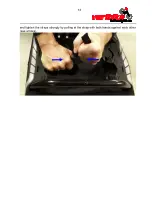
Page 12: ...12 Seat Put on the seat cover With the straps like this...

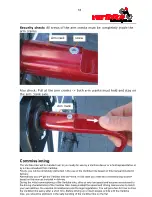
Page 13: ...13 and tighten the straps strongly by pulling at the strap with both hands against each other see arrows...

Page 14: ...rear frame Tighten the quick release skewer Tighten the quick release skewers on the front of the seat Both quick realese skewers must be tightened seat Rear frame Rear frame quick release skewer qui...

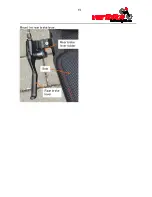
Page 15: ...15 Mount the rear brake lever Rear brake lever holder Rear brake lever Seat...

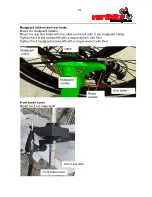
Page 16: ...on the left side of the mudguard holder Tighten the 2 brake screws M6 with a torque wrench with 7Nm Tighten the 4 mudguard screws M5 with a torque wrench with 3Nm Front brake Lever Mount the front bra...

Page 17: ...nd right To make shure that the arm crank is all the way on the arm crank axle screw out one screw and have a look inside the screw hole must be aligned with the groove Each arm crank has 2 screws Tig...

Page 18: ...you will get the Varibike trike delivered In this case you make the commissioning yourself based on this manual included in delivery During the initial commissioning of the Varibike trike drive at ve...

Page 19: ...eflective panels or strips is also to be recommended Whatever your cycling ambitions always ride carefully and avoid unnecessary risks for your own sake and the safety of others Accept that even Varib...

Page 20: ...p your Varibike trike vertically from a low height Listen for rattling noises and check if necessary Also check all bearings and connections IMPORTANT Do not ride your Varibike trike if any of these c...

Page 21: ...control The Varibike trike is only designed for transporting persons and must not be used for any other purpose e g by playing children or to transport goods If the weight load on the drive wheel fal...

Page 22: ...head he ground clearance is 9 cm Notes on components The following section contains information on the most important components of your Varibike trike The emphasis is on practical information Frames...

Page 23: ...ernal damage In case of doubt a replacement is needed Note that the screws and quick releases including quick release skewers of the seat and the seat frame must be tightened to the specified torque I...

Page 24: ...The chain is along with all shifting gear components a classical wearing part It requires care and maintenance see appropriate section and must be renewed in good time to avoid damage to other compon...

Page 25: ...ning of the synchron chain Person A holds the front frame Person B pulls with his hands at the axle of the arm cranks until the synchron chain is tightened 3 Tighten the allen screws of the telescope...

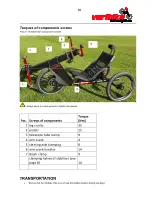
Page 26: ...Pos Screws of components Torque Nm 1 leg cranks 35 2 pedals 25 3 telescope tube clamp 9 4 arm crank 4 5 steering axle clamping 8 6 arm crank handles 14 7 Beam clamp 9 clamping halves of stabilizer se...

Page 27: ...o learn it first Before your ride your Varibike trike let your Varibike instructor teach you about riding a Varibike trike Important advices regarding the steering To steer the Varibike trike the fron...

Page 28: ...ur VARIBIKE trike and turn your wheels a couple of turns Spin your arm and leg cranks a couple of turns in counter wise direction When using again than carry out as prescribed in the chapter Before yo...

Reviews: