background image


Page 15  

CHAPTER 2 - INSTALLATION 

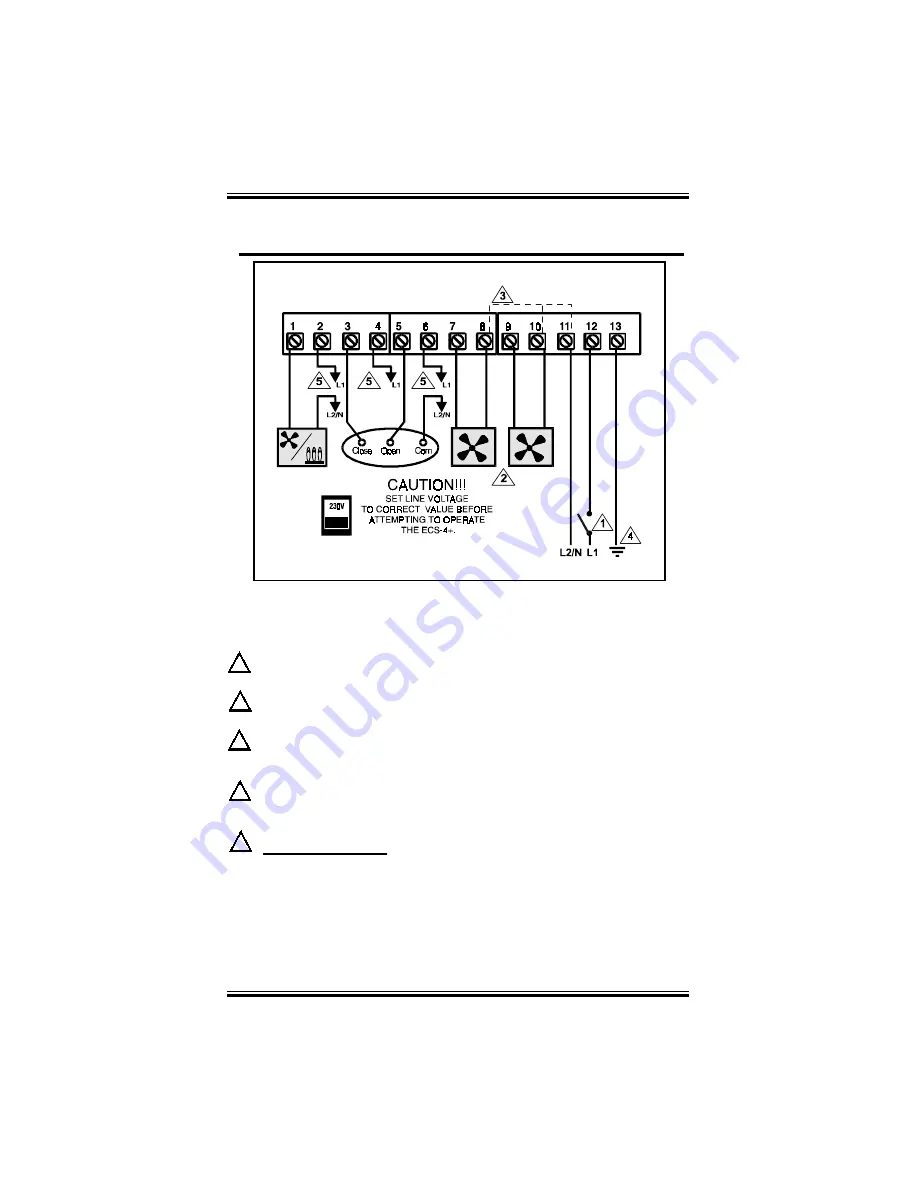
Figure 2 
Two fans, one actuator and one heating unit 

Notes for Figures 2 and 6


Power cut and protection devices in case of overload.  
 
Only use fans that have thermal protection devices. 
 
Terminals 8, 10, and 11 are internally connected. 
 
 
Connect the ground wire to ground terminal 13.  


IMPORTANT

 Must  be on a 15A separate circuit of 

the ECS. Make sure to disconnect power of the source 
and all loads before wiring. 


www.monitrol.com

Summary of Contents for ECS-4+

Page 1: ...ECS 4 USER S GUIDE www monitrol com ...

Page 2: ...uipment For added security against line voltage surges it is recommended that surge and noise suppression devices be installed at the electrical distribution panel Use of shielded cable for probes is recommended for protection against lightning These devices are available from most electrical supply distributors RECOMMENDATIONS The manufacturer recommends that all installation procedures described...

Page 3: ... 115 VAC 12 2 4 1 2 230 VAC 12 2 4 2 Fan 1 12 2 4 3 Fan 2 12 2 4 4 Fan 3 Heater 12 2 4 5 Air Inlet Baffle Board 13 2 5 Temperature Probes Static Pressure Probes 13 2 5 1 Single Temperature Probe 13 2 5 2 Temperature Averaging 13 2 5 3 Static Pressure Probe 13 2 6 Alarm 14 2 7 Powering Up 14 CHAPTER 3 USER S GUIDE LED Status Window 19 Control Dials 19 PRIMARY FUNCTIONS Main Set Point Temperature 21...

Page 4: ...ecord High Temperature 32 Room Temperature Display 33 SECONDARY FUNCTIONS Fan 1 Motor 34 Fan 1 Differential 35 Fan 2 Differential 36 Fan 2 Motor 37 Heater Fan 3 Hysteresis 38 Air Inlet Run Timer 39 Air Inlet Delay Timer 40 Minimum Ramping 41 Low Temperature Alarm 42 High Temperature Alarm 43 APPENDIX Motor Compatibility Table 44 Toubleshooting 45 Specifications 46 Warranty 47 www monitrol com ...

Page 5: ... a number of added features over existing ECS controls such as Hi Lo temperature indication Automatic temperature reduction ramping Adaptable variable speed outputs for a wide selection of fan models Static pressure probe Kits are available to upgrade existing control units The ECS 4 provides microprocessor control over a four stage output The first stage controls a variable speed fan which can op...

Page 6: ...eps you constantly informed by displaying the status of all its outputs as well as the room temperature With an optional static pressure probe the ECS 4 displays current static pressure levels Safety of livestock is ensured by the continuous control of climate and timely alarm notification should environmental conditions exceed alarm set points Further security may be obtained by connecting all EC...

Page 7: ... speed fans RAMPING An automatic daily reduction in the main set point and all temperature settings relative to this AIR INLET BAFFLE BOARD A device which regulates air flow into a building by controlling the opening or closure of an air passage DIFFERENTIAL ON OFF relay Range of temperature where 2 conditions are possible The output depends on whether the temperature is increasing or decreasing w...

Page 8: ...Page 8 ECS 4 www monitrol com ...

Page 9: ...e for maximum accuracy in monitoring and control of pressure levels 2 2 MOUNTING The manufacturer recommends that the installation instructions which follow be adhered to as closely as possible and all work be performed by a certified electrician Failure to do so may void the warranty To limit the unit s exposure to noxious gases install the unit in a hallway Make sure that the unit is mounted rig...

Page 10: ...ole is located on the rear side of the control panel box Refer to figure 1 Install mounting screw on wall and hang the unit in place by sliding the rear mounting hole of the control panel over the screw Use two more screws to secure the control panel in place using the bottom mounting holes shown in figure 1 Mounting hardware is not shipped with the unit Figure 1 Mounting holes location www monitr...

Page 11: ...d behind the control panel faceplate and adjusts the following options 1 2 3 4 Switch 1 Selects between a Fahrenheit or Celsius display on the front panel Switch 2 Locks unlocks user settings All settings except for main set point record low and record high are locked while this switch is off Switch 3 Selects between a heater or fan control on stage three of the control panel Switch 4 Selects whet...

Page 12: ...nals 11 and 12 on the main bottom board connect the ground wire to terminal 13 on the main board 2 4 2 Fan 1 terminals 9 and 10 Stage 1 controls the operation of the primary fan Connect the two leads from Fan 1 to terminals 9 and 10 on the main bottom board 2 4 3 Fan 2 terminals 7 and 8 Stage 2 controls the operation of the secondary fan Connect the two leads from Fan 2 to terminals 7 and 8 on the...

Page 13: ...tions are illustrated in Figure 4 2 5 1 Single Temperature Probe Install a single temperature probe in an area that best reflects the overall temperature of the room Connect the two leads and the shield of the temperature probe to the ECS terminals labelled Probe as indicated in Figure 3 2 5 2 Temperature Averaging optional Four temperature probes are required to do temperature averaging in larger...

Page 14: ...er to the casing of the control panel using the six screws previously removed Set Selector knob to position 12 Upon power up the unit will test its display by briefly lighting all the segments of its LEDs Make certain that all segments light up Following the LED display test the unit displays the ambient temperature of the room If the temperature is not displayed refer to the Troubleshooting secti...

Page 15: ...ction devices in case of overload Only use fans that have thermal protection devices Terminals 8 10 and 11 are internally connected Connect the ground wire to ground terminal 13 IMPORTANT Must be on a 15A separate circuit of the ECS Make sure to disconnect power of the source and all loads before wiring 1 2 4 3 5 www monitrol com ...

Page 16: ...Page 16 ECS 4 Figure 3 Probes and Alarm Wiring Figure 4 Temperature Averaging Probe connections www monitrol com ...

Page 17: ...Page 17 Figure 5 Main Board Terminal block switches fuses and ground CHAPTER 2 INSTALLATION www monitrol com ...

Page 18: ...Page 18 ECS 4 Figure 6 Recommended control backup www monitrol com ...

Page 19: ...al LEDS top part of LED window When illuminated each LED indicates that its associated fan heater or actuator motor is active The fifth LED lights up to indicate a low or high temperature alarm condition CONTROL DIALS The center dial is the Selector dial and is used to select one of the control panel s 12 primary or 10 secondary functions The dial located to the right of the Selector dial is the A...

Page 20: ...talled function 8 displays static pressure Function 12 displays room temperature The 10 secondary functions are 2 Fan 1 motor compatibility 3 Fan 1 differential temperature 4 Fan 2 differential temperature 5 Fan 2 motor compatibility 6 Fan 3 Heater hysteresis 7 Air inlet run timer 8 Air inlet delay timer 9 Ramping minimum temperature limit 10 Low temperature alarm 11 High temperature alarm Select ...

Page 21: ...nts from a minimum setting of 42 0 F 5 5 C to a maximum setting of 111 F 44 0 C Adjusting the main set point temperature rotate the Selector dial to position 1 rotate the Adjustor dial counterclockwise to decrease the temperature setting clockwise to increase it The main set point temperature is displayed on the front panel CHAPTER 3 USER S GUIDE Note The reduction per day feature primary func tio...

Page 22: ...age of maximum speed The Fan 1 minimum speed is adjusted in 2 increments from a minimum setting of 12 to a maximum setting of 100 Adjusting the minimum speed of Fan 1 rotate the Selector dial to position 2 rotate the Adjustor dial counterclockwise to decrease fan speed clockwise to increase it The minimum fan speed is displayed on the front panel www monitrol com ...

Page 23: ...y cycle is adjusted in 5 increments from a minimum setting of OFF 5 10 etc up to a maximum setting of ON corresponding to continuous operation Adjusting the duty cycle of Fan 1 rotate the Selector dial to position 3 rotate the Adjustor dial counterclockwise to decrease the duty cycle clockwise to increase it The duty cycle is displayed on the front panel CHAPTER 3 USER S GUIDE Example The duty cyc...

Page 24: ... from a minimum setting of 0 0 F 0 0 C to a maximum setting of 18 0 F 10 0 C Adjusting the relative set point of Fan 2 rotate the Selector dial to position 4 rotate the Adjustor dial counterclockwise to decrease the relative set point clockwise to increase it The Fan 2 relative set point is displayed on the front panel Example A main set point of 70 F along with a Fan 2 relative set point of 5 F i...

Page 25: ...maximum speed The Fan 2 minimum speed is adjusted in 2 increments from a minimum setting of 12 to a maximum setting of 100 Adjusting the minimum speed of Fan 2 rotate the Selector dial to position 5 rotate the Adjustor dial counterclockwise to decrease fan speed clockwise to increase it The minimum fan speed is displayed on the front panel CHAPTER 3 USER S GUIDE www monitrol com ...

Page 26: ...ements from a minimum setting of 9 0 F 5 0 C to a maximum setting of 30 0 F 16 0 C Adjusting the Heater Fan 3 relative set point rotate the Selector dial to position 6 rotate the Adjustor dial counterclockwise to decrease the setting clockwise to increase it The relative temperature setting is displayed on the front panel Example The main set point temperature is adjusted to 70 F A heater is in us...

Page 27: ...e the Adjustor dial counterclockwise to decrease the relative set point clockwise to increase it The air inlet relative set point is displayed on the front panel CHAPTER 3 USER S GUIDE Example A main set point of 70 F along with an air inlet relative set point of 5 F is selected When room temperature reaches 75 F and the air inlet timer delay has expired as set by secondary function 8 the air inle...

Page 28: ...of 0 00 H2O to a maximum setting of 14 H2O Adjusting the static pressure set point rotate the Selector dial to position 7 rotate the Adjustor dial counterclockwise to decrease the relative set point clockwise to increase it The air inlet static pressure set point is displayed on the front panel Example A static pressure set point of 0 08 H2O is selected When room pressure rises above 0 08 H2O and ...

Page 29: ...H2O If a static pressure level is lower than 20 H2O is senced LO is displayed On the other hand if static pressurelevel is higher than 20 H2O is sensed Hi is displayed Dislaying the static pressure level rotate the Selector dial to position 8 The static pressure level is displayed on the front panel CHAPTER 3 USER S GUIDE NOTE If a static pressure probe is not installed the unit displays www monit...

Page 30: ... setting of 0 99 F 0 50 C Adjusting the reduction per day rotate the Selector dial to position 9 rotate the Adjustor dial counterclockwise to decrease the reduction rate clockwise to increase it The reduction per day setting is displayed on the front panel NOTE When reduction is activated the main temperature set point cannot be adjusted manually Reduction per day automatically shuts OFF when the ...

Page 31: ...splay of 42 0 F 5 5 C to a maximum display of 111 F 44 0 C If a temperature lower than 42 0 F is recorded Lo is displayed Viewing the lowest temperature recorded rotate the Selector dial to position 10 Clearing the low temperature value quickly rotate the Adjustor dial counterclockwise then clockwise CLr will be briefly displayed on the front panel CHAPTER 3 USER S GUIDE www monitrol com ...

Page 32: ... a minimum display of 42 0 F 5 5 C to a maximum display of 111 F 44 0 C If a temperature higher than 111 F is recorded Hi is displayed Displaying the highest temperature recorded rotate the Selector dial to position 11 Clearing the high temperature value quickly rotate the Adjustor dial counterclockwise then clockwise CLr will be briefly displayed on the front panel www monitrol com ...

Page 33: ... the neerest 0 5 degree from a minimum display of 42 0 F 5 5 C to a maximum display of 111 F 44 0 C If the temperature is lower than 42 0 F Lo is displayed If the temperature is higher than 111 F Hi is displayed Viewing the room temperature rotate the Selector dial to position 12 The room temperature is displayed on the front panel CHAPTER 3 USER S GUIDE www monitrol com ...

Page 34: ...r and take note of the fan motor compatibility number Contact your local distributor if your model of fan is not listed Setting the Fan 1 motor compatibility rotate the Selector dial to position 12 rapidly rotate the Adjustor dial back and forth to enter secondary function mode rotate the Selector dial to position 2 rotate the Adjustor dial to select a motor setting The Fan 1 motor compatibility s...

Page 35: ...differential rotate the Selector dial to position 12 rapidly rotate the Adjustor dial back and forth to enter secondary function mode rotate the Selector dial to position 3 rotate the Adjustor dial counterclockwise to decrease the differential clockwise to increase it The Fan 1 differential setting is displayed on the front panel Diff CHAPTER 3 USER S GUIDE Example A main set point temperature of ...

Page 36: ...tial rotate the Selector dial to position 12 rapidly rotate the Adjustor dial back and forth to enter secondary function mode rotate the Selector dial to position 4 rotate the Adjustor dial counterclockwise to decrease the differential clockwise to increase it The Fan 2 differential setting is displayed on the front panel Diff Example The main set point temperature of the room is 70 F A Fan 2 rela...

Page 37: ... of the fan motor compatibility number Contact your local distributor if your model of fan is not listed Setting the Fan 2 motor compatibility rotate the Selector dial to position 12 rapidly rotate the Adjustor dial back and forth to enter secondary function mode rotate the Selector dial to position 5 rotate the Adjustor dial to select a motor setting The Fan 2 motor compatibility setting is displ...

Page 38: ...of 6 F 3 C degrees Adjusting the hysteresis setting rotate the Selector dial to position 12 rapidly rotate the Adjustor dial back and forth to enter secondary function mode rotate the Selector dial to position 6 rotate the Adjustor dial counterclockwise to decrease the hysteresis setting clockwise to increase it The hysteresis setting is displayed on the front panel Hyst Example The Heater Fan 3 r...

Page 39: ...justor dial back and forth to enter secondary function mode rotate the Selector dial to position 7 rotate the Adjustor dial counterclockwise to decrease the air inlet run timer clockwise to increase it The run timer setting is displayed on the front panel Run Time CHAPTER 3 USER S GUIDE Example The air inlet run timer is set to 30 seconds When the actuator motor is called upon to either open or cl...

Page 40: ...elector dial to position 12 rapidly rotate the Adjustor dial back and forth to enter secondary function mode rotate the Selector dial to position 8 rotate the Adjustor dial counterclockwise to decrease the air inlet delay timer clockwise to increase it The delay timer setting is displayed on the front panel Delay Example The air inlet delay timer is set to 5 minutes The actuator motor when called ...

Page 41: ...ting rotate the Selector dial to position 12 rapidly rotate the Adjustor dial back and forth to enter secondary function mode rotate the Selector dial to position 9 rotate the Adjustor dial counterclockwise to decrease the ramping setting clockwise to increase it The minimum ramping setting is displayed on the front panel Limit CHAPTER 3 USER S GUIDE Note When the main set point temperature reache...

Page 42: ...perature alarm is adjusted in 0 5 degree increments from a minimum setting of 32 0 F 18 C to a maximum setting of 0 0 F 0 0 C Adusting the low temperature alarm setting rotate the Selector dial to position 12 rapidly rotate the Adjustor dial back and forth to enter secondary function mode rotate the Selector dial to position 10 rotate the Adjustor dial counterclockwise to decrease the setting cloc...

Page 43: ...m is adjusted in 0 5 degree increments from a minimum setting of 0 0 F 0 C to a maximum setting of 32 0 F 18 0 C Adusting the low temperature alarm setting rotate the Selector dial to position 12 rapidly rotate the Adjustor dial back and forth to enter secondary function mode rotate the Selector dial to position 10 rotate the Adjustor dial counterclockwise to decrease the setting clockwise to incr...

Page 44: ...3 Multifan 6E56 230 v 22 3 Multifan AF AF36M 230 v 36 3 Leeson 1 2H PAF20L 115 v 20 3 Leeson 1 2HP AF24L 115 v 24 3 Aerotech F AT242 230 v 24 4 Multifan 2E25 230 v 10 4 Leeson 1 4HP AF14L 115 v 14 4 Leeson 1 4HP AF16L 115 v 16 4 Marathon 1 4HP 230 v 16 4 Marathon 1 3HP 230 v 18 4 Leeson 1 3HP AF18L 115 v 18 5 GE Motor 5KCP39 230 v 12 5 Leeson 1 4HP AF12L 230 v 12 5 GE Motor 5KCP39 230 v 14 5 Emers...

Page 45: ...tor or heater is not operating verify wiring fan and fuse Refer to Figure 5 for fuse location If fuse is blown replace with fuse of same type Stage 4 Fan actuator or Heater is operating erratically Verify that the software setting switch position 3 located behind the faceplate is properly set Verify the minimum rating 10mA at 230V or 20mA at 230V Display is blank Verify that the line voltage selec...

Page 46: ...d 6 AMP inductive 115V 230V 10 AMP max fuse 10A STAGE 2 variable speed 6 AMP inductive 115V 230V 10 AMP max fuse 10A STAGE 3 dry relay contact Not Fused 10 AMP 115V 230V 1 2 HP 115V 1 HP 230V Min Rating 10mA at 115V 20mA at 230V STAGE 4 dry relay contact Not Fused 10 AMP 115V 230V 1 2 HP 115V 1 HP 230V Min Rating 10mA at 115V 20mA at 230V ALARM dry relay contact 2 AMP 30V AC DC www monitrol com ...

Page 47: ... lightning or any other natural disaster Any unauthorized work modification or repair on this product automatically voids the warranty and disclaims the manufacturer from all responsibility The manufacturer assumes only those obligations set forth herein excluding all other warranties or obligations This warranty stipulates that in all cases the manufacturer shall be liable only for the supply of ...

Page 48: ...MAV ECS4 V2 1 July 2001 www monitrol com ...

Reviews: