6-2
VariQuest
®
Cutout Maker 1800 User’s Guide
Troubleshooting
Tips
Troubleshooting
Troubleshooting
Diagnosis
Required Action
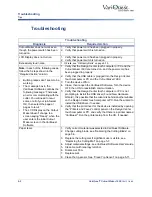
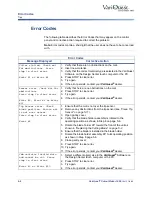
Cutout Maker does not work even
though the power switch has been
turned on.
1.
Verify that power cord has been plugged in properly.
2.
Verify that power switch is turned on.
LCD Display does not turn on.
1.
Verify that power cord has been plugged in properly.
2.
Verify that power switch is turned on.
Excessively loud noise.
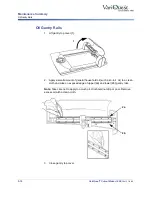
1. Oil rails, see “Oil Gantry Rails” on page 5-10.
Note:
In each of the following cases,
follow the 5 steps shown in the
“Required Action” column.
•
Button presses don't seem to be
working.
•
The message box in the
VariQuest Software contains the
following message: “There was
an error communicating with the
cutter. You will need to recut
some or all of your job. Select
OK, then select the page or
pages to recut.”
•
The LCD Display on the Cutout
Maker doesn't change to a
screen saying “Ready” when the
user enters the initial Cutout
Maker screen in the VariQuest
Software.
1.
Verify that the Design Center touch computer or PC and the
Cutout Maker 1800
are turned on, and the power cord has
been plugged in properly.
2.
Verify that the USB cable is plugged into the
Design Center
touch computer or PC and the
Cutout Maker 1800
.
3.
Turn the device off/on.
4.
Close, then reopen the VariQuest Software. Turn the device
OFF, then ON to reestablish communication.
5.
Verify that the
Design Center
touch computer or PC is not
prompting to install the USB driver (Found New Hardware
Wizard). It is possible that the wizard is behind another window
on the Design Center touch computer or PC. Run the wizard to
install the USB driver, if needed.
6.
Verify that the print driver for the device is installed by opening
the “Printers and Faxes” control panel on the
Design Center
touch computer or PC, and verify that there is a printer named
“VariQuest". Run the printer setup from the CD, if needed.
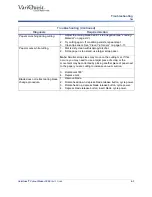
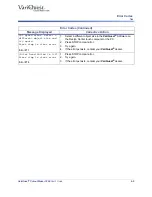
Paper tears.
1.
Verify correct material was selected in VariQuest Software.
2.
Change cutting blade, see “Replacing the Cutting Blade” on
page 5-3.
3.
Replace the cutting mat if significant use is visible, see
“Replacing the Cutting Mat” on page 5-7.
4.
Adjust material settings, see VariQuest Software User's Guide.
5.
Clean mat with isopropyl alcohol.
6.
Rotate mat 180
o
.
7.
Replace mat.
8.
Clean the tip sensor. See
“Clean Tip Sensor”
on page 5-11.

