background image


POWXG6026 

EN


Copyright © 2014 VARO 

P a g e

 | 

14


www.varo.com 

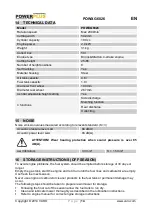
14  TECHNICAL DATA 

Model 

POWXG6026 

Rotation speed 

Max 2800min

-1


Cutting width 

502 mm 

Cylinder capacity 

190 cc 

Engine power 

2.4 kW 

Weight 

31 kg 

Collect box 

50l 

Engine type 

Briggs&Stratton  4-stroke engine 

Cutting height 

25-65 

Number of height positions 

Self tracking 

Yes 

Material housing  

Steel 

Oil tank capacity 

0.6 l 

Fuel tank capacity 

1.0 l 

Diameter front wheel 

190 mm 

Diameter rear wheel 

267 mm 

Central adjustable height setting 

Yes  

4 functions 

Side discharge 

Mulching function 

Rear discharge 

Collecting  

15  NOISE 

Noise emission values measured according to relevant standard. (K=3) 

Acoustic pressure level LpA 

84 dB(A) 

Acoustic power level LwA 

96 dB(A) 

ATTENTION!  Wear  hearing  protection  when  sound  pressure  is  over  85 
dB(A). 

aw (Vibration): 

3.3 m/s² 

K = 1.5 m/s² 

16  STORAGE INSTRUCTIONS (OFF SEASON) 

To avoid engine problems, the fuel system should be emptied before storage of 30 days or 
longer. 
Empty the gas tank, start the engine and let it run until the fuel lines and carburetor are empty. 
Use fresh fuel next season. 
Never use engine or carburetor cleaner products in the fuel tank or permanent damage may 
occur. 
The following steps should be taken to prepare lawn mower for storage. 


Following the final cut of the season allow the fuel tank to run dry. 


Clean and lubricate mower thoroughly as described in the lubrication instructions. 


Refer to engine manual for correct engine storage instructions. 

Summary of Contents for POWERplus GardenPro POWXG6026

Page 1: ...7 8 2 Attaching the handles Fig 2 7 8 3 Adjusting the cutting height 5 7 9 OPERATION 7 9 1 Read the engine manual before using the lawn mower 7 9 2 Starting the engine 7 9 3 Self propelling function 7...

Page 2: ...plug 10 11 5 Lubrication instructions 10 11 6 Maintenance schedule 11 12 CLEANING 11 12 1 Cleaning the air filter 11 12 2 Replacing the blade 12 12 3 Cleaning the mower housing 12 13 TROUBLESHOOTING 1...

Page 3: ...ch box 5 Height adjusting lever 6 Deck 7 Oil cap dipstick 8 Fuel cap 9 Starter handle 10 upper handle lock knob 11 Side discharge flap 12 Throttle 3 PACKAGE CONTENT LIST Remove all packing materials R...

Page 4: ...cording to the operation manual Caution Hot engine Do not touch a hot silencer or cylinder You may get burned These parts get extremely hot from operation When turned off they remain hot for a short t...

Page 5: ...lect Mow only in daylight or in good artificial light Avoid operating the equipment in wet grass where feasible Always be sure of your footing on slopes Walk never run For wheeled rotary machines mow...

Page 6: ...for wear or deterioration Replace worn or damaged parts for safety 6 SAFETY WARNINGS Operate the lawn mower only with the grass box and or the deflector plate installed Stop the engine before emptying...

Page 7: ...oil before starting the engine 9 2 Starting the engine After proper assembly of the lawn mower start the engine as follows Put the lever on START or Pull the engine control lever 3 towards the handle...

Page 8: ...the mulching wedge into the deck Lock the mulching wedge with the button into the opening on the deck 3 Lower the rear cover again 10 2 2 Resetting for side discharge mowing Fig 5 WARNING only with a...

Page 9: ...extreme heat Allow the engine to cool before storing in any enclosure To reduce the fire hazard keep the engine exhaust silencer battery compartment and petrol storage area free of grass leaves or exc...

Page 10: ...the drain bolt and washer Tighten the drain bolt securely 11 4 Replacing and cleaning the spark plug Only use F6RTC Nanjing Huade NHSPLD with engine DY1P64F After the engine has cooled down remove th...

Page 11: ...sed with heavy load or in high ambient temperatures 3 These items should be serviced by a technician 4 For commercial use record hours of operation to determine proper maintenance intervals 12 CLEANIN...

Page 12: ...he blade again check that the cutting edges are properly aligned to the rotation direction of the engine The blade screw must be fixed with an electrodynamic tool with a tightening torque of 3 7 kg m...

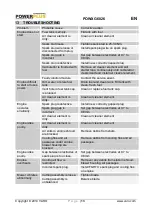
Page 13: ...n fresh fuel Vent hole in fuel tank cap is plugged Clean or replace fuel tank cap Air cleaner element is dirty Clean air cleaner element Engine operates erratically Spark plug is defective Install new...

Page 14: ...vant standard K 3 Acoustic pressure level LpA 84 dB A Acoustic power level LwA 96 dB A ATTENTION Wear hearing protection when sound pressure is over 85 dB A aw Vibration 3 3 m s K 1 5 m s 16 STORAGE I...

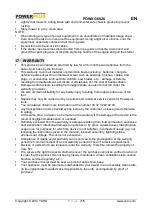
Page 15: ...y be carried out by an authorised customer service centre for Powerplus tools You can always obtain more information at the number 00 32 3 292 92 90 Any transportation costs shall always be borne by t...

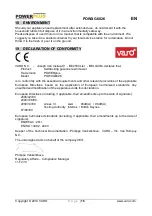
Page 16: ...OWERplus Model POWXG6026 is in conformity with the essential requirements and other relevant provisions of the applicable European Directives based on the application of European harmonized standards...

Reviews: